
How to Disable Virtualization Based Security on Windows 10/11?
# Way 1: Disable Virtualization Based Security via Windows Settings
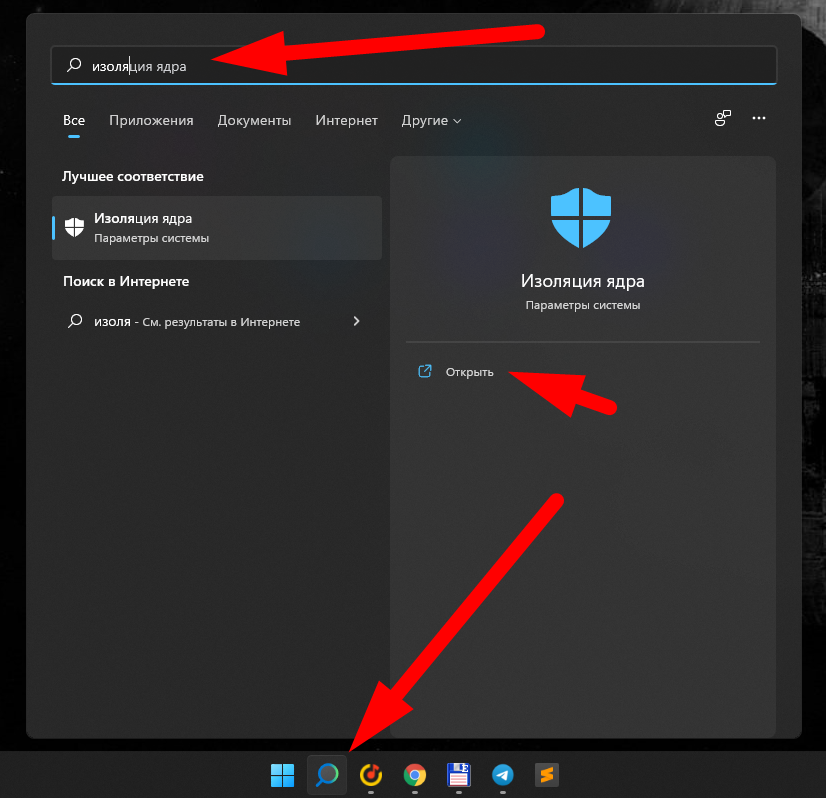
Step 1. Press Win + I to open Windows Settings.
Step 2. Go to Update & Security > Windows Security > Device security.
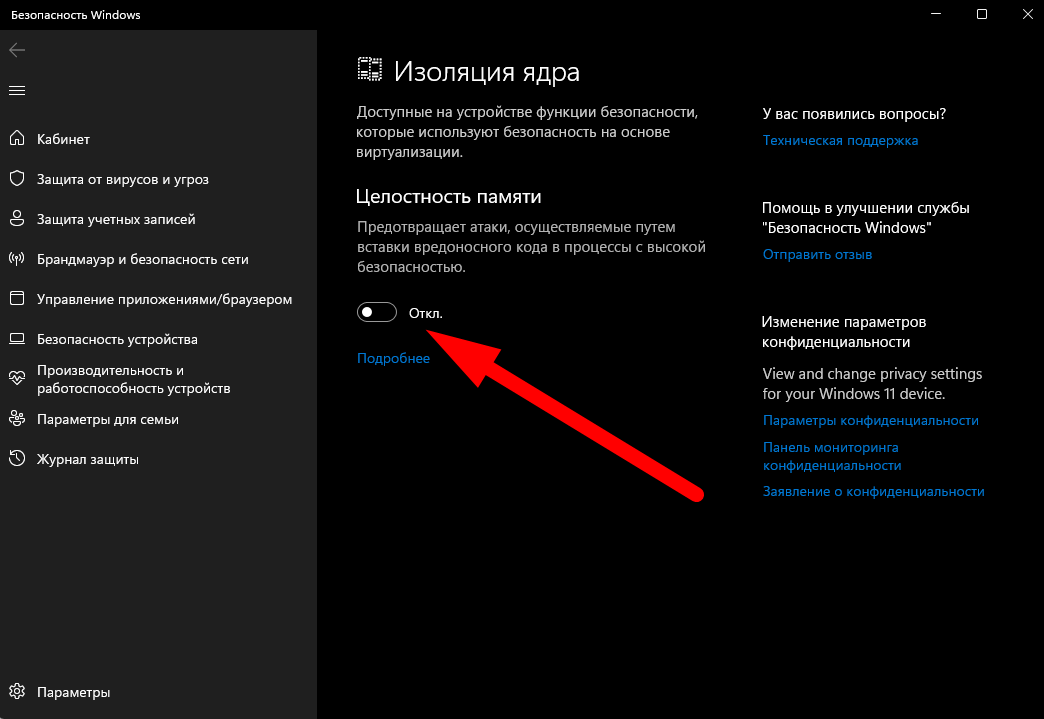
Step 3. Click on Core isolation details under Core isolation and then toggle off Memory integrity.
# Way 2: Disable Virtualization Based Security via Command Prompt
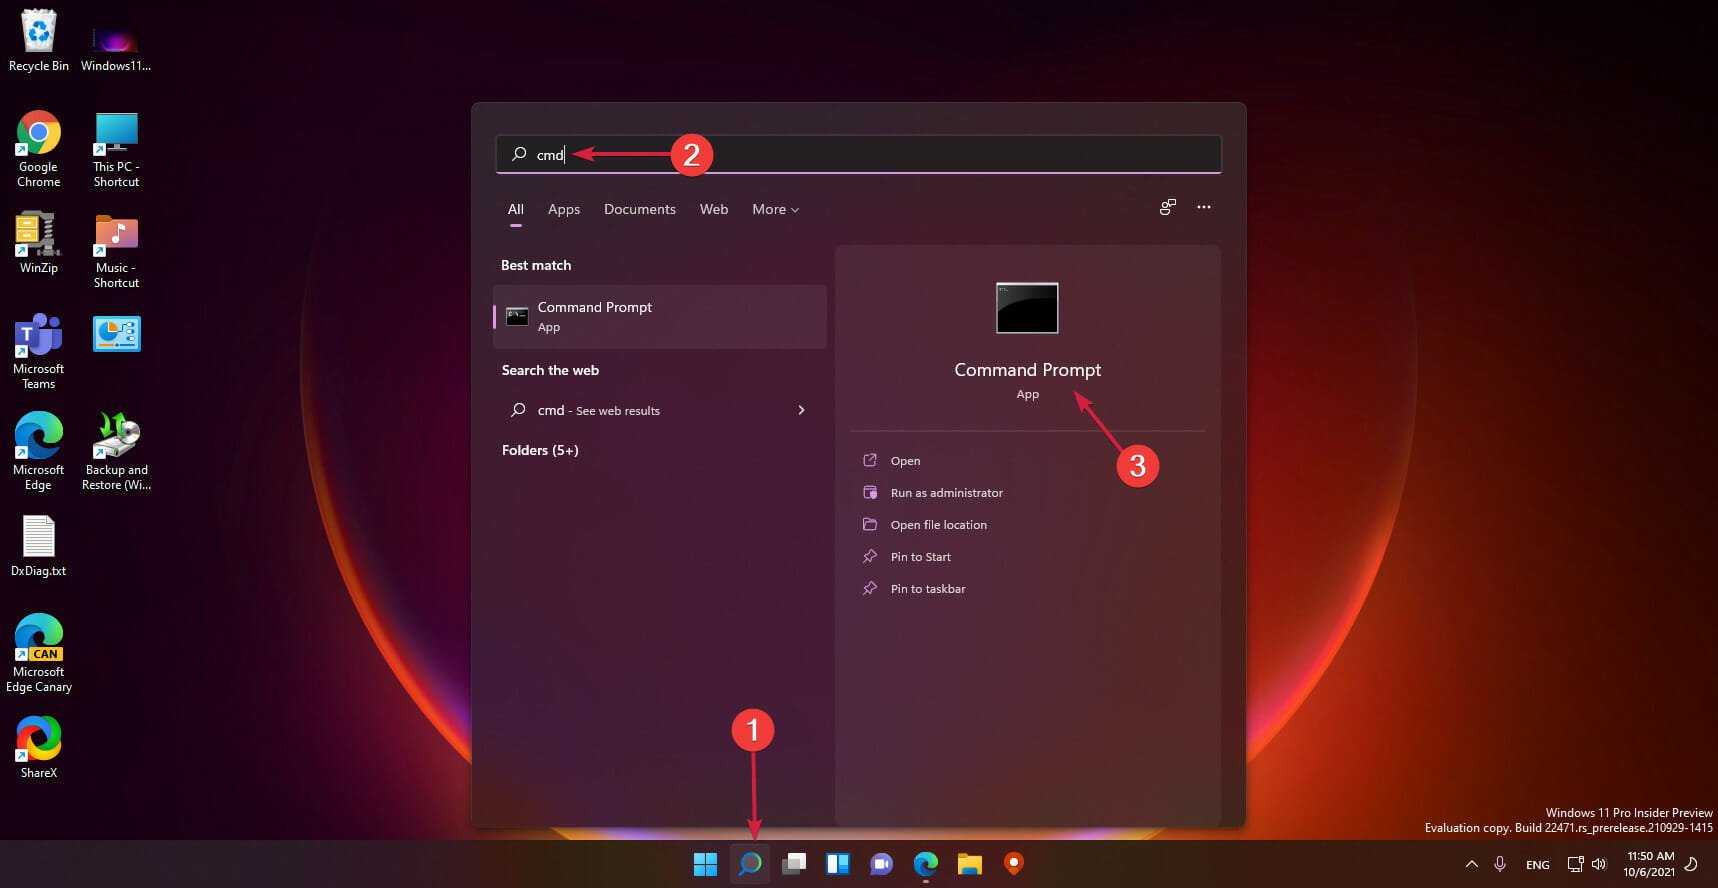
Step 1. Type cmd in the search bar to find Command Prompt and right-click on it to choose Run as administrator.
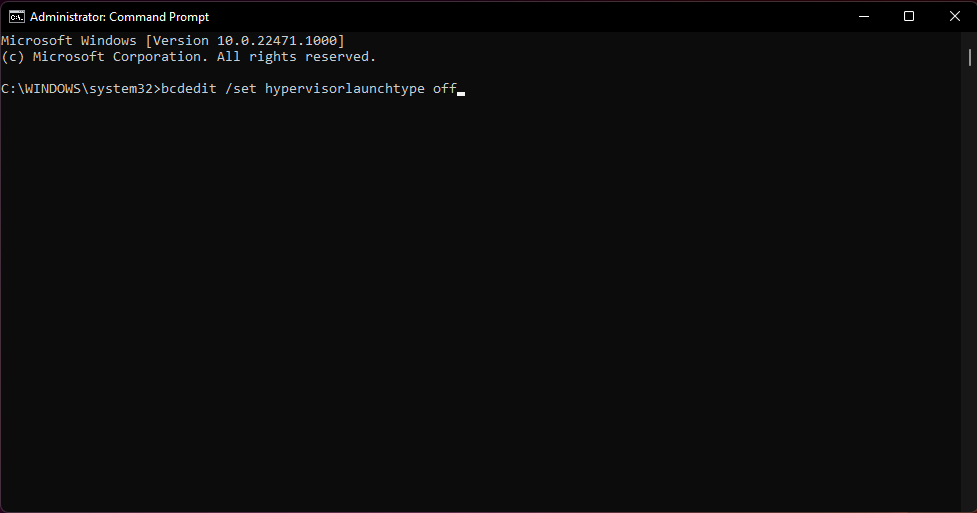
Step 2. In the text area, type bcdedit /set hypervisorlaunchtype off and hit Enter.
Step 3. After the process is done, reboot your computer.
# Way 3: Disable Virtualization Based Security via Windows Features
Step 1. Type control panel in the search bar and hit Enter.
Step 2. Go to Programs > Programs and Features > Turn Windows features on or off.
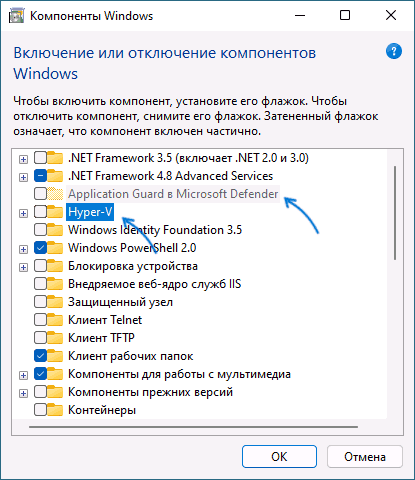
Step 3. In Windows Features, untick Microsoft Defender Application Guard, Virtual Machine Platform, and Windows Hypervisor Platform in the list.
Step 4. Click on OK and restart your computer to apply the changes.
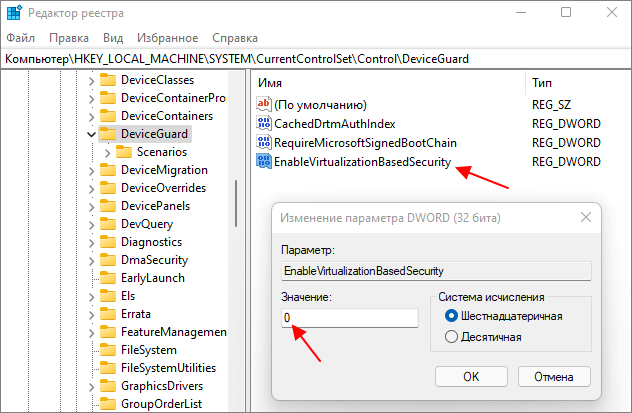
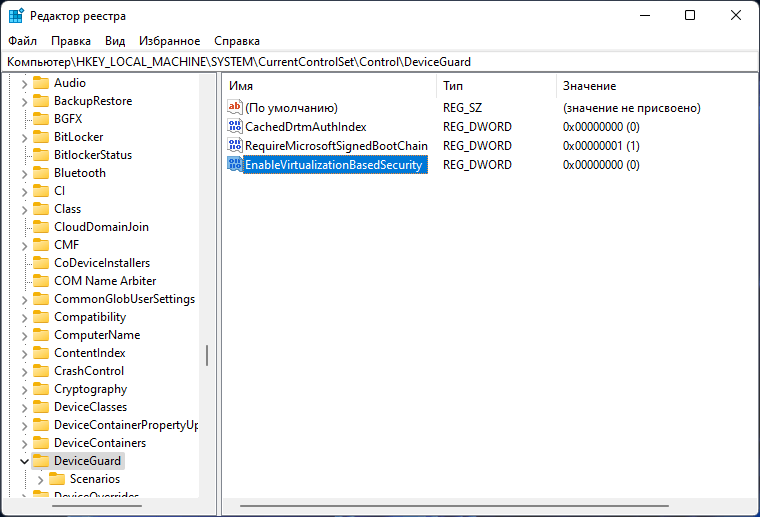
# Way 4: Disable Virtualization Based Security via Registry Editor
Step 1. Type registry editor in the search bar and hit Enter.
Step 2. Navigate to the path below:
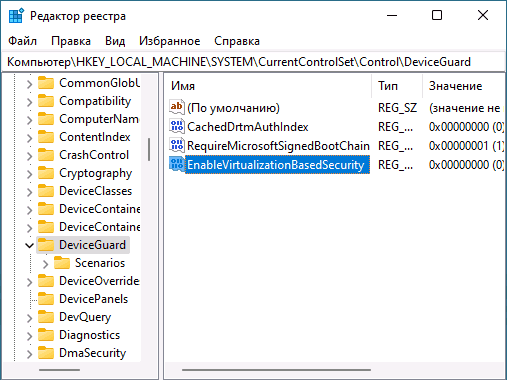
HKEY_LOCAL_MACHINE\SYSTEM\CurrentControlSet\Control\DeviceGuard
Step 3. In the right panel, right-click on EnableVirtualizationBasedSecuirty and set its value data to .
Step 4. Click on OK and reboot your system.
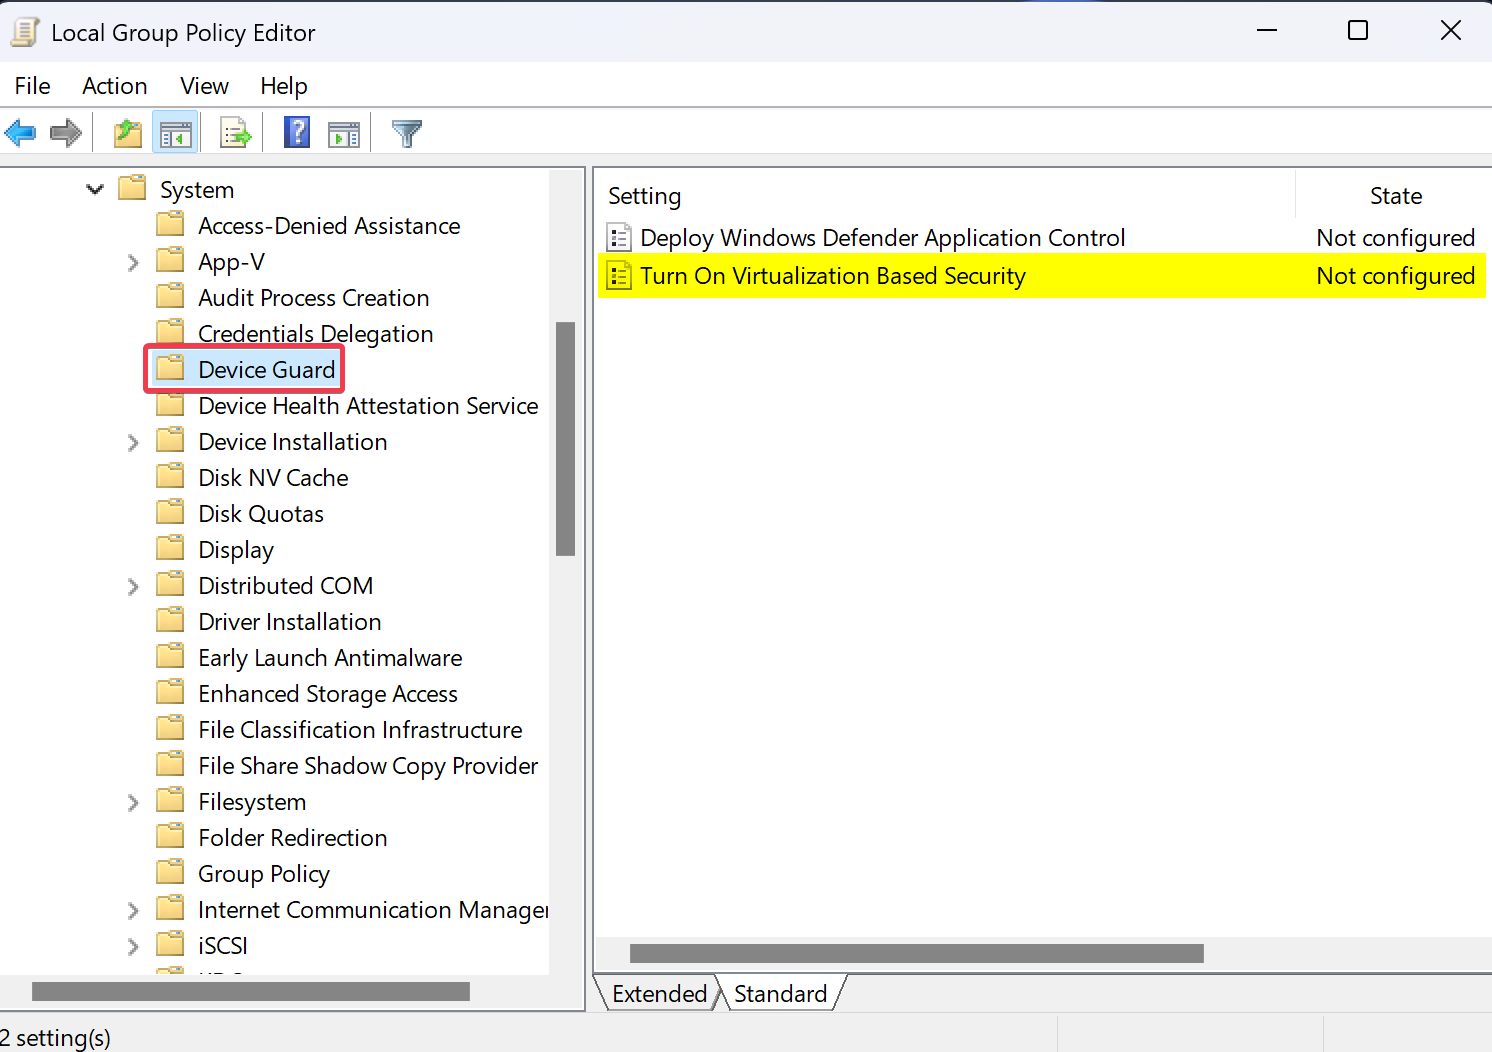
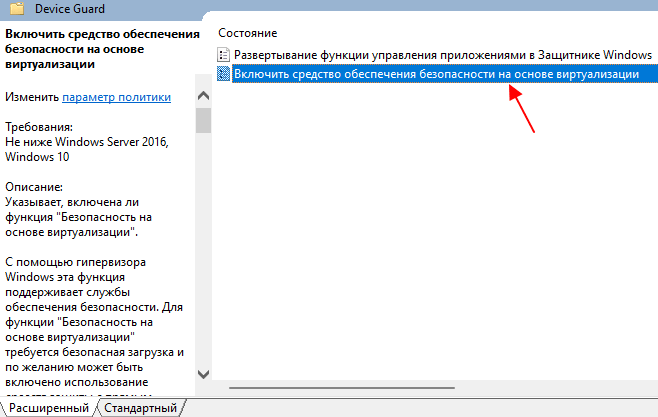
# Way 5: Disable Virtualization Based Security via Group Policy Editor
Step 1. Press Win + R to open the Run box.
Step 2. In the run box, type gpedit.msc and hit Enter.
Step 3. Go to the following path:
Local Computer Policy\Computer Configuration\Administrative Templates\System\Device Guard
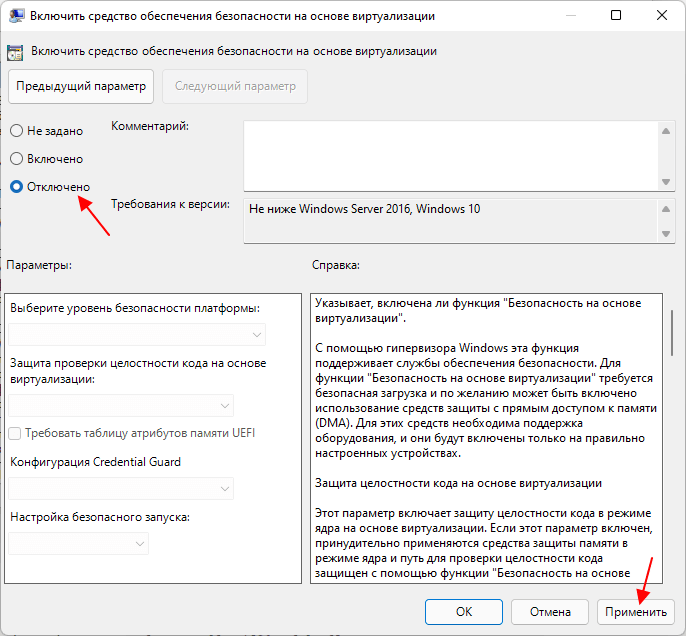
Step 4. From the right-side pane, double-click on Turn on Virtualization Based Security.
Step 5. Tick Disable and hit Apply & OK.
Как отключить VBS в редакторе локальной групповой политики
Вы можете использовать редактор групповой политики, чтобы отключить VBS навсегда. Помните, что GPE недоступен для пользователей Windows 11 Home. Чтобы включить GPE, необходимо запустить пакетный сценарий. Ознакомьтесь с нашим полным руководством по редактору групповой политики для получения дополнительной информации об этом
Чтобы отключить VBS с помощью редактора групповой политики, сделайте следующее:
- Нажмите Win + R , чтобы запустить командное окно ‘Выполнить’. Введите gpedit.msc и нажмите клавишу ввода, чтобы запустить редактор групповой политики.
- Перейдите в раздел Локальная Политика компьютера > Конфигурация компьютера > Административные шаблоны > Система > Защита устройств.
- В разделе Device Guard найдите политику Turn On Virtualization Based Security и дважды щелкните на ней.
- Нажмите на радиокнопку Disabled в окне политики. Затем нажмите кнопку Применить .
- Нажмите на кнопку OK и выйдите из редактора групповой политики. Перезагрузите систему, чтобы применить изменения.
- Чтобы снова включить VBS, нажмите на радиокнопку Enabled в политике Turn On Virtualization Based Security.
Как отключить виртуализацию через BIOS
Последний вариант – отключить технологию виртуализации из BIOS системы. Как упоминалось ранее, VBS не будет работать, если вы отключите функции виртуализации. Таким образом, сделав это, вы можете гарантировать, что VBS больше никогда не включится
Чтобы отключить технологию виртуализации из BIOS, повторите следующие шаги:
- Перезагрузите вашу систему. Нажмите соответствующую F-клавишу для доступа к настройкам BIOS (обычно это клавиша F2 или F12).
- Войдя в BIOS, перейдите на страницу advanced settings. Помните, что у каждого производителя комплектующих свой внешний вид BIOS и расположение настроек.
- Найдите опцию Virtualization Technology в разделе расширенных настроек. Нажмите на него, чтобы отключить функцию в вашей системе.
- Теперь нажмите клавишу F10 , чтобы сохранить изменения. Выход из настройки BIOS и продолжение процесса загрузки ОС.
- Проверьте опцию Memory Integrity в Windows Security. Он будет отображаться серым цветом.
Каковы последствия отключения VBS в вашей системе?
Защита на основе виртуализации (VBS) работает с гипервизором Windows для создания изолированной области памяти. В этой изолированной области надежно хранятся ваши учетные данные для входа, важный код безопасности Windows и многое другое. HVCI — это функция, которую VBS использует для проверки целостности программного обеспечения.
Проще говоря, злоумышленнику трудно получить доступ к вашей системе, когда VBS активен. Таким образом, его отключение делает вас уязвимым для атак на уровне ядра. Если вы тот, кто использует свою систему для секретных служебных дел, лучше оставить VBS включенным. Если вы геймер или используете ресурсоемкие приложения, отключение VBS улучшит производительность. Проверять Лучшие бесплатные приложения для бенчмаркинга для Windows.
1. How to Disable VBS From the Windows Settings
Perform the following steps to disable VBS from the Settings app.
- Press Win + I to launch the Settings app. Navigate to the left-hand side menu and click on the Privacy and Security option.
- Click on Windows Security and then click the Open Windows Security button.
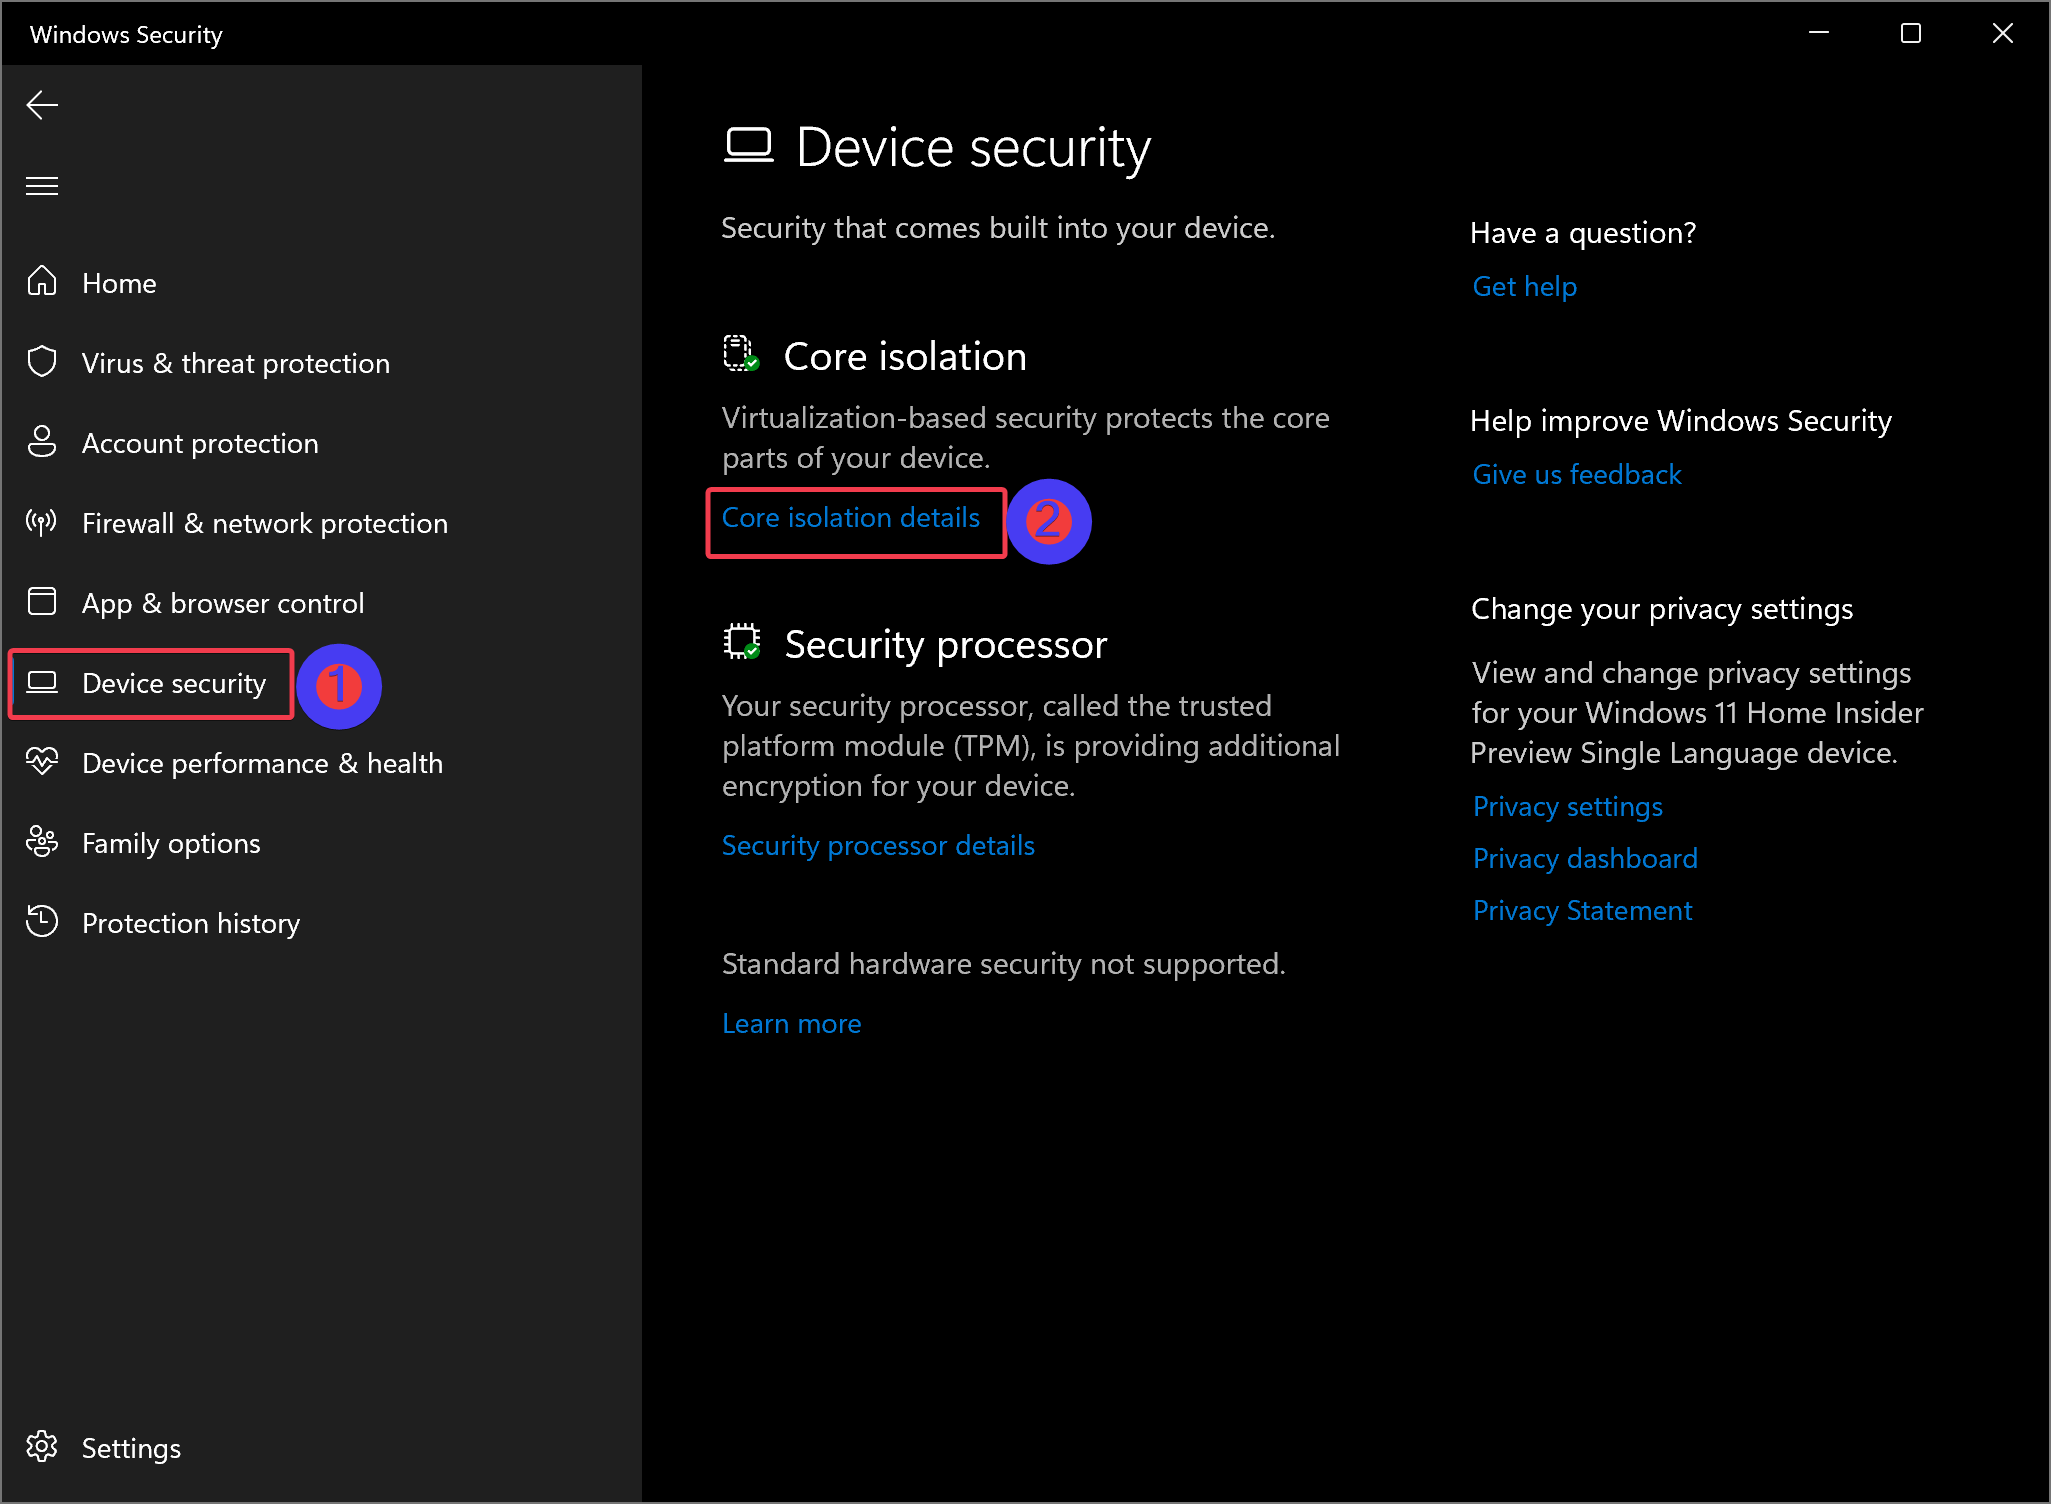
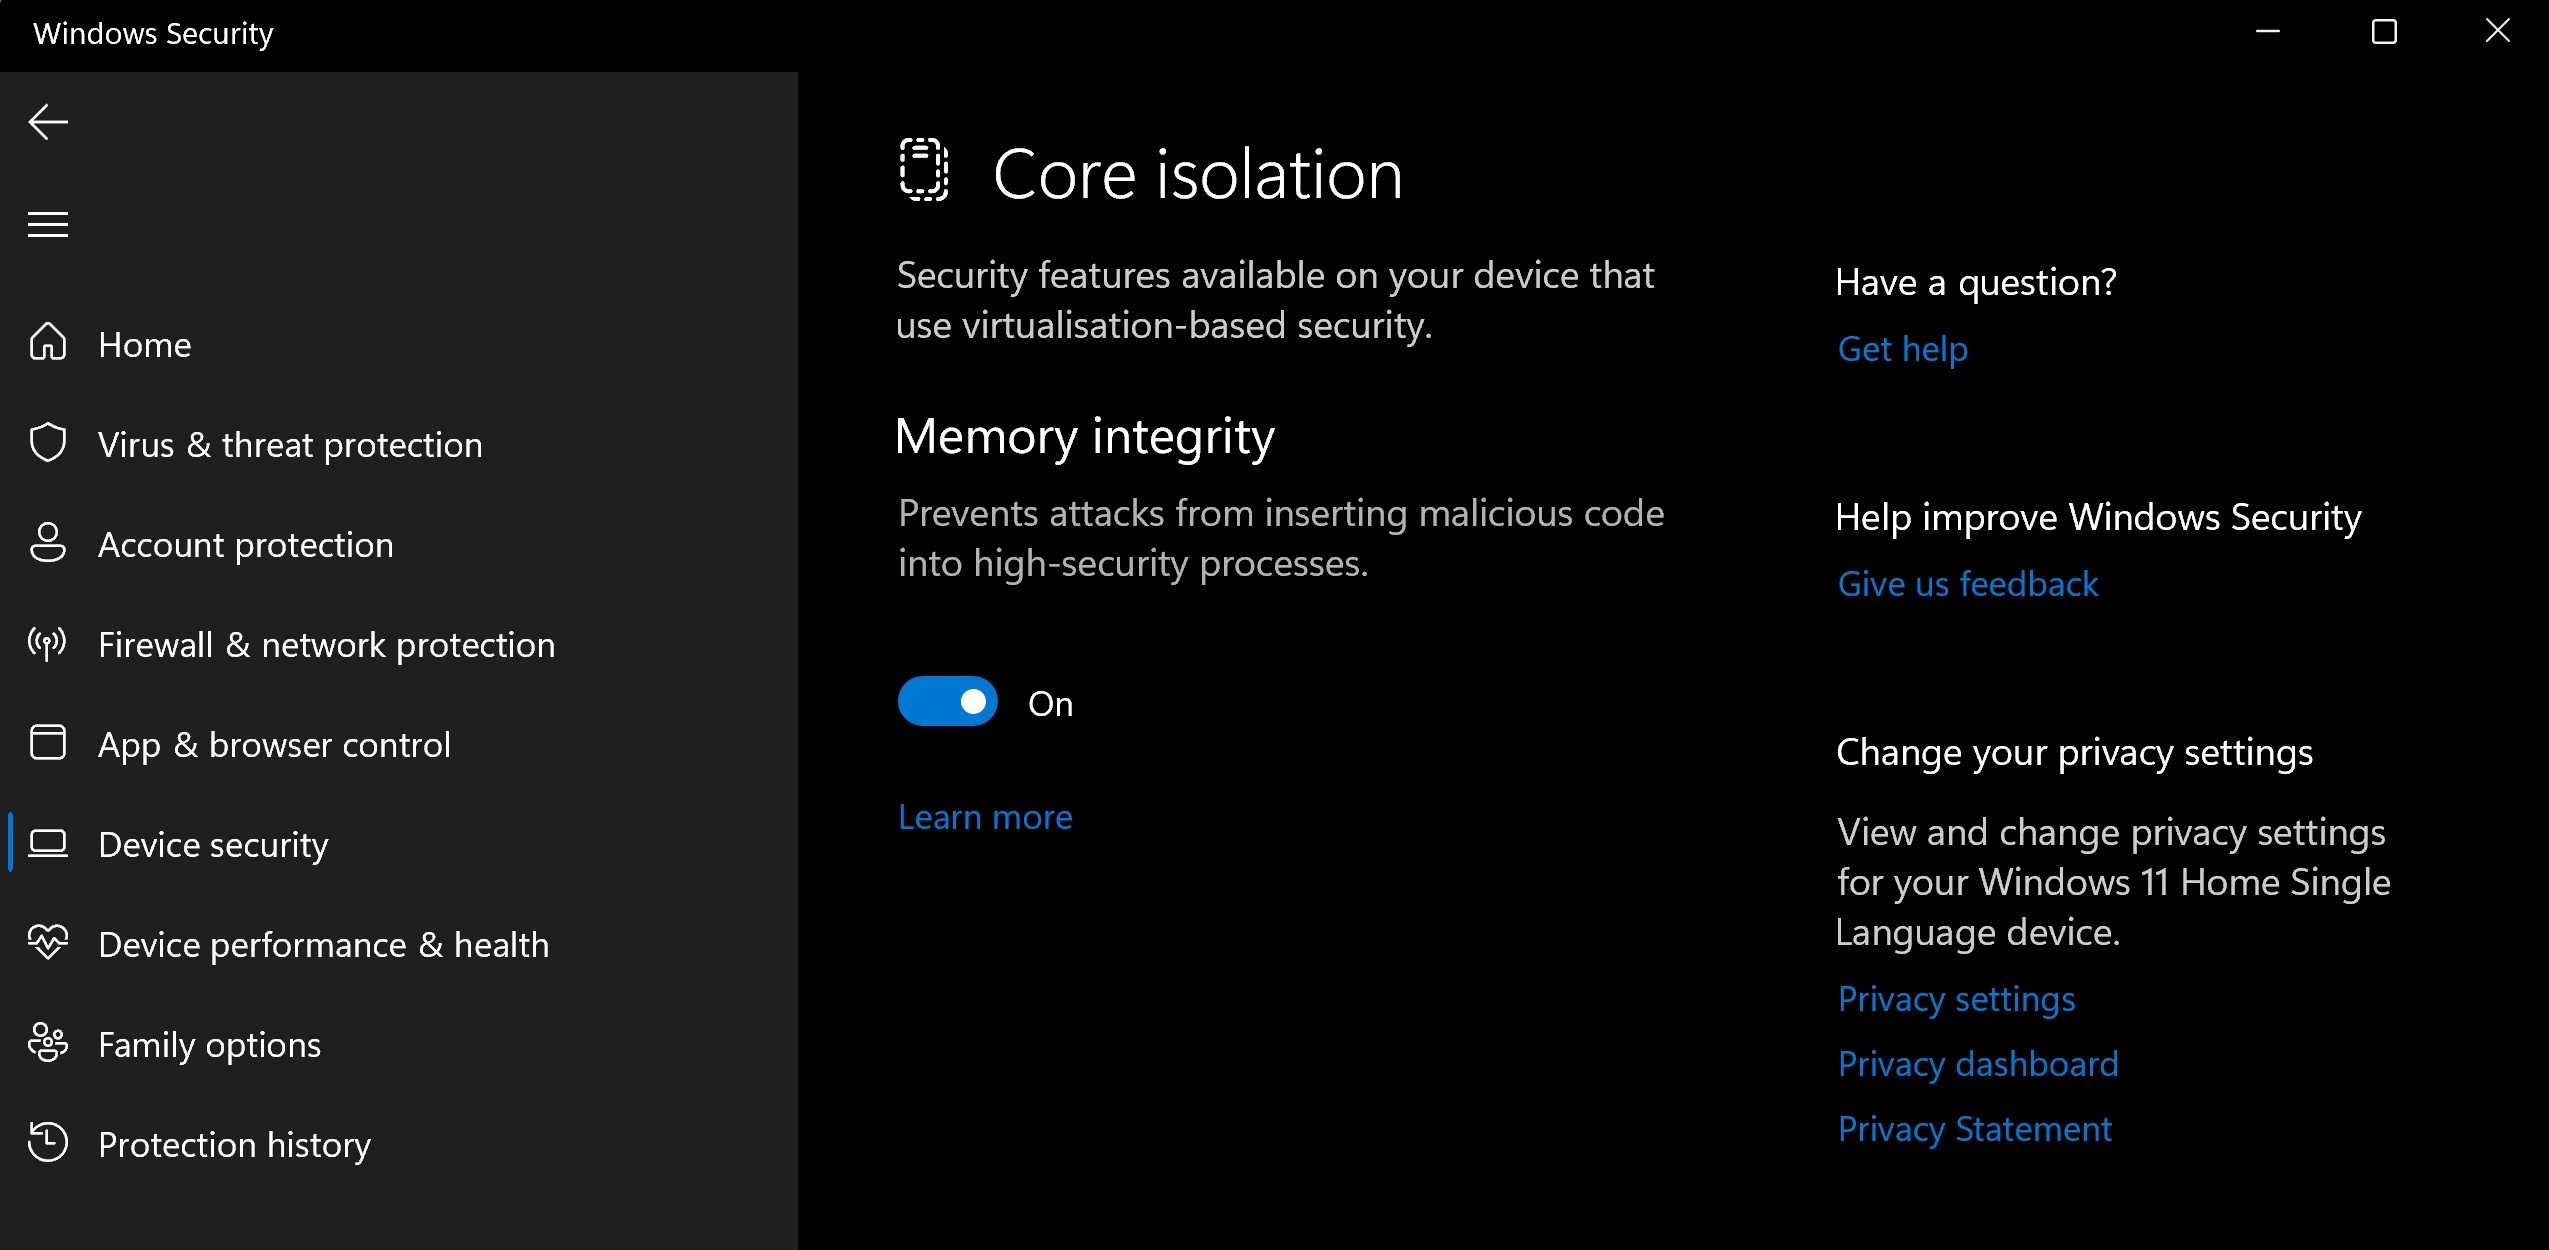
- Windows Security app will launch. Go to the left-hand side menu and select Device Security.
- Find the Core isolation section and click on the Core isolation details option.
- Now, check whether the Memory Integrity toggle is active or not. If it is active, click on it to disable the feature.
- Restart your system. Test some apps and games to check their performance.
Как отключить Virtualization Based Security (VBS) в Windows 11 и Windows 10
Безопасность на основе виртуализации, Virtualization based security или VBS — функция Windows 11 и Windows 10, предотвращающая выполнение потенциально опасного кода в памяти компьютера, изолируя его. Функция полезная, но по некоторым отзывам её отключение может повысить производительность в играх, а некоторые программы могут не запускаться, если она включена.
В этой инструкции описаны способы отключить безопасность на основе виртуализации. Далее рассмотрено отключение Virtualization Based Security в редакторе локальной и групповой политики, а также альтернативные методы, если отключение этими способами не помогло.
Основной способ отключения Virtualization Based Security — настройка соответствующей политики в Windows. Если у вас установлена Pro или Enterprise версия системы, можно использовать редактор локальной групповой политики:
- Нажмите правой кнопкой мыши по кнопке «Пуск», выберите пункт «Выполнить», введите gpedit.msc и нажмите Enter.
- В редакторе локальной групповой политики перейдите к разделу «Конфигурация компьютера» — «Административные шаблоны» — «Система» — «Device Guard». Дважды кликните по пункту «Включить средство обеспечение безопасности на основе виртуализации» в правой панели.
- Установите значение «Отключено» и примените настройки.
- Перезагрузите компьютер.
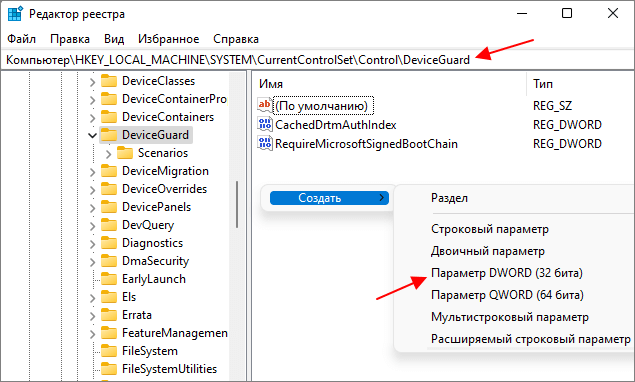
В случае, если на вашем компьютере установлена домашняя редакция Windows, можно использовать редактор реестра:
- Нажмите клавиши Win+R на клавиатуре, введите regedit и нажмите Enter.
- Перейдите к разделу реестра
- Нажмите правой кнопкой мыши в пустом месте правой панели редактора реестра и создайте новый параметр DWORD с именем EnableVirtualizationBasedSecurity и установите значение 0 для него.
- При наличии такого параметра, дважды нажмите по нему и измените значение на 0.
- Перезагрузите компьютер.
В результате функция VBS будет отключена. Если несмотря на это какая-то программа требует отключить Virtualization Based Security для своей работы, используйте далее описанные методы.
Дополнительные методы отключения Virtualization Based Security
Если предыдущий вариант не помог, и какая-то программа при запуске требует отключить VBS, можно использовать дополнительные подходы. Учитывайте, что при их использовании также будут отключены другие встроенные функции виртуализации Windows 11 и Windows 10 (на базе Hyper-V):
- Запустите командную строку от имени администратора, введите командуи нажмите Enter. После этого перезагрузите компьютер.
- Откройте окно «Программы и компоненты» в панели управления или с помощью Win+R — appwiz.cpl, нажмите «Включение или отключение компонентов Windows» слева, отключите компоненты «Application Guard в Microsoft Defender», «Hyper-V», «Платформа виртуальной машины», нажмите «Ок» и перезагрузите компьютер после удаления компонентов.
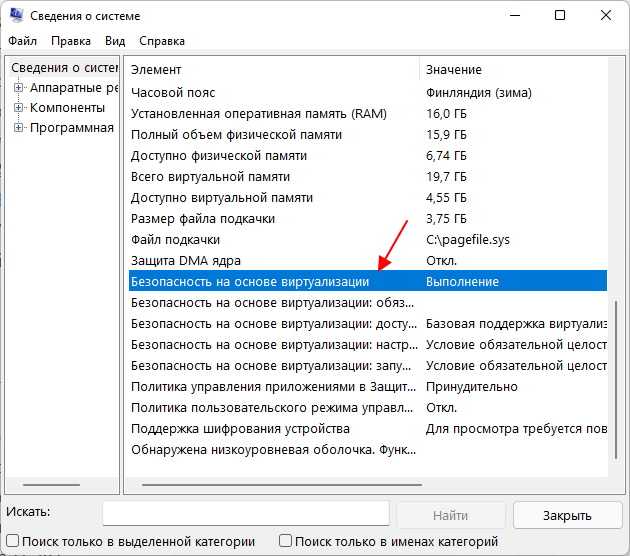
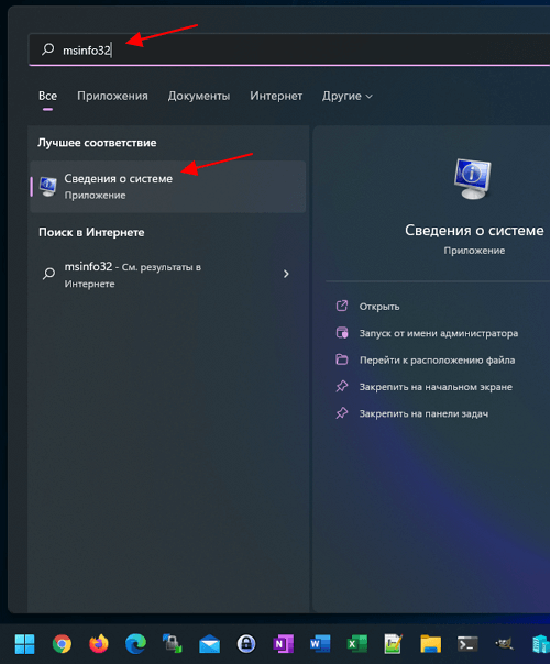
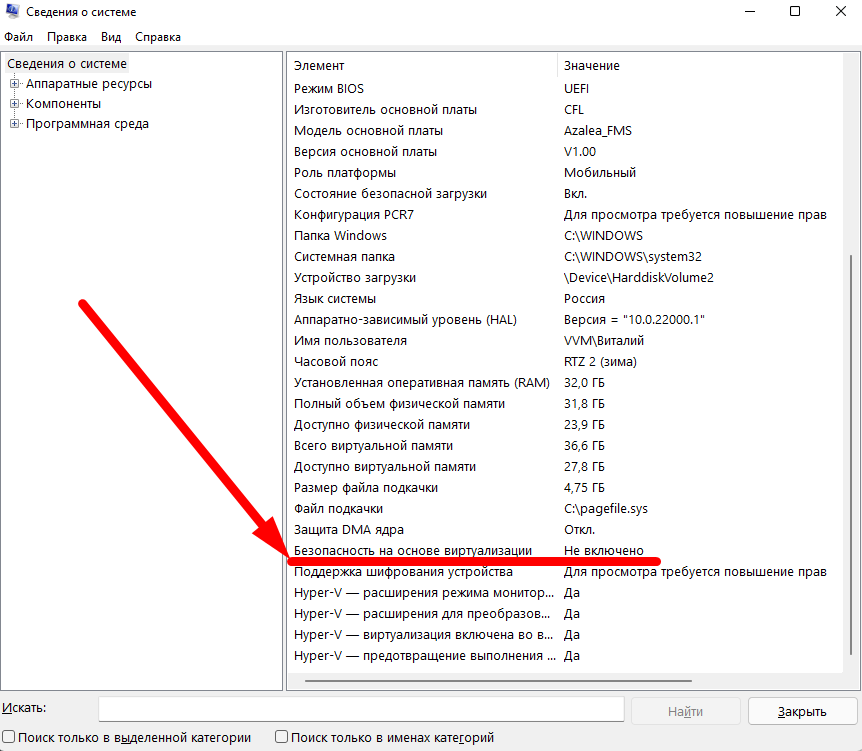
Обычно один из этих способов помогает решить проблемы, связанные с включенной функцией безопасности на основе виртуализации. Если вам требуется узнать текущий статус функции, вы можете нажать клавиши Win+R, ввести команду msinfo32 и нажать Enter.
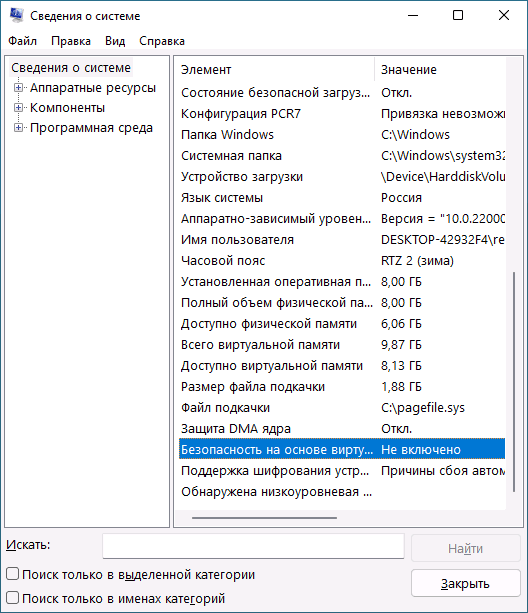
В разделе «Сведения о системе» внизу списка вы найдете пункт «Безопасность на основе виртуализации» с нужной информацией.
Действительно ли VBS снижает производительность?
Углубить все PC Gamer و Оборудование Tom’s Чтобы узнать о снижении производительности, которое происходит после включения VBS. Результаты показали снижение производительности, которое колебалось в пределах 5-25%. Во многих популярных играх, таких как Horizon: Zero Dawn и Shadow of the Tomb Raider, количество кадров в секунду сильно падало.
Удивительно, но частота CPU и GPU осталась неизменной. Но эти компоненты потребляли меньше энергии. Не было никаких подробных сведений о том, почему это на самом деле так. Но если вы хотите получить максимальную производительность в своих играх и приложениях, то VBS, вероятно, может вам помешать.
4. How to Disable VBS From the Local Group Policy Editor
You can use the Group Policy Editor to turn off VBS permanently. Keep in mind that GPE is not available for Windows 11 Home users. You need to run a batch script to enable GPE. Check out our complete Group Policy Editor guide for more information on this.
To disable VBS using the Group Policy Editor, do as follows:
- Press Win + R to launch the Run command box. Type gpedit.msc and hit the enter key to launch the Group Policy Editor.
- Navigate to Local Computer Policy > Computer Configuration > Administrative Templates > System > Device Guard.
- Under Device Guard, find the Turn On Virtualization Based Security policy and double-click on it.
- Click on the Disabled radio button in the policy window. Then, click on the Apply button.
- Click on the OK button and exit the Group Policy Editor. Restart your system to apply changes.
- To re-enable VBS, click on the Enabled radio button in the Turn On Virtualization Based Security policy.
Virtualization Based Security
Virtualization Based Security is a security feature in Windows that creates an isolated region of memory for security features. It can protect the vital system and operating system resources by enforcing restrictions.
However, enabling this feature will lower your device performance, especially while playing games. To get maximum performance in games and applications, you can try disabling Virtualization Based Security. In this post, we will introduce 5 ways to disable VBS for you.
It is highly recommended to back up your data to an external hard driver or USB flash drive before proceeding. In this case, MiniTool ShadowMaker is a good choice to you. This is a piece of Windows backup software that is available on Windows 11/10/8/7. It supports backing up multiple items like files, folders, systems, partitions, and even the whole disk. Get this freeware and have a try by hitting the button below!
6. How to Disable VBS Using Registry Editor
If you don’t have Group Policy Editor on your Windows 11 Home version, you can use the Registry Editor to change the status of VBS on your PC. Instead of manually navigating to the registry key, you can use Command Prompt to modify the EnableVirtualizationBasedSecurity DWORD value.
But before doing that, create a manual backup of the Windows Registry and save it to an external USB drive as a backup option. After doing that, repeat the following steps to disable VBS by tweaking the registry:
- Press Win + R to launch the Run dialog box. Type cmd and press the Ctrl + Shift + Enter keys simultaneously to open the Command Prompt with administrator privileges.
- Now, type the following command and press the Enter key to execute it:
- If everything went fine, you will see a «The operation completed successfully.» message.
- Type exit and press Enter to close the Command Prompt window.
- Restart your PC to apply the changes.
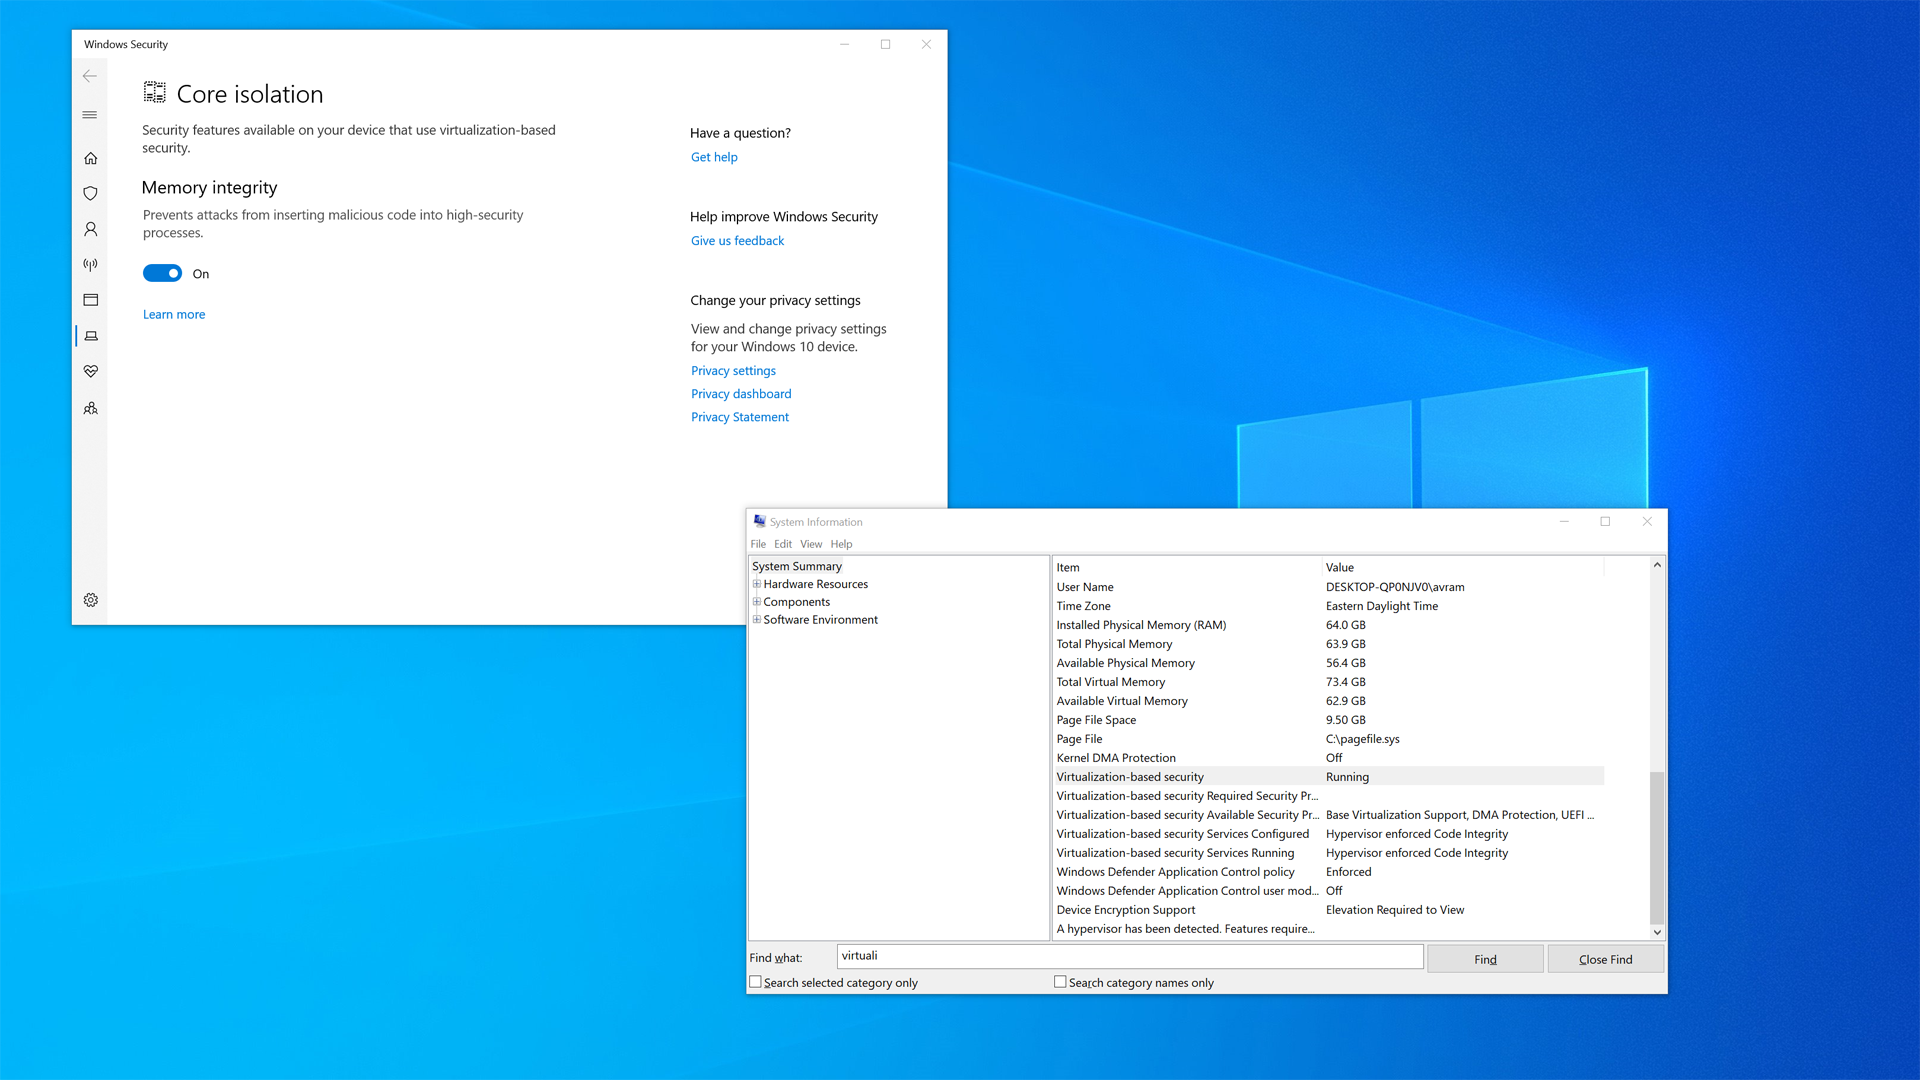
How to activate VBS and HVCI in Windows 10
To check if VBS and HVIC are active and running on your Windows 10 personal computer, we will have to delve deeply into the Settings menu. Click or tap the Start Button and select Settings (gear icon). From the Settings menu select Update & Security and then select Windows Security from the navigation bar located in the left windowpane, as shown in Figure A.
Figure A
On this screen, click Device Security from the list of items in the right windowpane. As you can see in Figure B, this Settings screen deals with several advanced Windows 10 security protocols.
![Disable virtual machine platform on windows 11 [5 steps]](https://kubwheel.ru/wp-content/uploads/c/1/c/c1c10eb07c48d858b454659a7dd81fef.png)
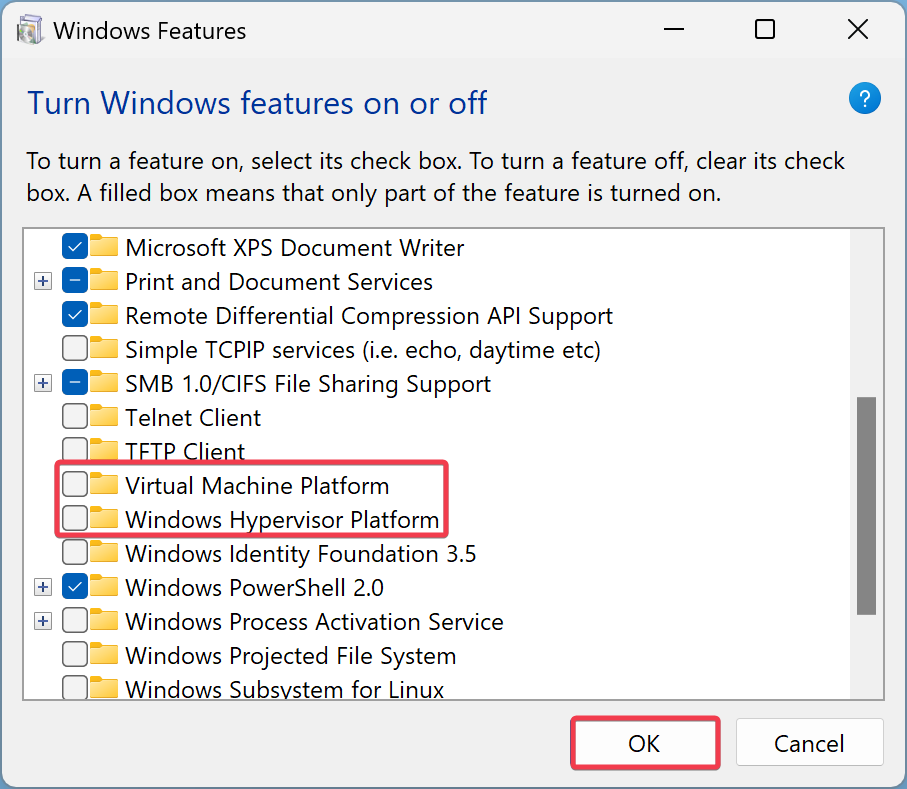
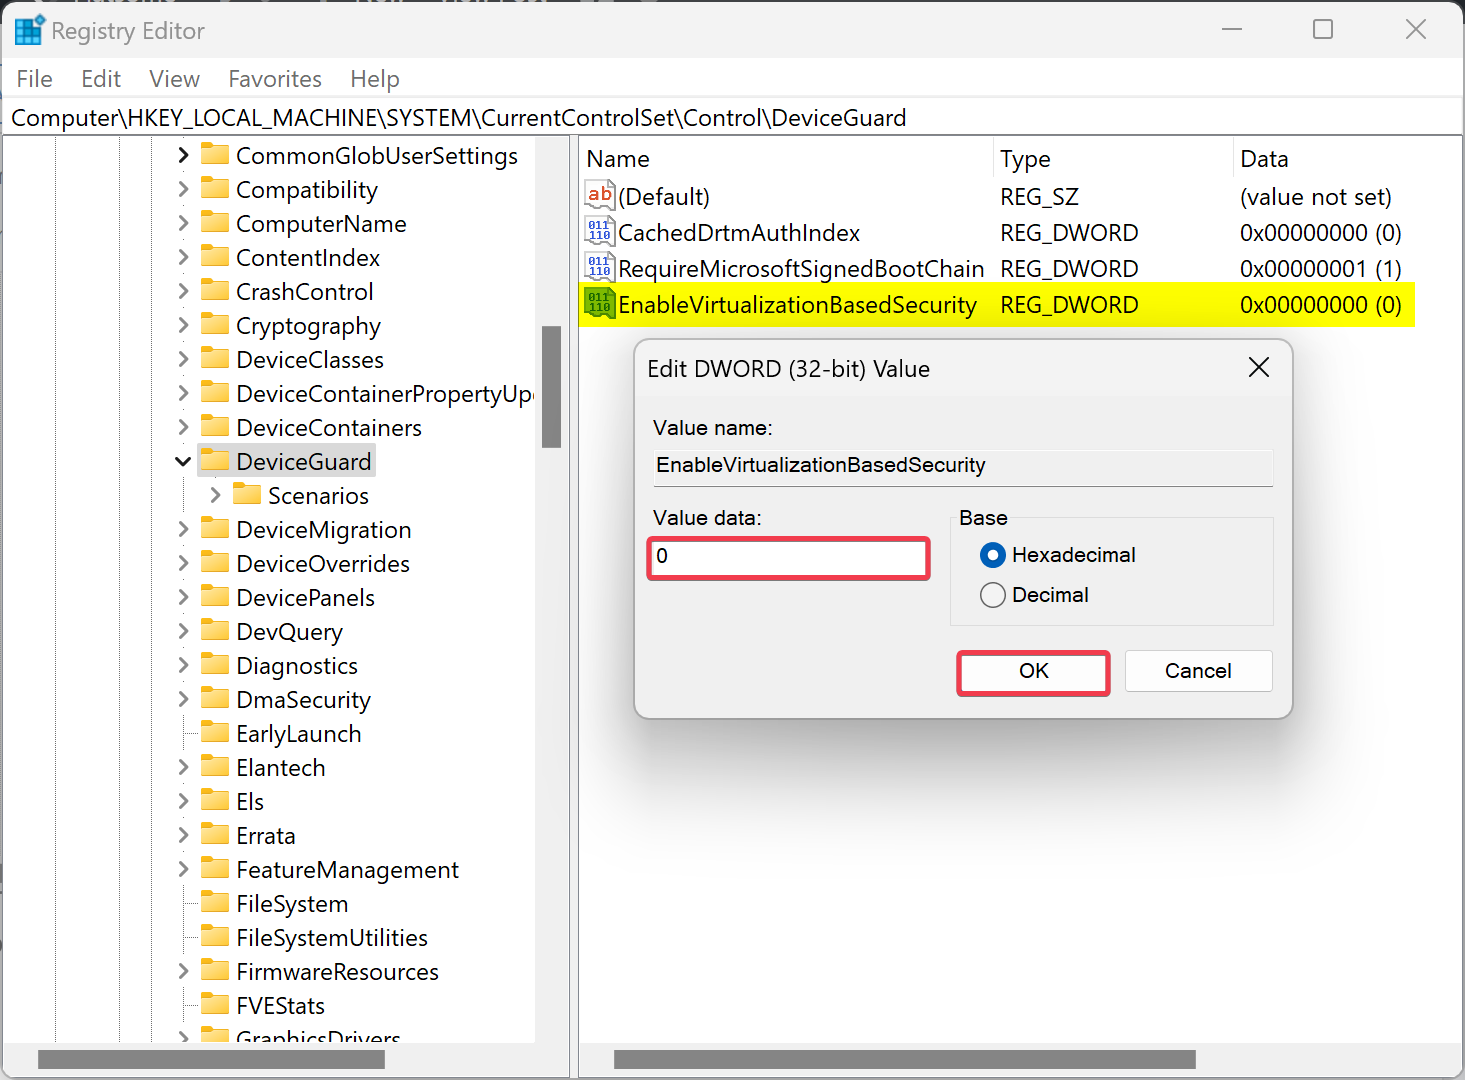
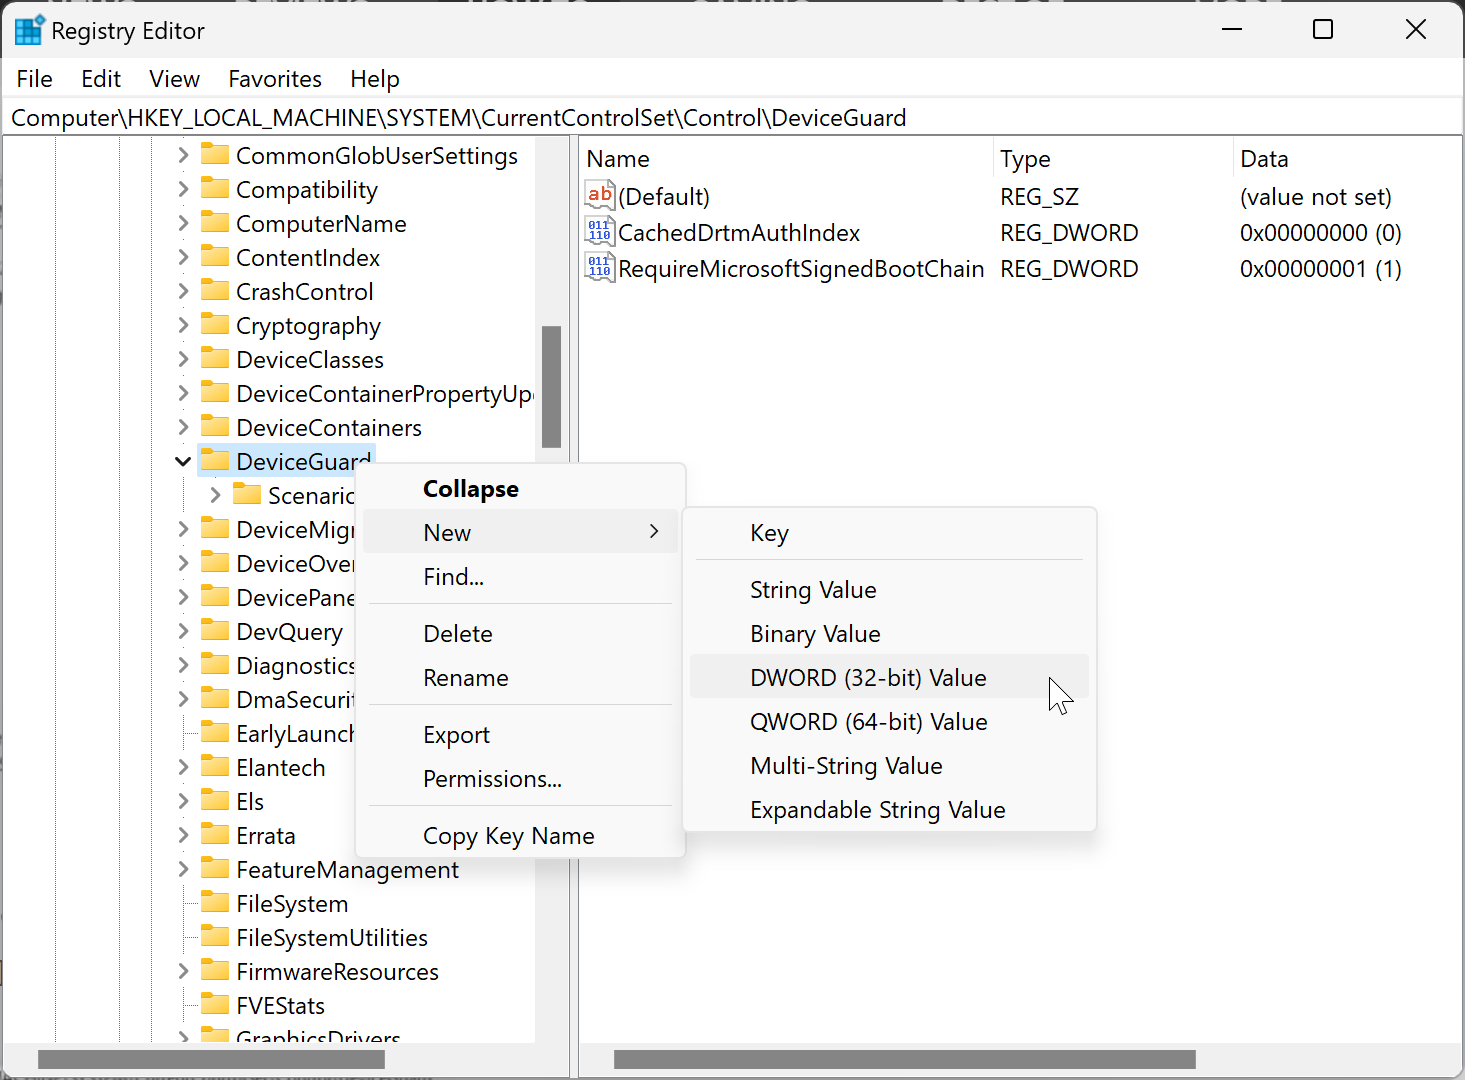
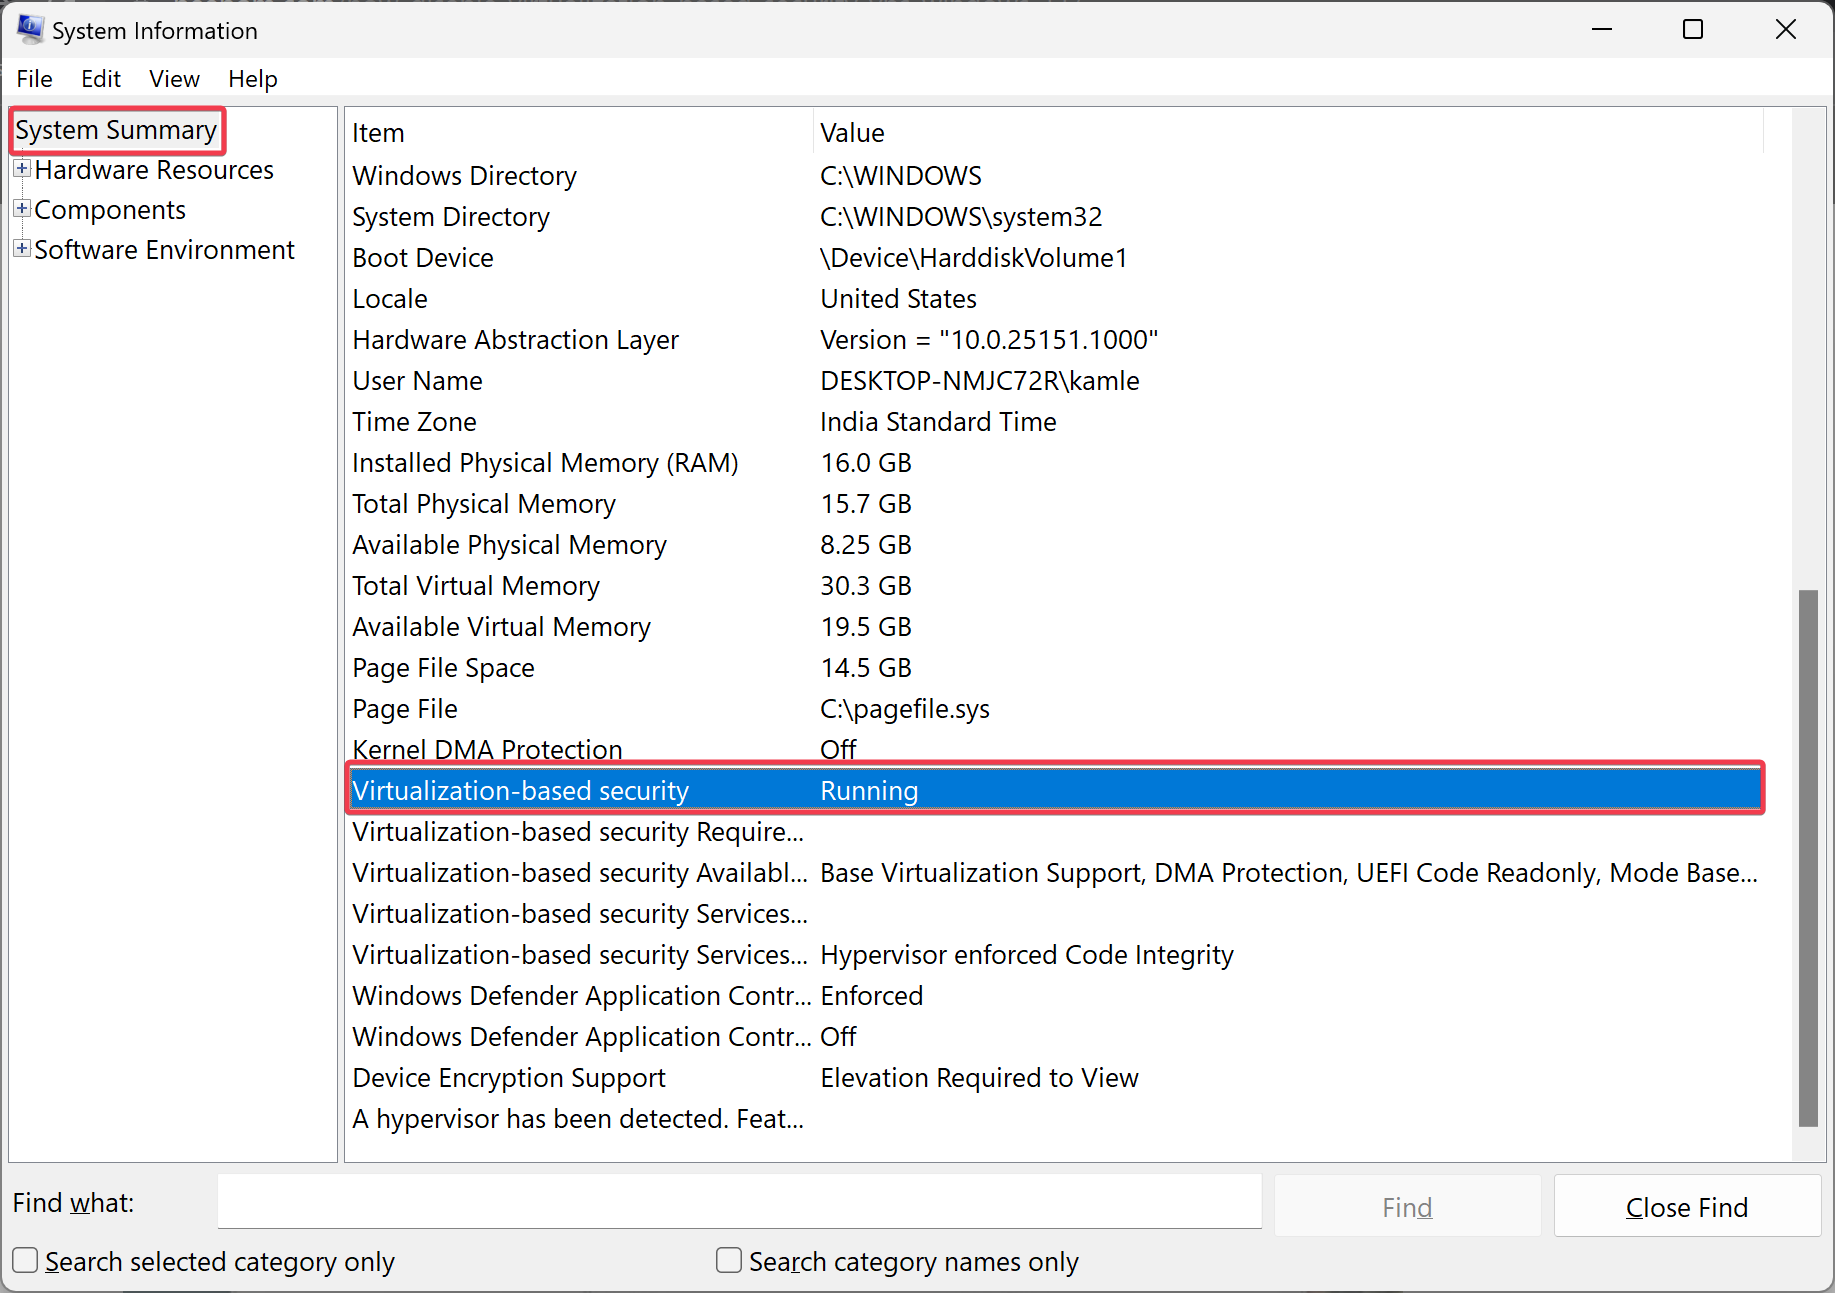
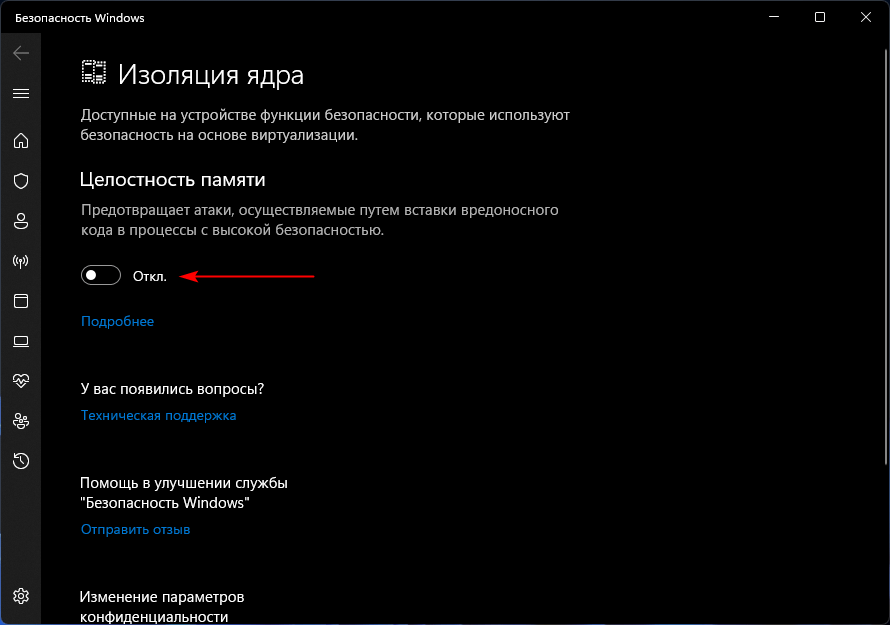
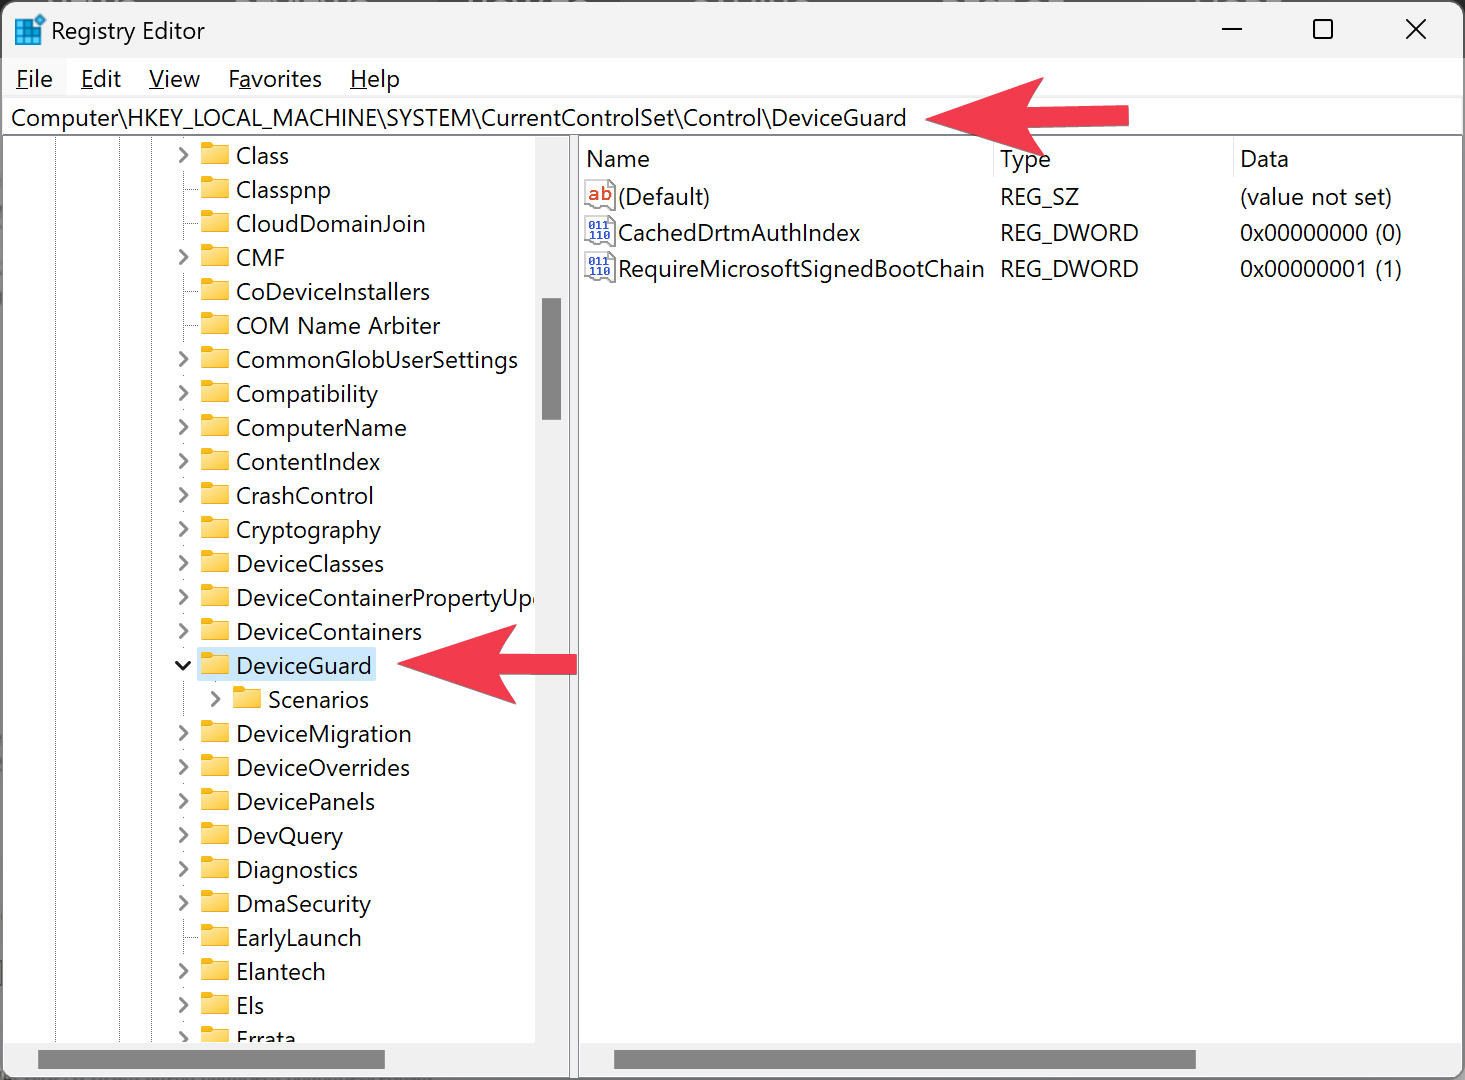
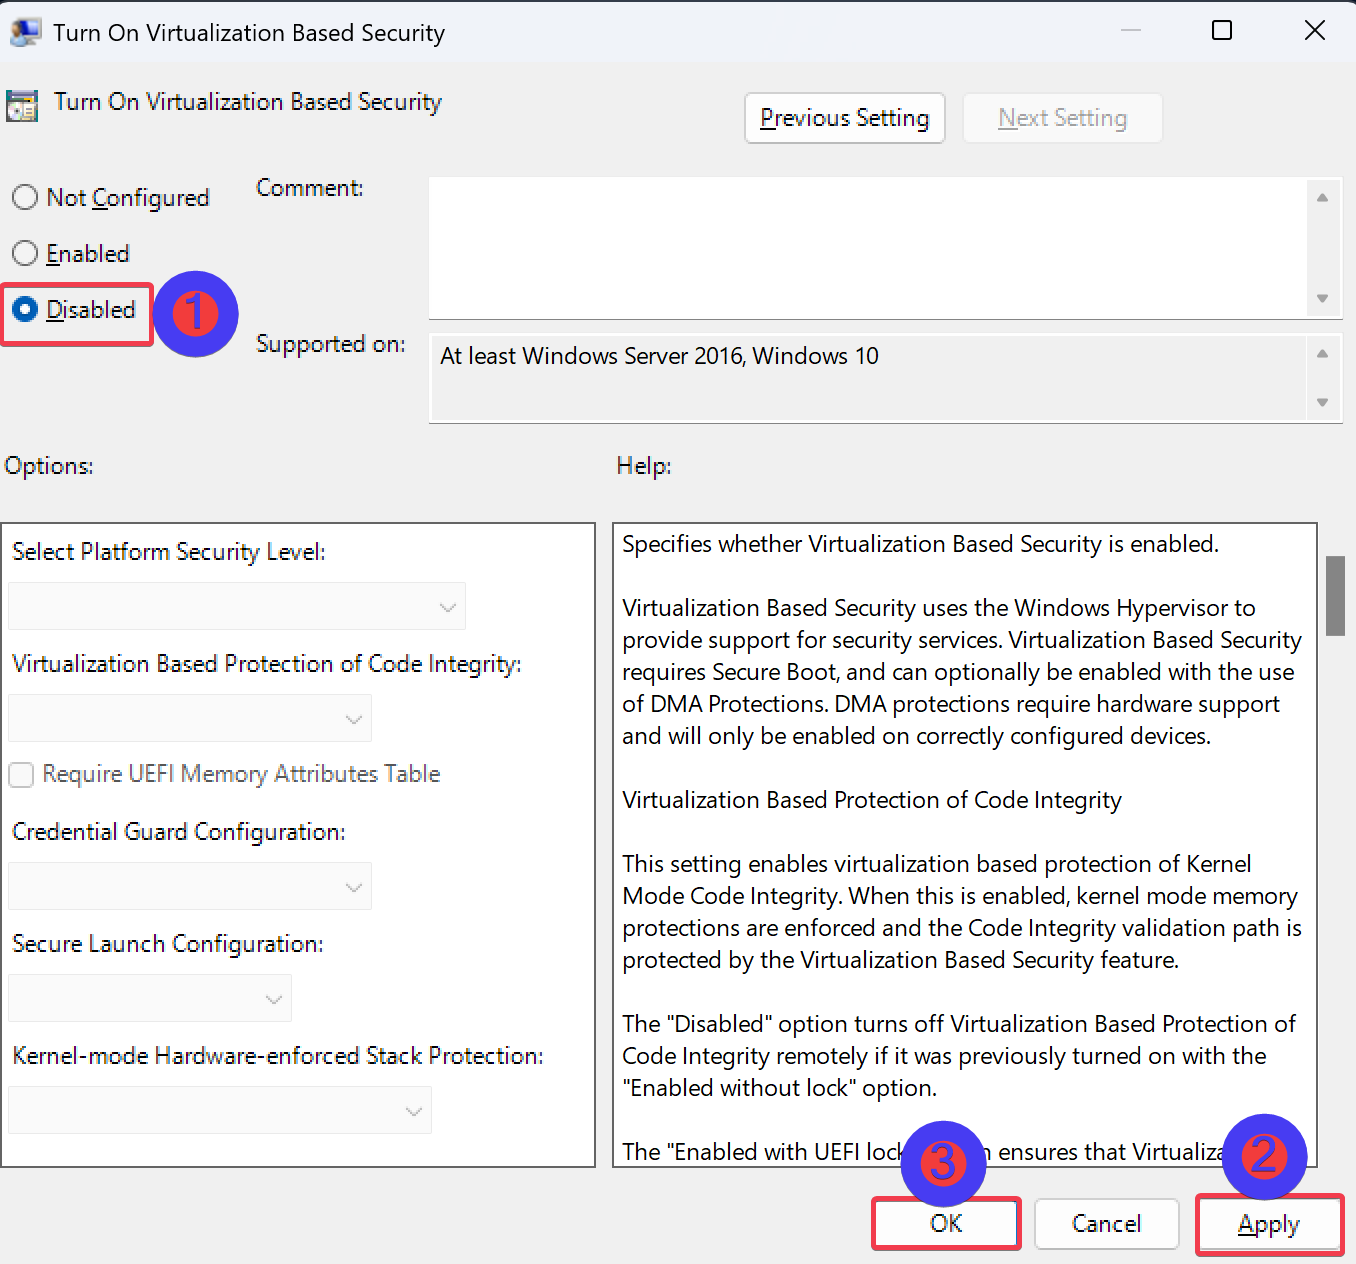
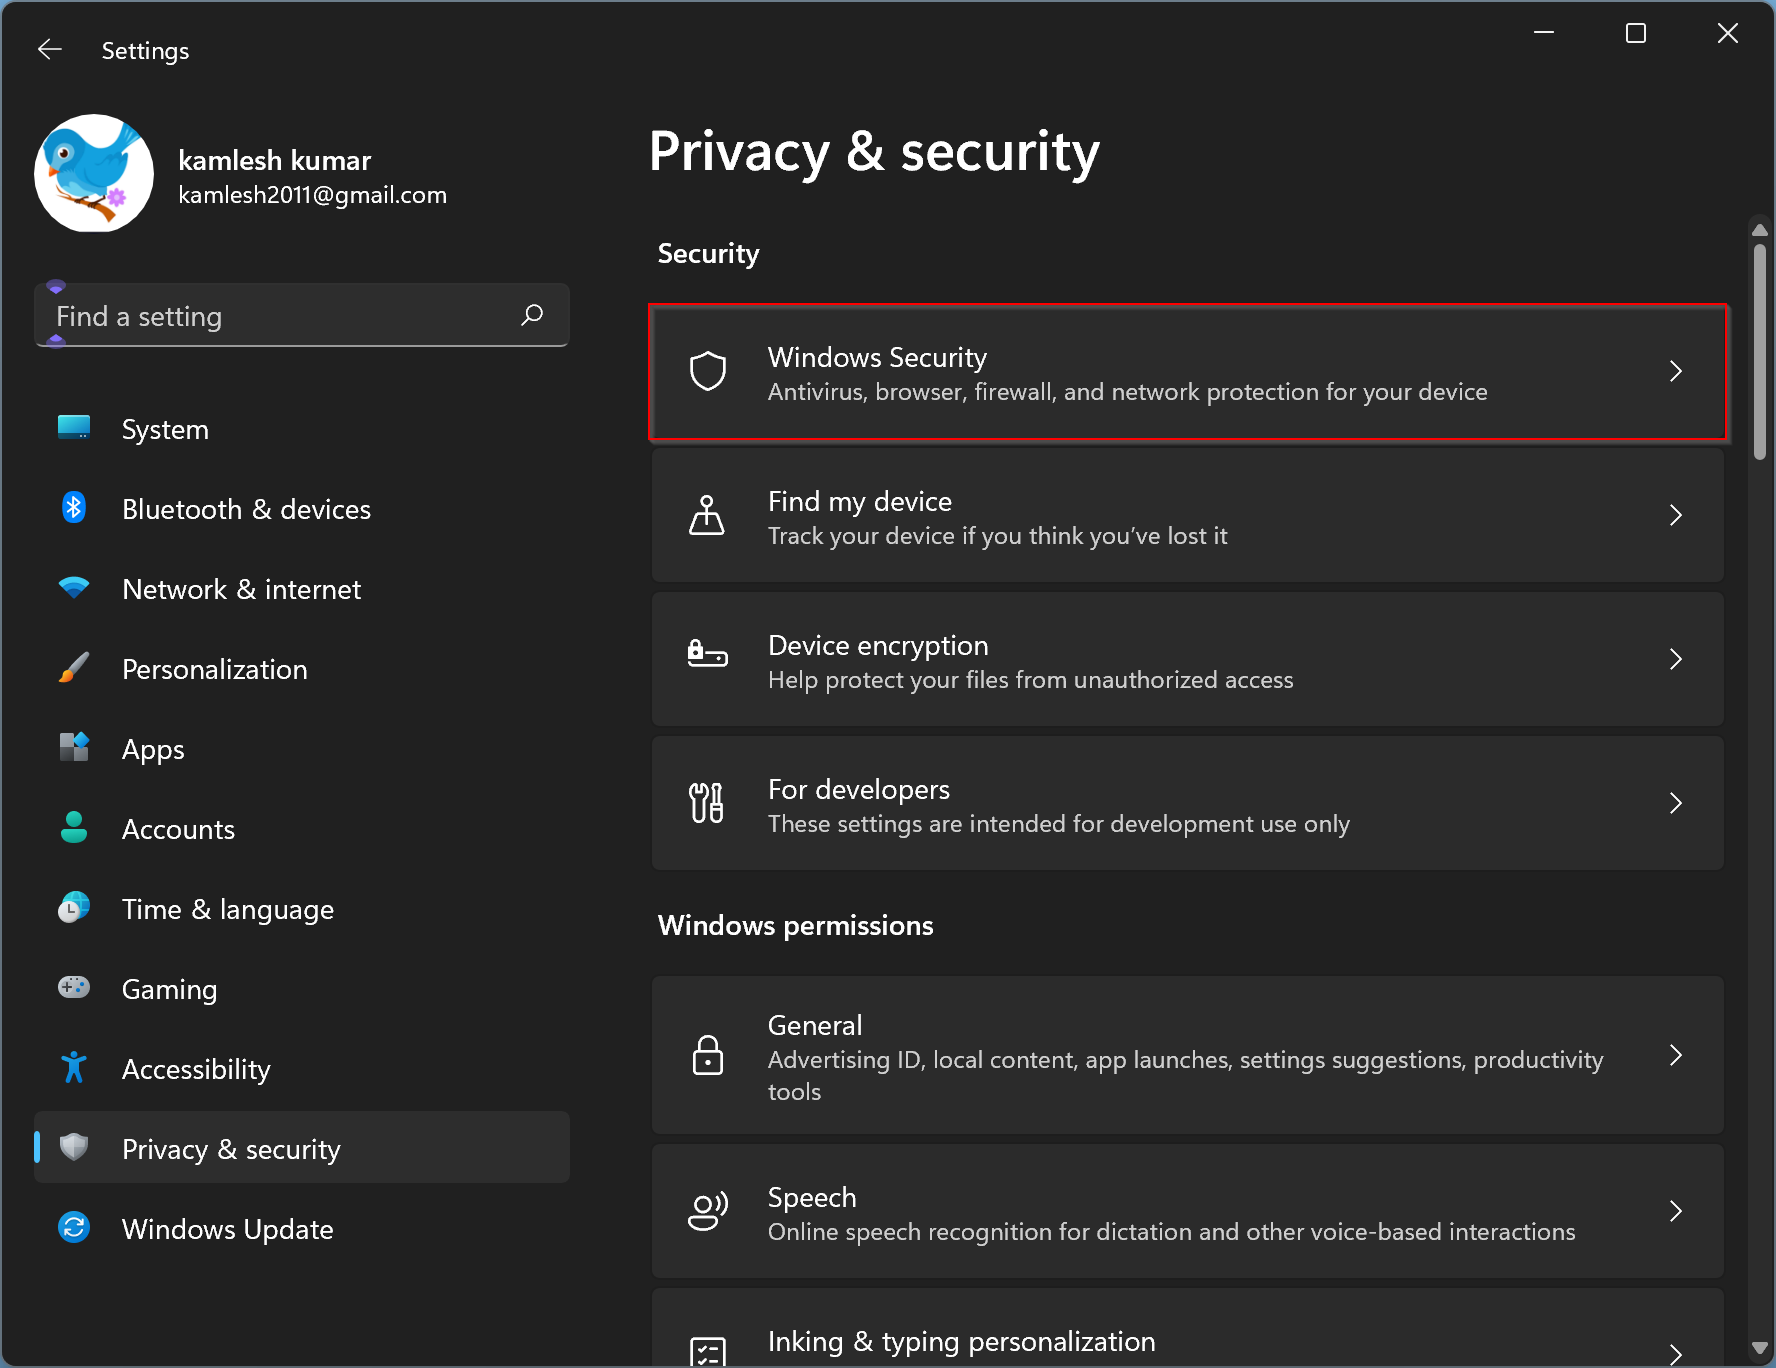

Figure B
To check the status of HVIC we want to drill down on core isolation, so click the Core Isolation Details link to reveal the details page shown in Figure C.
Figure C
If your Windows 10 PC is capable, it is a good idea to turn the memory integrity features on. Just toggle the switch to the “on” position. After answering a security check, you will have to restart your PC for the protocols to take effect.
How can I turn off VBS in Windows 11?
This feature is not new, and it’s also implemented in Windows 10, so we know exactly how to deal with it. We will present to you five different ways to disable this feature.
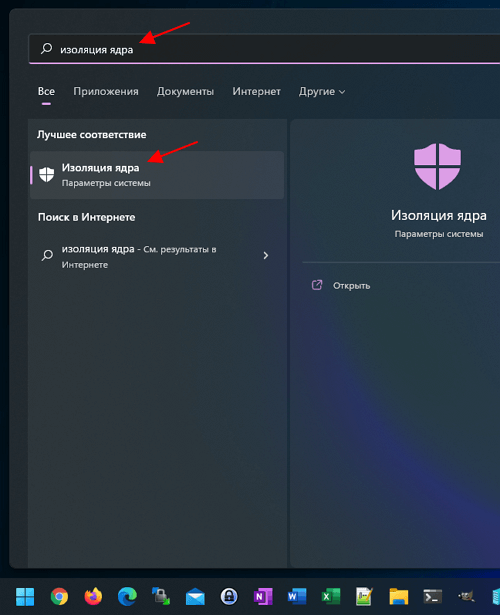
1. Disable Memory integrity
- Click the Search icon from the Taskbar, type core isolation and click on the setting from the results.
- Now toggle Off the Memory integrity option from the Core isolation section.
- Restart your PC for the change to take effect.
2. Use the Local Group Policy Editor
- Press the Windows key + R to start Run, type gpedit.msc and press Enter or click OK.
- Go to the following path:
- Double-click Turn on Virtualization Based Security.
- Select Disabled, then click on Apply and OK.
3. Turn off Windows virtualization features
- Click the Search icon from the Taskbar, type windows features, and select Turn Windows features on or off.
- Make sure you uncheck the following features from the list: Windows Hypervisor Platform, Virtual Machine Platform, and Microsoft Defender Application Guard.
- Restart your PC for the changes to take effect.
4. Via Command Prompt
1. Click the Search button from the Taskbar or press the Windows Key to open the Start menu.
2. Type cmd and then select Run as administrator from the results.
3. Type the following command:
4. Press Enter to run the command.
5. VBS is now disabled on your Windows 11 PC.
A fast and easy method to turn off VBS on your device is to use the built-in command tool called Command Prompt. All you need to do is open cmd and input a command to disable this feature, and the tool will do it for you.
5. Disable Intel Virtualization Technology in BIOS
- Enter BIOS. There are different ways to get into BIOS for different computers but usually implies pressing an F (function) key or Del before booting the OS.
- Go to the Advanced tab and change the option from Enabled to Disabled.
- Save and exit BIOS. It’s usually done by pressing the F10 key on your keyboard but that depends on your BIOS.
We hope that our solutions helped you disable VBS in Windows 11 and now you can enjoy your games without any limitations.
As you probably noticed, our solutions basically disable any virtualization technology so if you’re running Windows 11 on a virtual machine, the procedures will block that.
Therefore, don’t apply these solutions if you installed the new OS on a VM because that will make your virtual machine unusable.
However, if you just want to test Windows 11 before you get it as a primary system, check out our guide on how to install it on a virtual machine.
If you have any other questions or issues, drop us a line in the dedicated comments section below.
Was this page helpful?
457
MyWOT
Trustpilot
Thank you!
Not enough details
Hard to understand
Other
x
Contact an Expert
There are 1 comments
Why activate VBS and HVIC?
VBS uses Hyper-V to create and isolate a secure memory region from the operating system, which is used to protect Windows 10 and Windows 11 from security vulnerabilities introduced by legacy support. HVCI takes advantage of VBS to check all kernel-mode drivers and binaries to prevent unsigned drivers and system files from being loaded into system memory. The security protocols also work with application code, catching malware before too much harm can be done.
SEE: Microsoft’s new security tool will discover firmware vulnerabilities, and more, in PCs and IoT devices (TechRepublic)
Unfortunately, HVIC and VBS are only available on systems running 64-bit versions of Windows 10 (and eventually Windows 11). Those of you running 32-bit systems will have to upgrade your software and possibly your hardware to access these core isolation security features. These features also require an updated input-output memory management unit. This is why so many older PCs have been failing the Windows 11 capability tests.


Microsoft’s hard line on updated hardware with advanced security features as a prerequisite for Windows 11 comes in direct response to recent high-profile cyberattacks involving ransomware and other malicious activity. Unfortunately, we are in an arms race with cyber criminals, and it is increasingly difficult for normal everyday users to keep up. If your PC is capable, HVIC and VBS can help stave off at least some of the more common attacks.
Subscribe to the Microsoft Weekly Newsletter
Be your company’s Microsoft insider by reading these Windows and Office tips, tricks, and cheat sheets.
Delivered Mondays and Wednesdays
Sign up today
What Are the Repercussions of Disabling VBS on Your System?
Virtualization-Based Security (VBS) works with Windows Hypervisor to create an isolated memory region. This isolated region securely stores login credentials, crucial Windows security code, and more. HVCI is a feature that uses VBS to conduct integrity checks on programs.
In simple words, attackers have a tough time when VBS is active. So, turning it off leaves you exposed to kernel-level attacks. If you are someone who uses their system for confidential official work, it is best to keep VBS enabled. If you are a gamer or use resource-intensive apps, disabling VBS will minimize the performance drop.
5. How to Disable Virtualization via the BIOS
The last option is to disable virtualization technology from the system BIOS. As mentioned before, VBS won’t work if you disable virtualization features. So, by doing this, you can ensure that VBS doesn’t turn on ever again.
To turn off virtualization technology from BIOS, repeat the following steps:
- Restart your system. Press the corresponding F-key to access the BIOS setup (usually it is the F2 or F12 key).
- Once you are inside the BIOS, go to the advanced settings page. Remember that each OEM has a different BIOS appearance and settings layout.
- Find the Virtualization Technology option under advanced settings. Click on it to disable the feature on your system.
- Now, press the F10 key to save the changes. Exit the BIOS setup and continue the OS boot process.
- Check the Memory Integrity option in Windows Security. It will appear grayed out.
3. How to Turn Off Windows’ Virtualization Features
VBS can run on your system only if virtualization is active. If you shut off all the Virtualization features of Windows, VBS won’t work. So, you have to uninstall a few Windows features.
To turn off Virtualization features in Windows 11, do as follows:
- Press the Win key, type Control Panel and open the first result.
- Find the Program and Features option and then click on Uninstall a Program option.
- Navigate to the top left-hand side and click on the Turn Windows Features on or off option.
- Windows Features will launch. Find Microsoft Defender Application Guard, Virtual Machine Platform, and Windows Hypervisor Platform in the list.
- Uncheck all these features and then click on the OK button. Wait for the setup to disable these features on your device. Click on the Restart Now button to apply changes.
- Revisit the Windows Features to check whether all Virtualization features are inactive or not.