

Removing Hyper-V with DISM
DISM (Deployment Image Servicing and Management) is a tool for working with Windows images (.wim files) and install/uninstall Windows drivers, features, and packages.
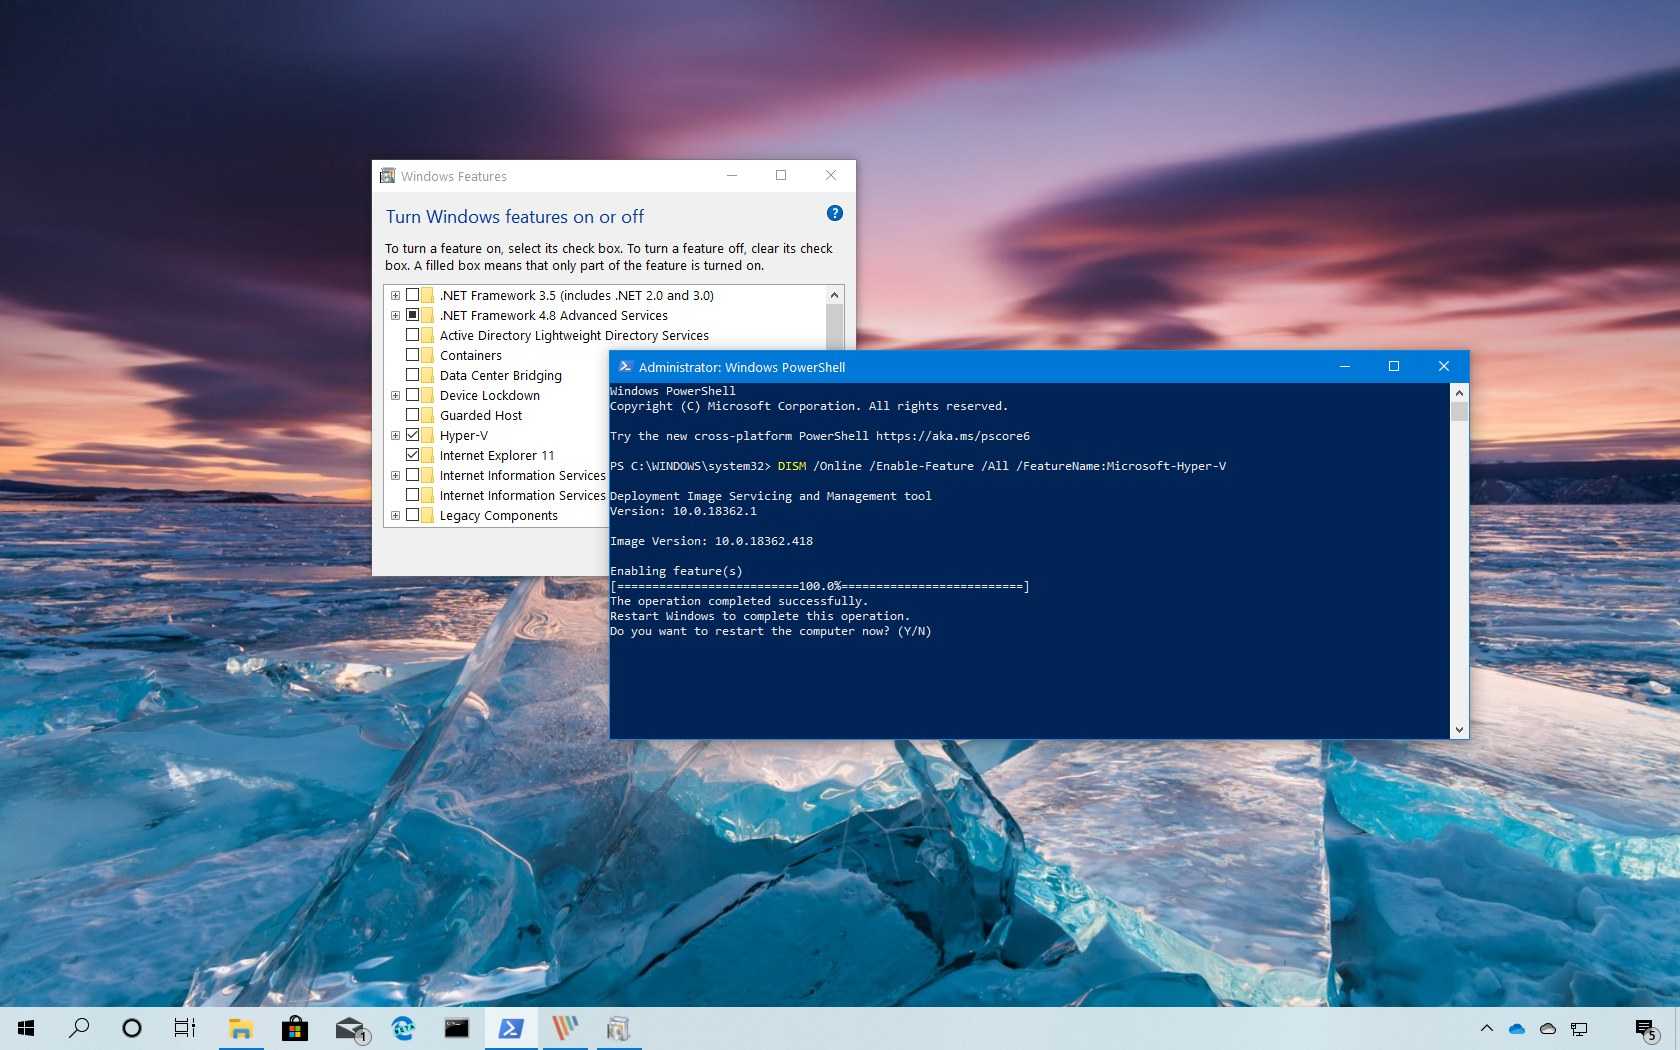
Open PowerShell with administrative privileges, and run this command to disable Hyper-V:
DISM /Online /Disable-Feature:Microsoft-Hyper-V

You may need to disable Secure Boot in UEFI/BIOS settings of a computer to finish the uninstallation process and uninstall Hyper-V. The sequence to disable Secure Boot depends on your hardware vendor and differs for different motherboard vendors and models.
You can change Hyper-V startup options when Windows boots without uninstalling Hyper-V completely. In this case, Hyper-V is installed but inactivated. Hyper-V is not booted before Windows boots if you disable Hyper-V by using the command line bcdedit tool. Bcdedit is the command line tool to manage Boot Configuration Data or BCD. BCD store is used to describe boot parameters for applications, add boot menu entries, etc. If you use BCD to disable Hyper-V, the Hyper-V feature is disabled but not uninstalled completely from Windows. As you remember, Hyper-V is the first-type hypervisor that boots before Windows boots. The idea of using this method is to disable Hyper-V in boot configuration.
Run the command prompt (CMD) as administrator and run the following command to disable Hyper-V by using bcdedit:
bcdedit /set hypervisorlaunchtype off

Note: If you need to enable Hyper-V again, run bcdedit /set hypervisorlaunchtype on
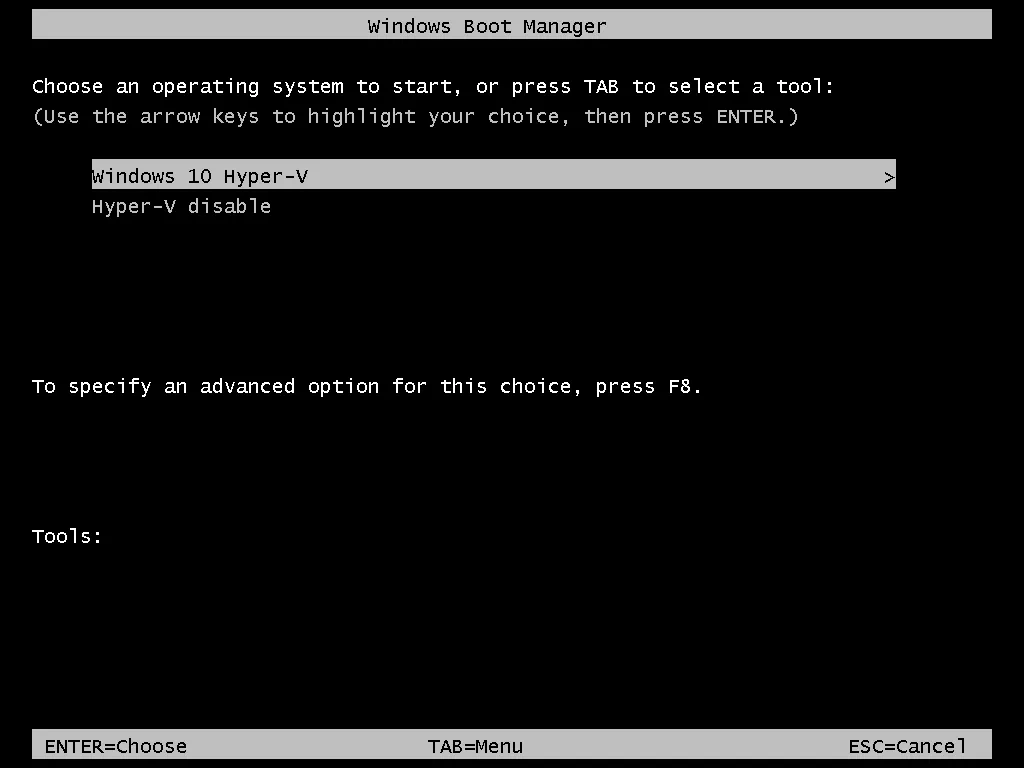
For more convenience, you can create two boot entries for your Windows machine. One boot entry is used to boot an operating system with Hyper-V, and another one is used to boot an OS without Hyper-V.
Run the following command to copy the default boot configuration to the new entry. “Hyper-V disable” is the name of the new boot entry in my case.
bcdedit /copy {default} /d «Hyper-V disable»
The following output message is displayed:
«The entry was successfully copied to {xxxxxxxx-xxxx-xxxx-xxxx-xxxxxxxxxxxx}.»
Run the command to edit Hyper-V boot options for the new boot entry you have created. Copy the value in brackets {} from the above output message and paste to this command:
bcdedit /set {xxxxxxxx-xxxx-xxxx-xxxx-xxxxxxxxxxxx} hypervisorlaunchtype off

You should see the message: The operation completed successfully.
Edit the name of the default boot entry with Hyper-V to “Windows 10 Hyper-V” for more convenience:
bcdedit /set {default} description «Windows 10 Hyper-V»
Restart your computer.
Now you have two boot menu entries. Select “Hyper-V disable” to boot Windows without Hyper-V or select “Windows 10 Hyper-V” to boot Windows with Hyper-V.
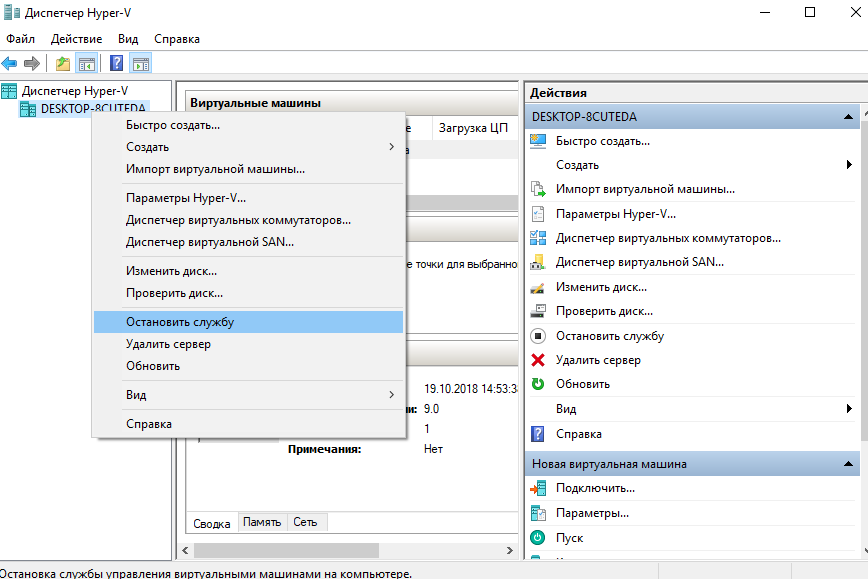
Отключить Hyper-V в Windows 10
Вы можете отключить Hyper-V в Windows 10 3 быстрыми и простыми способами. Мы исследуем эту тему с помощью методов, описанных ниже в этом разделе:
- Через панель управления
- Через PowerShell
- Через редактор реестра
Давайте посмотрим на описание пошагового процесса применительно к каждому из методов.
1]Отключить Hyper-V через панель управления
Чтобы отключить Hyper-V через панель управления, сделайте следующее:
- Нажмите Клавиша Windows + R для вызова диалогового окна «Выполнить».
- В диалоговом окне «Выполнить» введите и нажмите Enter, чтобы открыть Программы и особенности апплет.
- В окне с левой стороны щелкните значок Включение и отключение функций Windows связь.
- Подождите, пока апплет заполнится.
- Затем разверните Hyper-V, расширять Платформа Hyper-V,
- Очистить Гипервизор Hyper-V Установите флажок или просто снимите флажок с родительской папки Hyper-V.
Теперь вы можете выйти из панели управления.
2]Отключить Hyper-V через PowerShell
Чтобы отключить Hyper-V через PowerShell, сделайте следующее:
- Нажмите Клавиша Windows + X , чтобы открыть меню опытного пользователя.
- Кран А на клавиатуре, чтобы запустить PowerShell в режиме администратора / с повышенными правами.
- В консоли PowerShell введите или скопируйте и вставьте команду ниже и нажмите Enter:
Disable-WindowsOptionalFeature -Online -FeatureName Microsoft-Hyper-V-Hypervisor
Кончик: Если у вас включена поддержка аппаратной виртуализации в BIOS / UEFI, вы можете запустить ту же команду, чтобы быстро включить Hyper-V; просто замените с в команде.
Процесс может занять некоторое время. После выполнения команды вы можете выйти из PowerShell.


3]Отключить Hyper-V через редактор реестра
Поскольку это операция реестра, рекомендуется создать резервную копию реестра или создать точку восстановления системы в качестве необходимых мер предосторожности. Чтобы отключить Hyper-V через редактор реестра в Windows 10, сделайте следующее:
Чтобы отключить Hyper-V через редактор реестра в Windows 10, сделайте следующее:
- Нажмите Клавиша Windows + R для вызова диалогового окна «Выполнить».
- В диалоговом окне «Выполнить» введите и нажмите Enter, чтобы открыть Блокнот.
- Скопируйте и вставьте приведенный ниже код в текстовый редактор.
Windows Registry Editor Version 5.00


"RequireMicrosoftSignedBootChain"=dword:00000000


"WasEnabledBy"=dword:00000000
"Enabled"=dword:00000000
- Теперь щелкните Файл вариант в меню и выберите Сохранить как кнопка.
- Выберите место (желательно на рабочем столе), в котором вы хотите сохранить файл.
- Введите имя с .reg расширение (например, Disable_HyperV.reg).
- выбирать Все файлы от Сохранить как тип выпадающий список.
- Дважды щелкните сохраненный файл .reg, чтобы объединить его.
- При появлении запроса нажмите Беги> да (ОАК)> Да> Ok чтобы одобрить слияние.
- Теперь вы можете удалить файл .reg, если хотите.
Вот и все о трех способах отключения Hyper-V в Windows 10!
How to Uninstall Hyper-V on Windows Server 2016
The process of removing Hyper-V in Windows Server 2016 is slightly different compared to Windows 10. In this section, I explain how to uninstall Hyper-V in Windows Server 2016. If you use Windows Server 2019, the workflow to uninstall Hyper-V on Windows Server 2019 is identical.
Using the GUI
If your Windows Server is installed with the graphic experience and has a graphical user interface (GUI), then the easiest way to uninstall Hyper-V is using Server Manager and the Remove Roles and Features wizard.
Open Server Manager (Start > Server Manager). Click Manage > Remove Roles and Features.
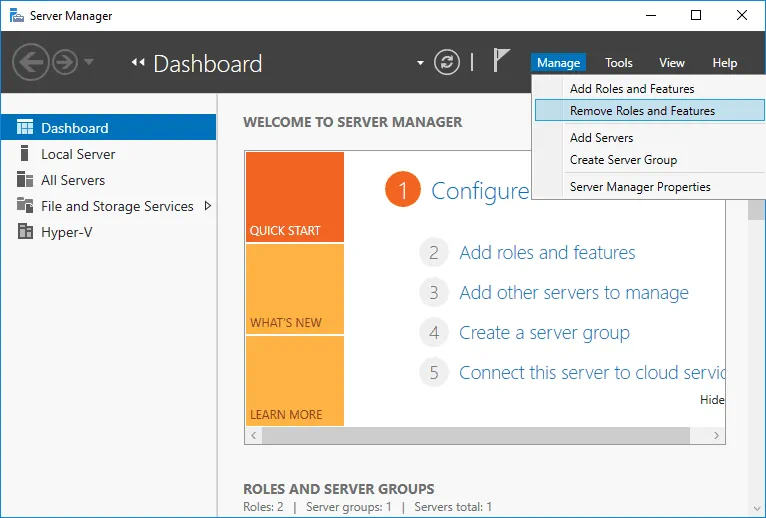
The Remove Roles and Features wizard opens.
Before You Begin. There is nothing to configure at this step, but you can select the Skip this page by default to avoid displaying this page in the future. Click Next to continue.
Server Selection. Select a server from the server pool and select your server in the list. The server name is Hyper-V-Repl.test.net in my case. Hit Next at each step of the wizard to continue.

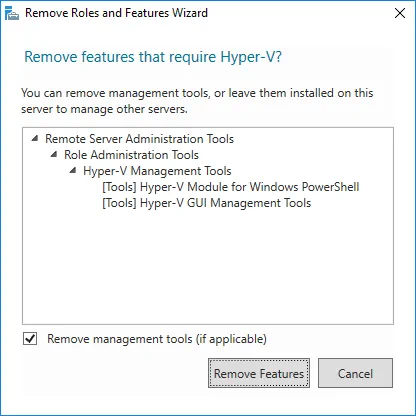
Server Roles. Deselect the Hyper-V checkbox in the list of roles to uninstall Hyper-V.

The popup window opens. Check the features that you are about to remove. Select Remove management tools (if applicable) to remove Hyper-V Manager Windows tools. Click Remove Features.
Features. There is no need to remove custom features when you uninstall Hyper-V. Leave features configuration as is.

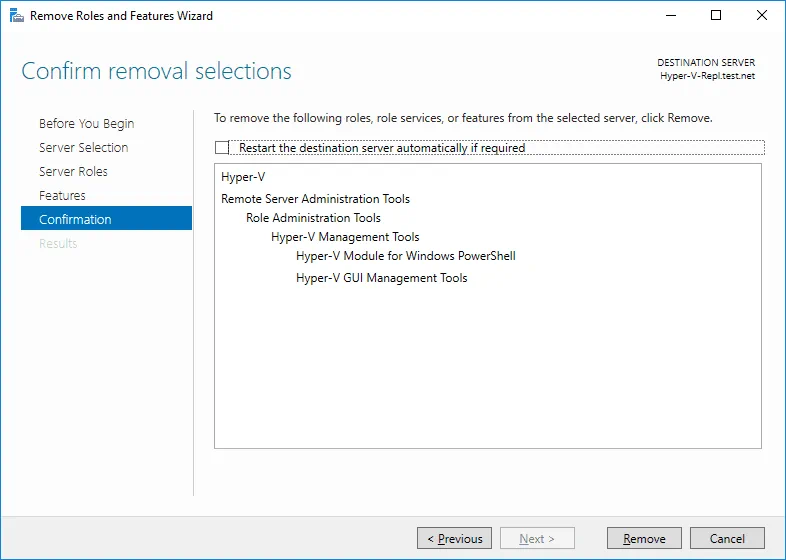
Confirmation. Check all items that are going to be removed. Select the checkbox if you want your server to restart automatically when the Hyper-V role is removed. Otherwise, you need to restart Windows manually for changes to take effect and finish Hyper-V uninstallation. Click Remove to finish and uninstall Hyper-V.
Using PowerShell
The PowerShell command to uninstall Hyper-V in Windows Server 2016 and 2019 is not the same as in Windows 10.
Open PowerShell as administrator.
Run the following command to uninstall Hyper-V on Windows Server 2016:
Remove-WindowsFeature -Name Hyper-V

Restart the server to finish the removal process.
How to Uninstall Hyper-V in Control Panel of Windows 10
Using the Control Panel to uninstall Hyper-V is the most convenient method and is preferred by most Windows 10 users. As a result, the Hyper-V feature is uninstalled completely. Let me explain the workflow step by step.
Click Start, type Control Panel, and open Control Panel. There are two alternative methods to open Control Panel. Press the Win+X combination on your keyboard, and, in the menu that opens, click Control Panel. Press Win+R. In the Run field, type appwiz.cpl and press Enter.
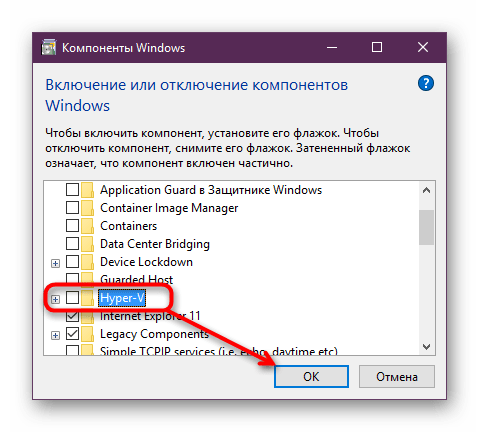
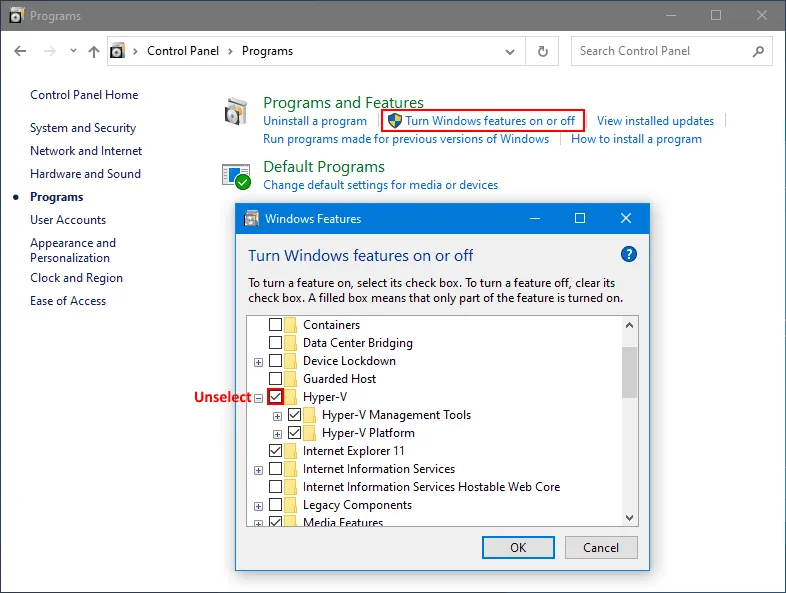
Click Turn Windows features on or off in the Control Panel window.
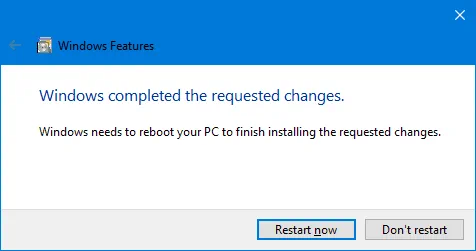
In the Windows Features window that opens, deselect the Hyper-V checkbox. Make sure that checkboxes in Hyper-V subfolders are deselected. Hit OK to save settings and start the Hyper-V uninstallation process.
Hit Restart now to restart your computer to finish the process and uninstall Hyper-V.
Issues that Can Occur
Sometimes issues may occur when you try to uninstall Hyper-V in Windows 10 and Windows Server 2016 or 2019. Let me explain some common issues and offer recommendations to help fix these issues.


Case 1
If you see a message that Windows cannot uninstall Hyper-V components, try to check system files and their storage. Different error codes are displayed, for example, 0x800F0831, 0x80073701, etc. Use command line tools to fix this issue. Open the command line (CMD) with administrative privileges and run the following commands.
Dism /Online /Cleanup-Image /RestoreHealth
Dism.exe /online /Cleanup-Image /StartComponentCleanup
sfc /scannow
Disable-WindowsOptionalFeature -Online -FeatureName Microsoft-Hyper-V-All
After executing these commands, logs are written to CBS.log and dism.log. Logs are useful for troubleshooting.
Case 2
Hyper-V is not uninstalled because a virtual network adapter or a virtual switch created by Hyper-V is present in a host Windows system. Remove virtual Hyper-V network adapters, and try to uninstall Hyper-V again. Here are some posts about Hyper-V network adapters and virtual switches from our blog.
Case 3
You disable Hyper-V but after reboot, Hyper-V is enabled again. A possible cause may be that a group policy is set to enable Hyper-V automatically on login after each boot. A system administrator should edit group policy configuration to fix this issue. Remember, that Device Guard and Credential Guard are features using Hyper-V to work in Windows. Check Computer Configuration -> Administrative Templates -> System -> Device Guard in the group policy editor to make sure that there are no settings to force run Device Guard on a Windows machine.
Как отключить Hyper-V в Windows 10
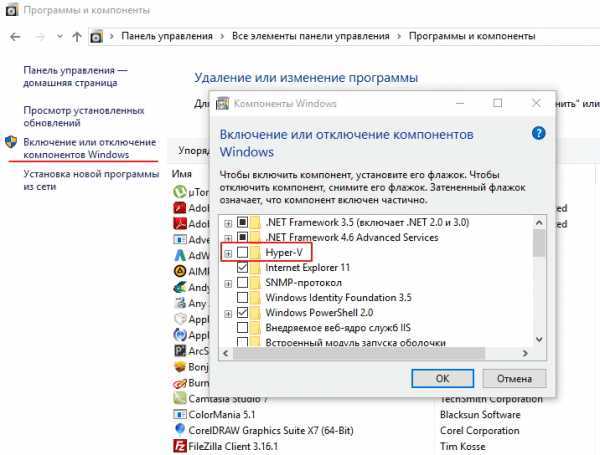
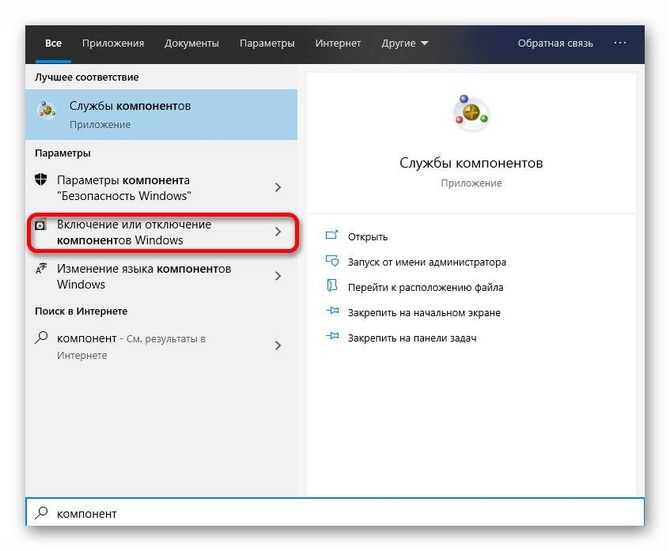
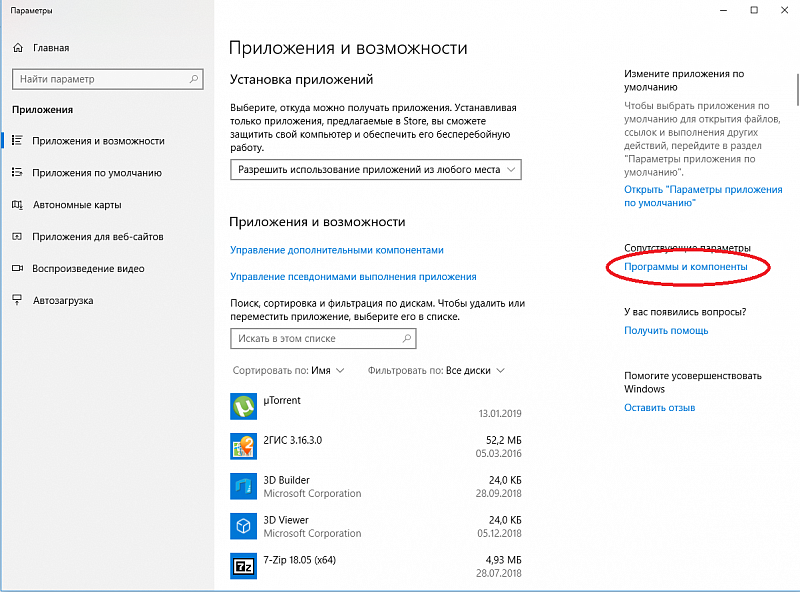
Программы и компоненты
- Выполняем команду appwiz.cpl в окне Win+R.
- В открывшемся окне программ и компонентов переходим в раздел Включение или отключение компонентов Windows.
- Дальше снимите флажок с Hyper-V, чтобы отключить его компонент и нажмите кнопку ОК.
Windows PowerShell
С помощью оболочки Windows PowerShell можно не только включать и отключать компоненты системы, а и удалять стандартные приложения Windows 10.
- Запускаем оболочку Windows PowerShell от имени администратора используя поиск Windows 10.
- В открывшемся окне выполняем команду: Disable-WindowsOptionalFeature -Online -FeatureName Microsoft-Hyper-V-All.
- После завершения процесса отключения подтверждаем перезагрузку компьютера нажав Y и кнопку Enter.
Командная строка
- Запускаем командную строку нажав Win+X и выбрав пункт Командная строка (администратор).
- Дальше выполняем команду: dism /online /disable-feature /featurename:microsoft-hyper-v-all.
- После завершения процесса отключения подтверждаем перезагрузку компьютера нажав кнопку Y.
Заключение
Выключить виртуализацию Hyper-V в Windows 10 возможность есть, поскольку по умолчанию компонент Hyper-V отключен и виртуализация не используется. А также возможность одновременно использовать несколько виртуальных машин нужна далеко не многим пользователям. Поэтому мы рассмотрели как отключить службу управления виртуальными машинами, потом уже и сам компонент Hyper-V.
Как проверить виртуализацию в Windows 10
Чтобы проверить включена ли виртуализация в системе или нет, достаточно воспользоваться встроенными утилитами msinfo32.exe или systeminfo.exe, которые мы уже подробно обсуждали в упомянутой выше статье о включении движка виртуализации. Разница между ними только в том, что первая – графическая, а вторая – консольная.
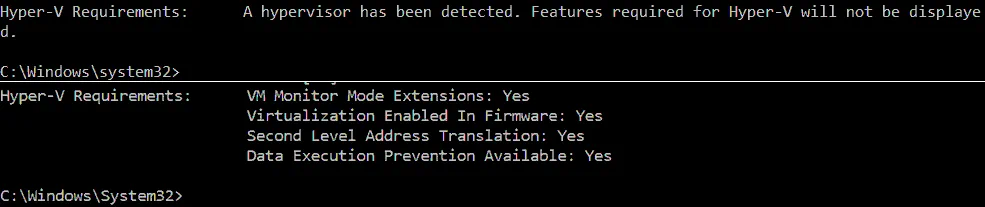
Возьмем, для примера, вывода systeminfo в командной строке(cmd) :
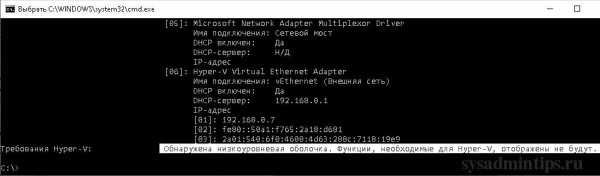
Если внизу экрана в требованиях вы увидите фразу “Обнаружена низкоуровневая оболочка. Функции, необходимые для Hyper-V, отображены не будут“, то это означает, что виртуализация Hyper-V включена.
Если виртализация отключена совсем, вы просто увидите список технологий, необходимых для работы Hyper-V, и информацию о том, присутствуют ли они в системе. В этом случае ничего больше делать не нужно.
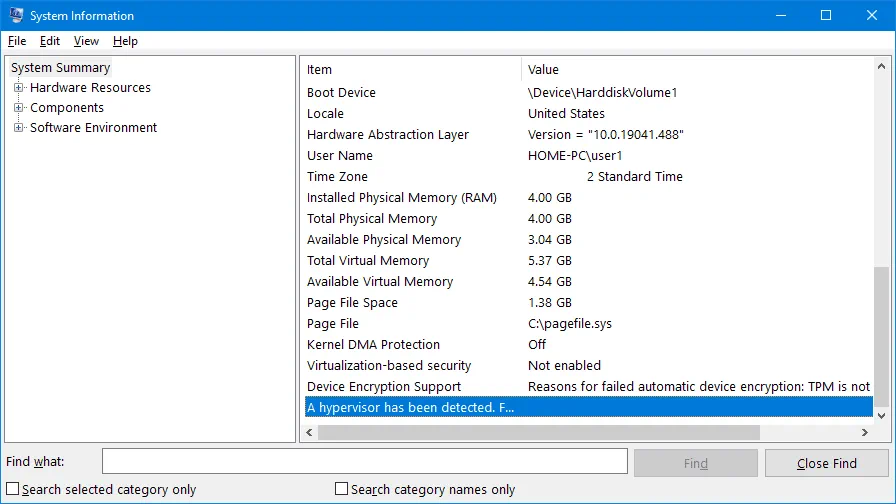
Пример в msinfo32:

Это самый несложный и быстрый способ проверки.
Для чего это нужно?
Hyper-V является версией гипервизора от Microsoft. Работает этот компонент виртуализации непосредственно на оборудовании. С его помощью выполняется запуск виртуальных машин в системе х86-64. Гипервизор установлен во всех 64-битных вариантах Виндовс 10 (кроме версии Win 10 Home).
Hyper-V применяется:
- для создания нескольких виртуальных машин на одном физическом сервере;
- в качестве безопасной платформы для тестирования ПО.
Гипервизор позволяет создать на компьютере пользователя эмуляторы ПК. Эти виртуальные машины используют часть ресурсов устройства. На эмуляторы можно установить изолированный Виндовс и использовать платформу для тестирования компьютерных разработок.
Иногда требуется отключить гипервизор. Причиной деактивации этого компонента может стать внутрисистемная проблема. Например, некоторые сторонние приложения виртуализации не хотят работать совместно с Hyper-V. К таким конфликтным программам относятся: VMWare Workstation и VirtualBox. При включенном Hyper-V другие приложения нередко переходят в низкоскоростной режим эмуляции и даже не запускают виртуальные машины. Конфликт возникает именно при активации низкоуровневой оболочки Гипер-В.
Вызвать проблемы в работе приложений виртуализации могут службы безопасности Виндовса (например, Device Guard и Credential Guard), которые также рекомендуется деактивировать. Прежде чем отключать Гипер-В, нужно проверить его наличие и включение. Ведь в режиме «по умолчанию» в лицензионных сборках гипервизор должен быть отключен.
Как найти Hyper-V:
- активировать «Поиск»;
- в поисковой строке написать: msinfo32.exe;
- откроется окно «System Information»;
- активировать «System Summary»;
- отыскать фразу «A hypervisor has been detected. Features required…» («Обнаружен гипервизор. Компоненты…не отображаются…»).
Найденный Hyper-V можно отключить, если он мешает работе других приложений виртуализации. Оборудование ПК функционирует без сбоев при каком-то одном активированном гипервизоре.
Важно! Гипервизор является встроенным компонентом 64-разрядных версий Виндовса. Отключать или включать его можно через служебные программы или используя возможности самой системы
How to Uninstall Hyper-V in the Command Prompt of Windows 10
You can uninstall Hyper-V in the command line interface (CLI). At the end of this workflow you get the same result as for the method explained in the previous section when using the graphical user interface (GUI). Check the Hyper-V installation status in the command line before you start to uninstall Hyper-V and after you uninstall Hyper-V to make sure that this hypervisor is removed from your Windows system.

Open the command line (CMD) as administrator. Open the Windows Start menu, type cmd, right click the cmd entry, and click Run as administrator.
Run systeminfo to check whether Hyper-V is installed.
If Hyper-V is not installed, you can see in the Hyper-V requirements section the names of technologies required to install Hyper-V and the status of their availability on the machine.
If Hyper-V is installed, you should see the following message in the Hyper-V Requirements line:
A hypervisor has been detected. Features required for Hyper-V will not be displayed.
As an alternative, you can run msinfo32.exe to check whether Hyper-V is uninstalled in the GUI. The needed information is located in the System Summary section in the bottom of the item list.
Now it is time to uninstall Hyper-V in Windows 10 by using the command line. You should open PowerShell with administrative privileges (type PowerShell in the Start menu, right click PowerShell and click Run as administrator just as you do to run CMD). Run the following command to remove the Hyper-V feature from Windows 10:
Disable-WindowsOptionalFeature -Online -FeatureName Microsoft-Hyper-V-All

Do you want to restart the computer to complete this operation now?
Type Y and hit Enter.
Restart is required after executing this command. You can type N (No) and restart Windows manually.