
Введение
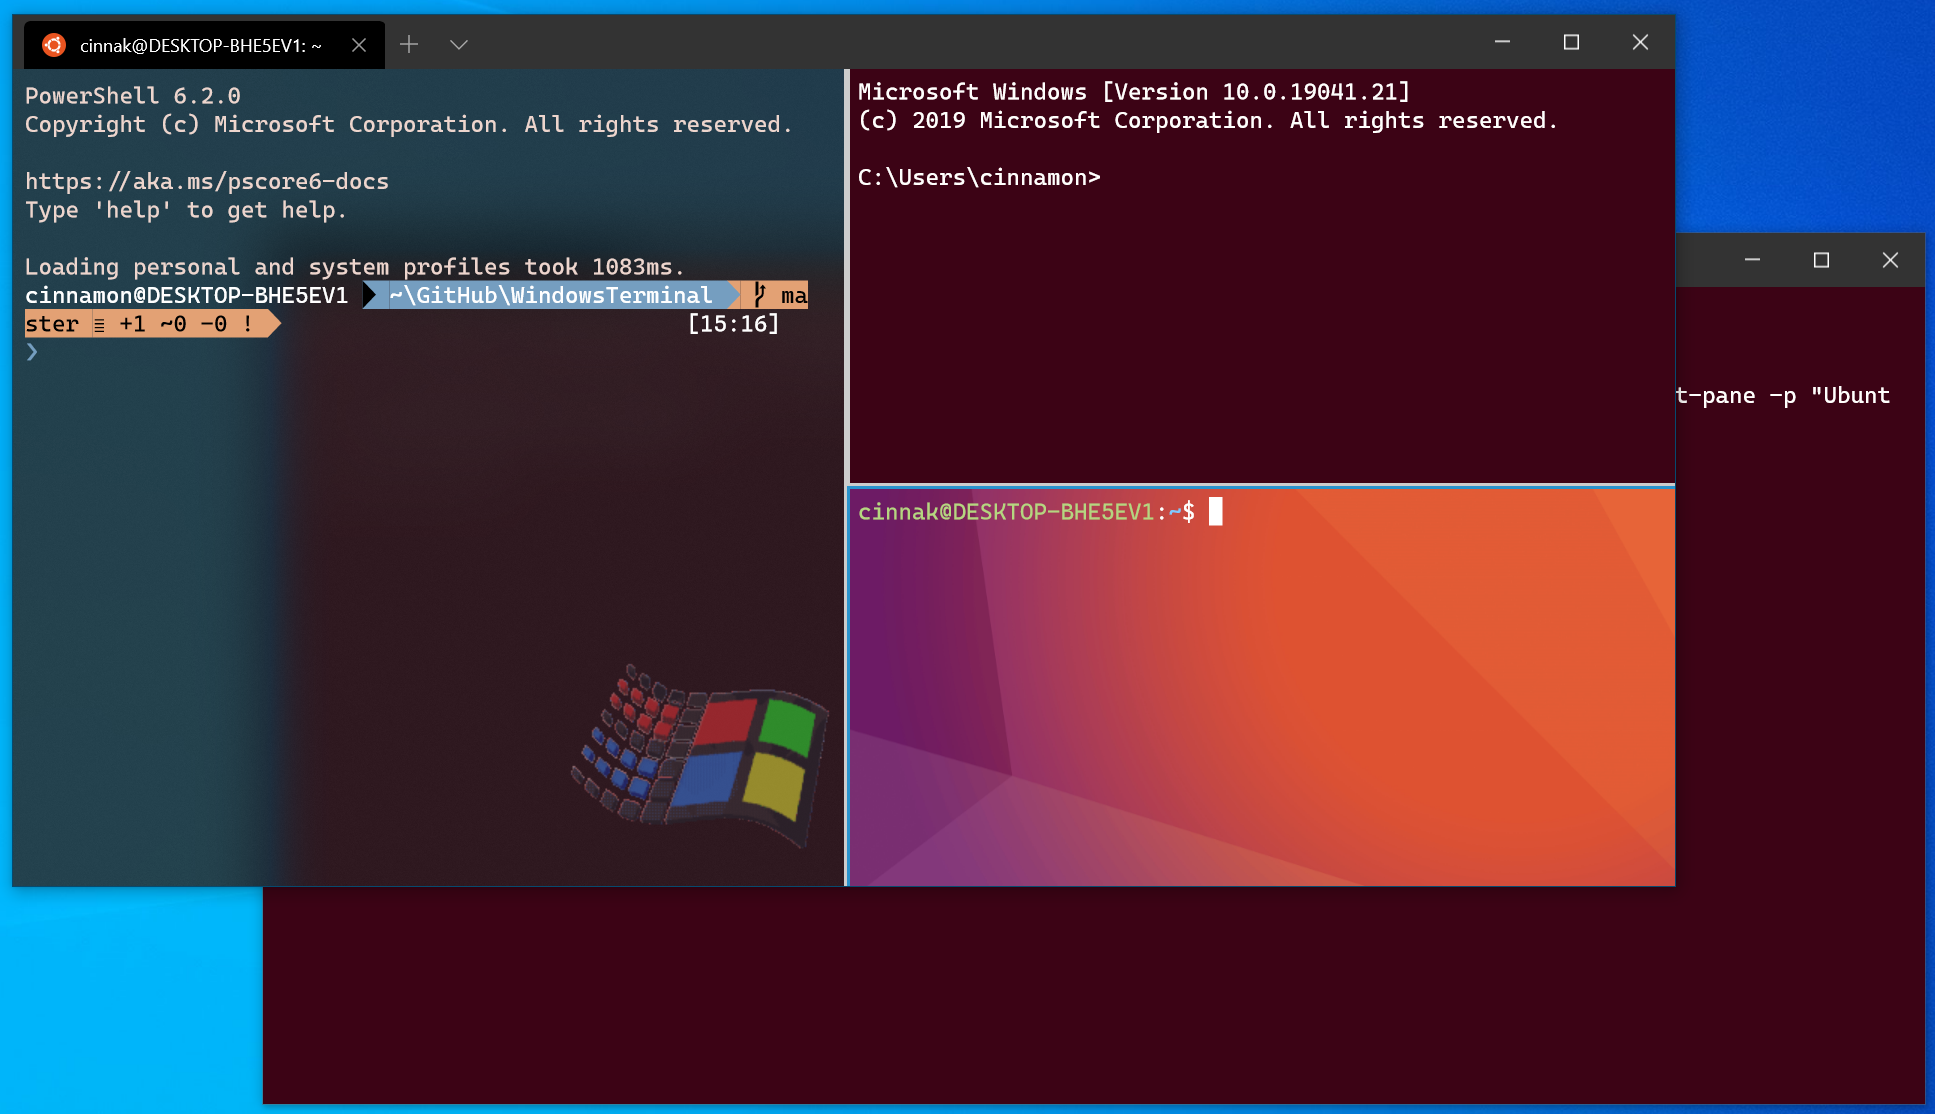
Как на домашнем, так и на рабочем ноутбуке, единственная ОС сейчас у меня Windows 10, и в этом году я окончательно перешёл на использование только WSL вместо VM / dualboot / Cygwin / MinGW. Теперь мой терминал по умолчанию — это локальный шелл WSL, где я могу запускать практически любые задачи, как в нативном Linux. Кроме этого, в домашней сети работает мини-сервер Intel NUC, на котором развёрнут Proxmox с LXC контейнерами и KVM, в котором крутится Docker. На все VM хожу по SSH, с ключами из директории Windows. Очень много времени в профессиональной деятельности проходит в CLI, с домашним сервером и сетью тоже самое. Поэтому всегда возникает желание разобраться с инструментами для более комфортной работы в терминале, а в Windows всегда с этим были проблемы. Но сейчас всё меняется.
Эта и последующие статьи больше ориентированы на энтузиастов, которые ищут свежие решения и желают прокачать свой шелл. Но и новичкам должно быть что-то интересно, хотя статья получилась с достаточно глубоким погружением в тему и предполагает, что у читателя есть какие-то фундаментальные знания в Linux. Вся информация собрана на основе личного опыта использования WSL, терминала, а так же бесконечного листания Stack Overflow и Github issues в процессе постоянного усовершенствования конфигов и поиска удобных тулов для работы.
7 способов открыть терминал Windows в Windows 11

Терминал Windows был выпущен в 2019 году и объединяет PowerShell, Azure Cloud Shell и командную строку в одном приложении. Есть несколько способов открыть приложение, и в этом руководстве я покажу несколько способов открыть Windows Terminal в системах Windows 11. Вы можете попробовать эти методы и использовать тот, который вам кажется самым простым, для открытия приложения.
Откройте терминал Windows Windows 11
Есть несколько способов сделать это, и вы можете выбрать любой из них, который вам кажется наиболее удобным. Попробуйте все эти методы и расскажите нам о своем любимом.
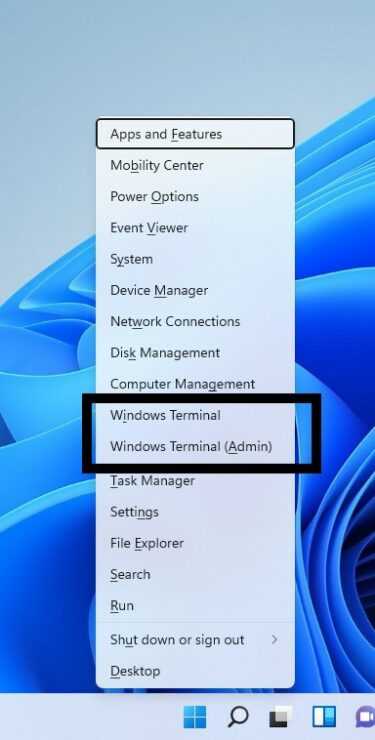
Способ 1: меню WinX
Шаг 1: щелкните правой кнопкой мыши значок Windows на панели задач, чтобы открыть меню WinX (сочетания клавиш: Win + X).
Шаг 2: Нажмите «Терминал Windows » или «Терминал Windows (администратор) », если вам нужны повышенные права.
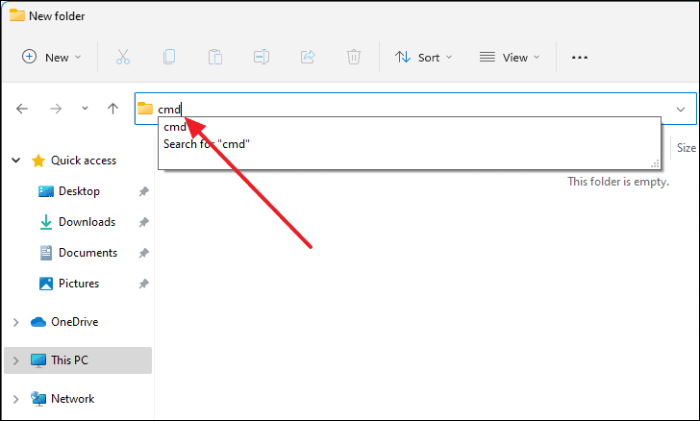
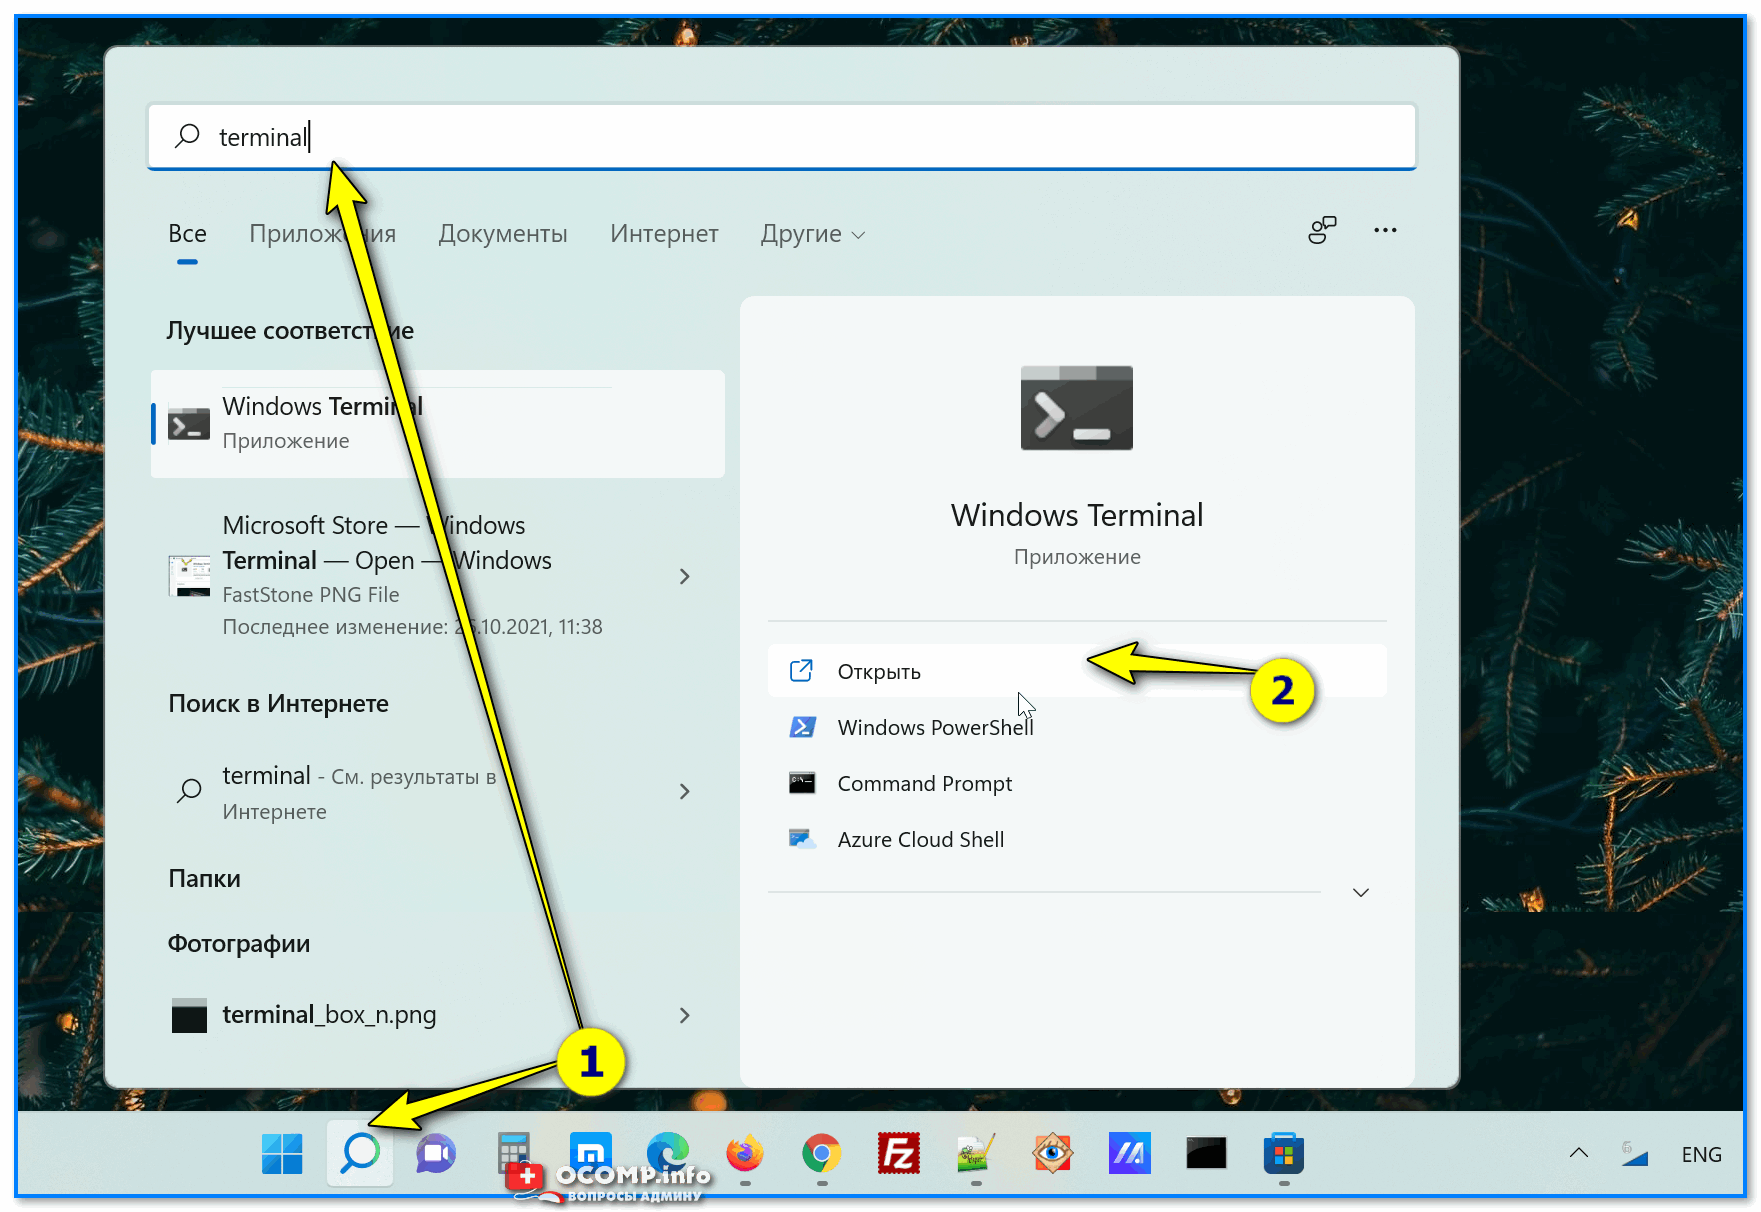
Способ 2: откройте терминал Windows в Windows 11 с помощью поиска
- Щелкните значок поиска на панели задач.
- Введите Терминал Windows и нажмите Открыть.
ДОПОЛНИТЕЛЬНЫЙ Совет: щелкните правой кнопкой мыши результат поиска в терминале Windows и выберите « Запуск от имени администратора», чтобы получить повышенные привилегии.
Способ 3: меню «Пуск»
Шаг 1: Щелкните значок Windows на панели задач или используйте клавишу Windows на клавиатуре, чтобы открыть меню «Пуск».
Шаг 2: выберите « Все приложения».
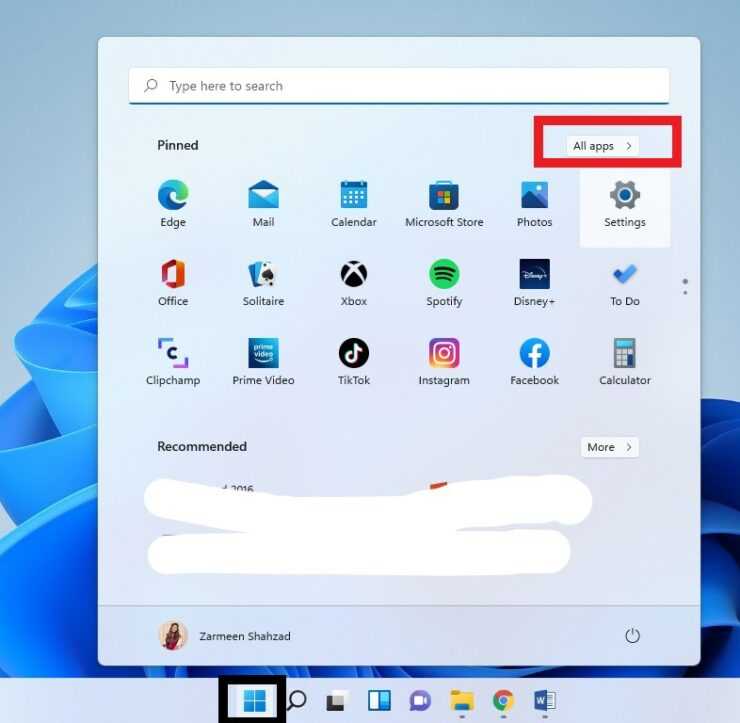
Шаг 3. Прокрутите вниз, пока не дойдете до приложений «W» и не найдите Windows Terminal. Нажмите на нее, чтобы открыть приложение.

ДОПОЛНИТЕЛЬНЫЙ совет: если вы хотите, чтобы приложение имело права администратора, щелкните правой кнопкой мыши параметр Windows Terminal, выберите « Дополнительно» и выберите « Запуск от имени администратора».

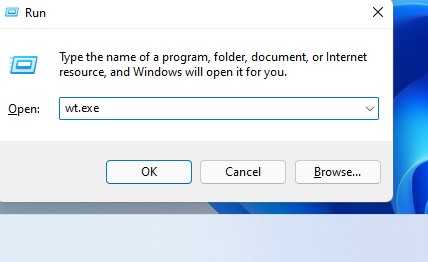
- Используйте сочетания клавиш Win + R, чтобы открыть окно «Выполнить».
- Введите wt.exe и нажмите Enter.
Способ 5: ярлык на рабочем столе

Шаг 2: Введите следующее в текстовое поле « Введите местоположение элемента »:

Шаг 4: Введите Терминал Windows в текстовое поле Введите имя для этого ярлыка.
Шаг 5: Выберите «Готово».

Способ 6: закрепить на панели задач
- Щелкните значок поиска и введите Терминал Windows.
- Щелкните правой кнопкой мыши параметр « Терминал Windows » и выберите « Закрепить на панели задач ».
- Приложение Windows Terminal теперь будет доступно на панели задач, и вы можете щелкнуть по нему, чтобы открыть его в любое время.
Способ 7: приложение для запуска
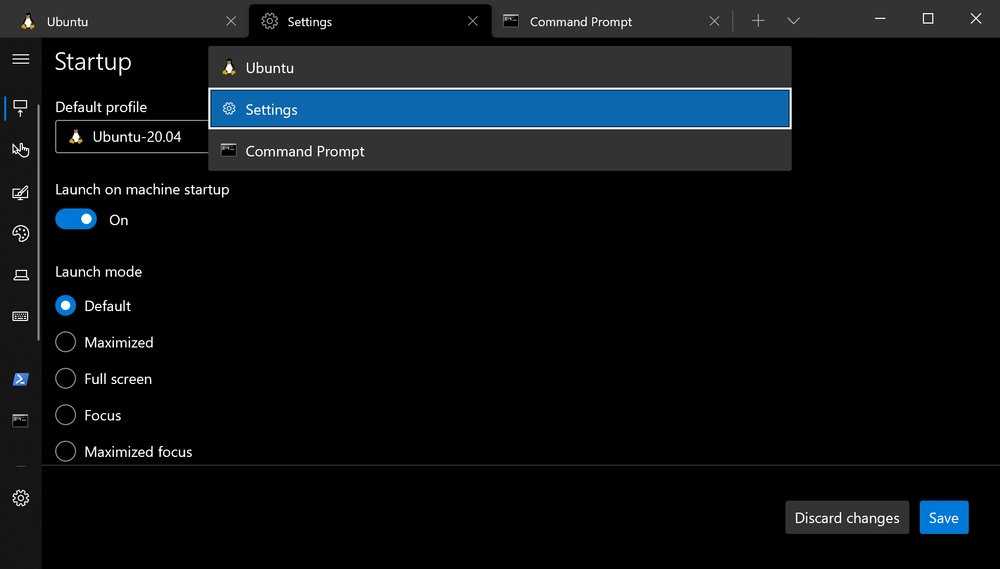
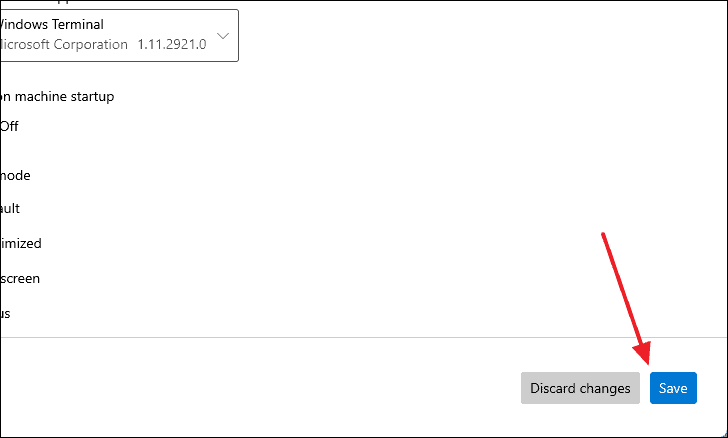
Если вы регулярно получаете доступ к терминалу Windows, вы можете настроить его так, чтобы всякий раз, когда вы запускаете компьютер с Windows 11, терминал Windows открывался автоматически. Для этого выполните следующие действия:
Шаг 1: Откройте приложение Windows Terminal. (Используйте любой из вышеперечисленных способов).
Шаг 3: Включите тумблер рядом с Запускать при запуске компьютера.
Шаг 4: Нажмите Сохранить.
Шаг 5: Закройте приложение.
Теперь при каждом запуске компьютера будет запускаться Windows Terminal. Если вы хотите отключить этот параметр, выполните все шаги седьмого метода и переведите тумблер рядом с пунктом «Запуск при запуске компьютера» в положение «Выкл.».
Rescue Your Lost or Deleted Data on Windows
In this part, we will introduce a professional data recovery software that can help you recover data from all kinds of data storage devices on Windows. It is MiniTool Power Data Recovery.
This software can work under different situations. For example, if you permanently delete some files, you can use this software to recover them. If the data drive is inaccessible, you can also use this software to scan that drive and recover data. After that, you can fix the inaccessible drive. Even if your Windows is unbootable, you can use the bootable edition of this software to recover your data.
You can first try the trial edition to see if it can find your needed files.
Summary
Windows Terminal is definitely pretty cool, and I’ve enjoyed using it so far. It feels snappy and quick, and although I’m not much of a customizer, I plan on trying to make some pretty cool looking profiles. I also recently saw something on Twitter where the Windows Terminal team is working on a graphical interface to configuring the settings instead of working in JSON (citation needed, I can’t find the tweet now!). I’m making a guess that it will be similar to VS Code as that tool also started out with customizations occurring in JSON.
Windows Terminal is also open-sourced, so everyone can contribute if you have a feature idea. You can check out their GitHub page here for more information.
Questions or comments? If so, drop me a note below or find me on or LinkedIn to discuss further.
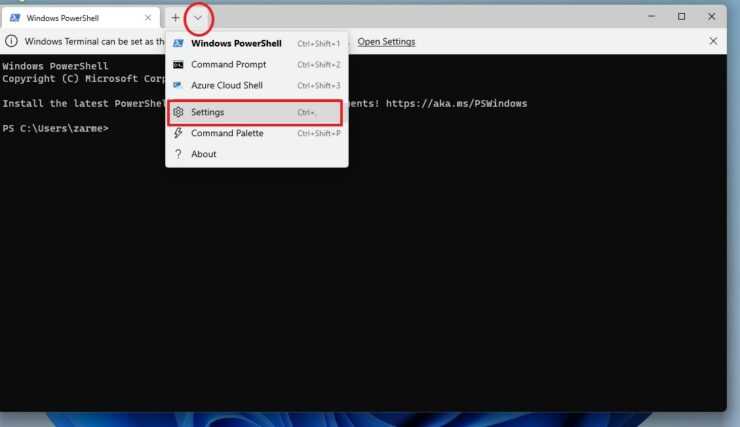
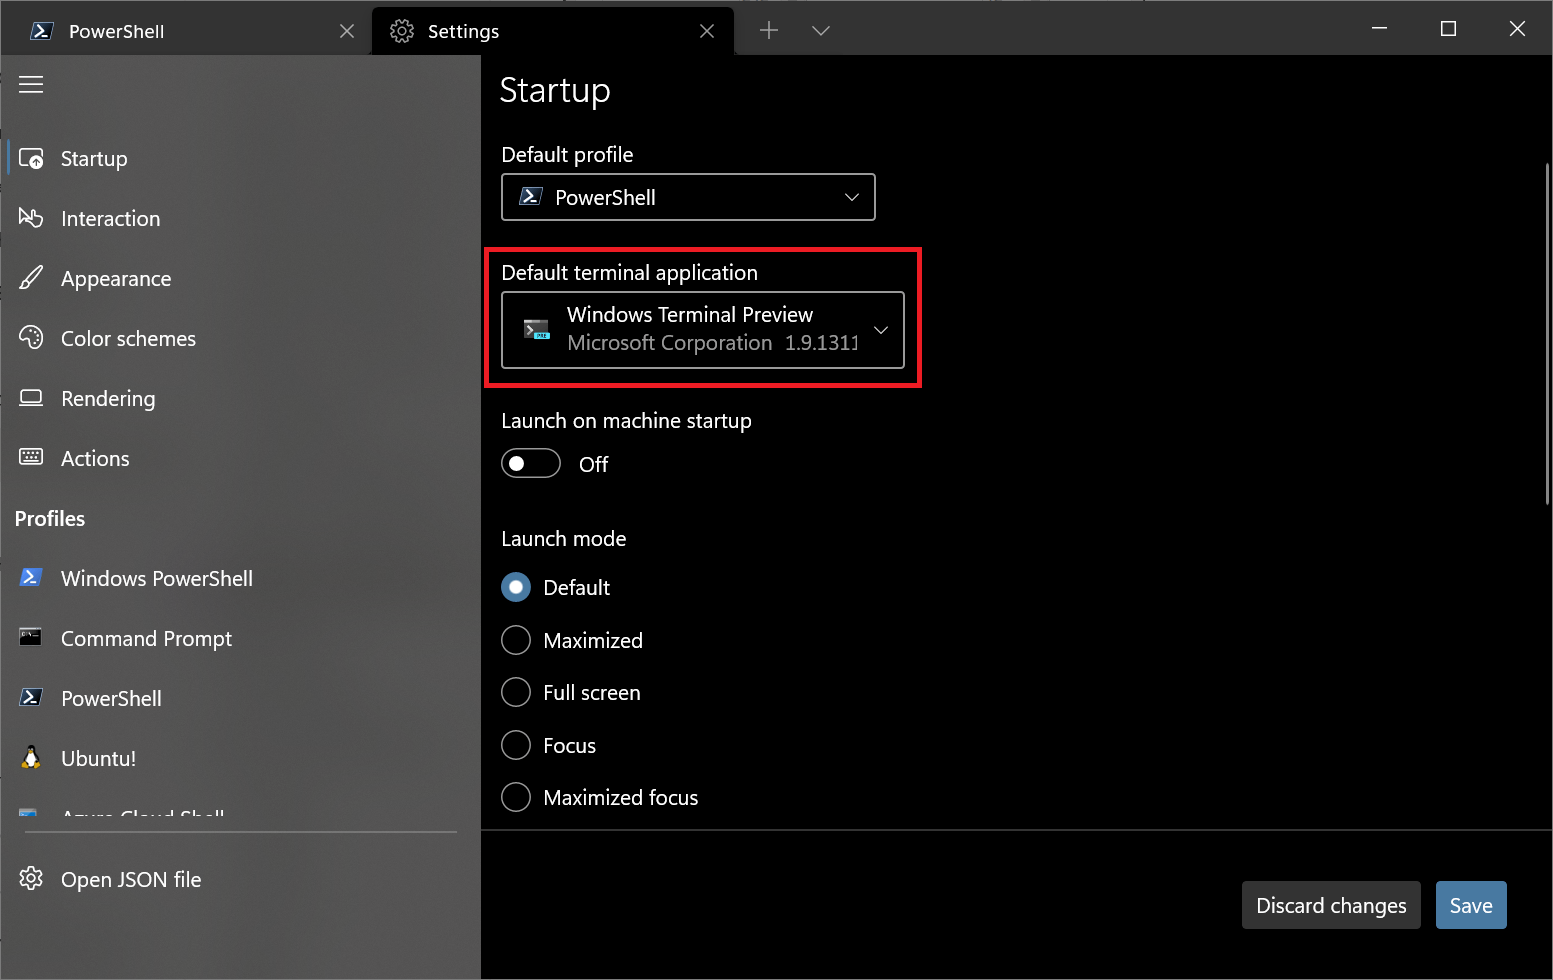
Настройки
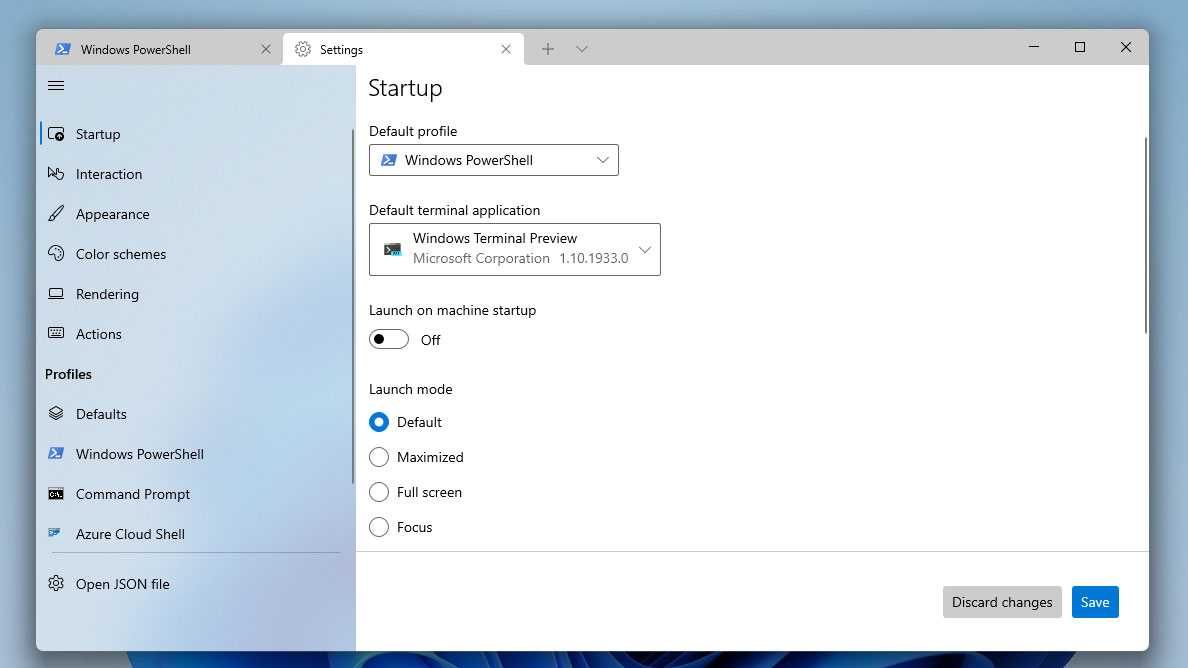
Вы можете получить доступ к настройкам Windows Terminal, нажав на кнопку со стрелкой или воспользовавшись сочетанием клавиш на клавиатуре Ctrl + «запятая». Опции меняются от версии к версии, и на момент написания обзора они выглядят следующим образом
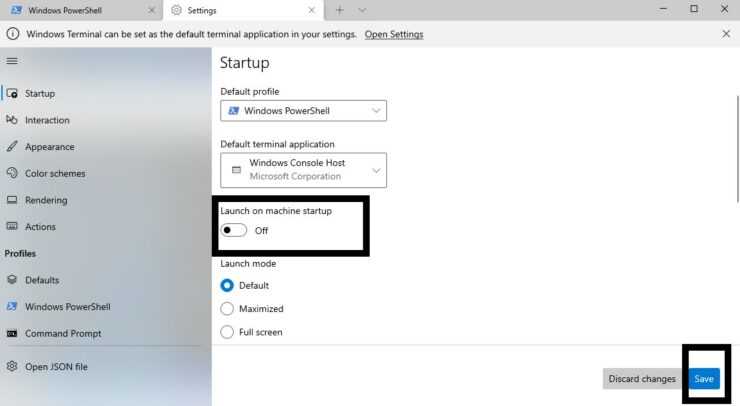
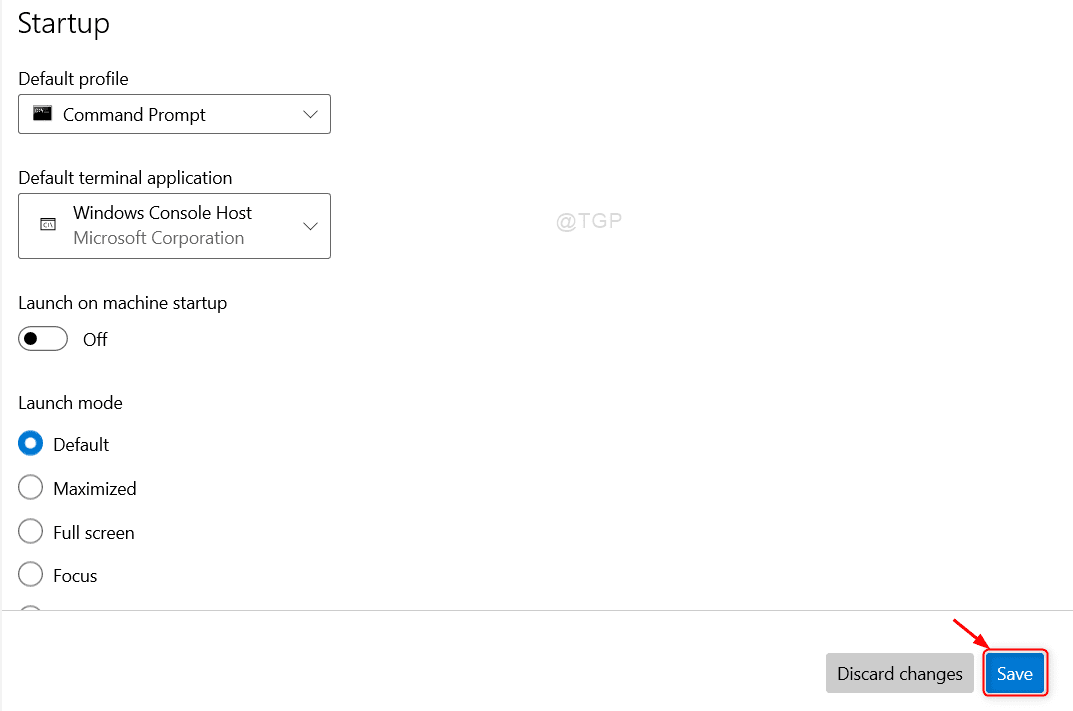
- На вкладке «Запуск» вы можете выбрать оболочку по умолчанию, e.g. выберите «Командная строка» вместо «Windows PowerShell», включите автозапуск, измените режим запуска.
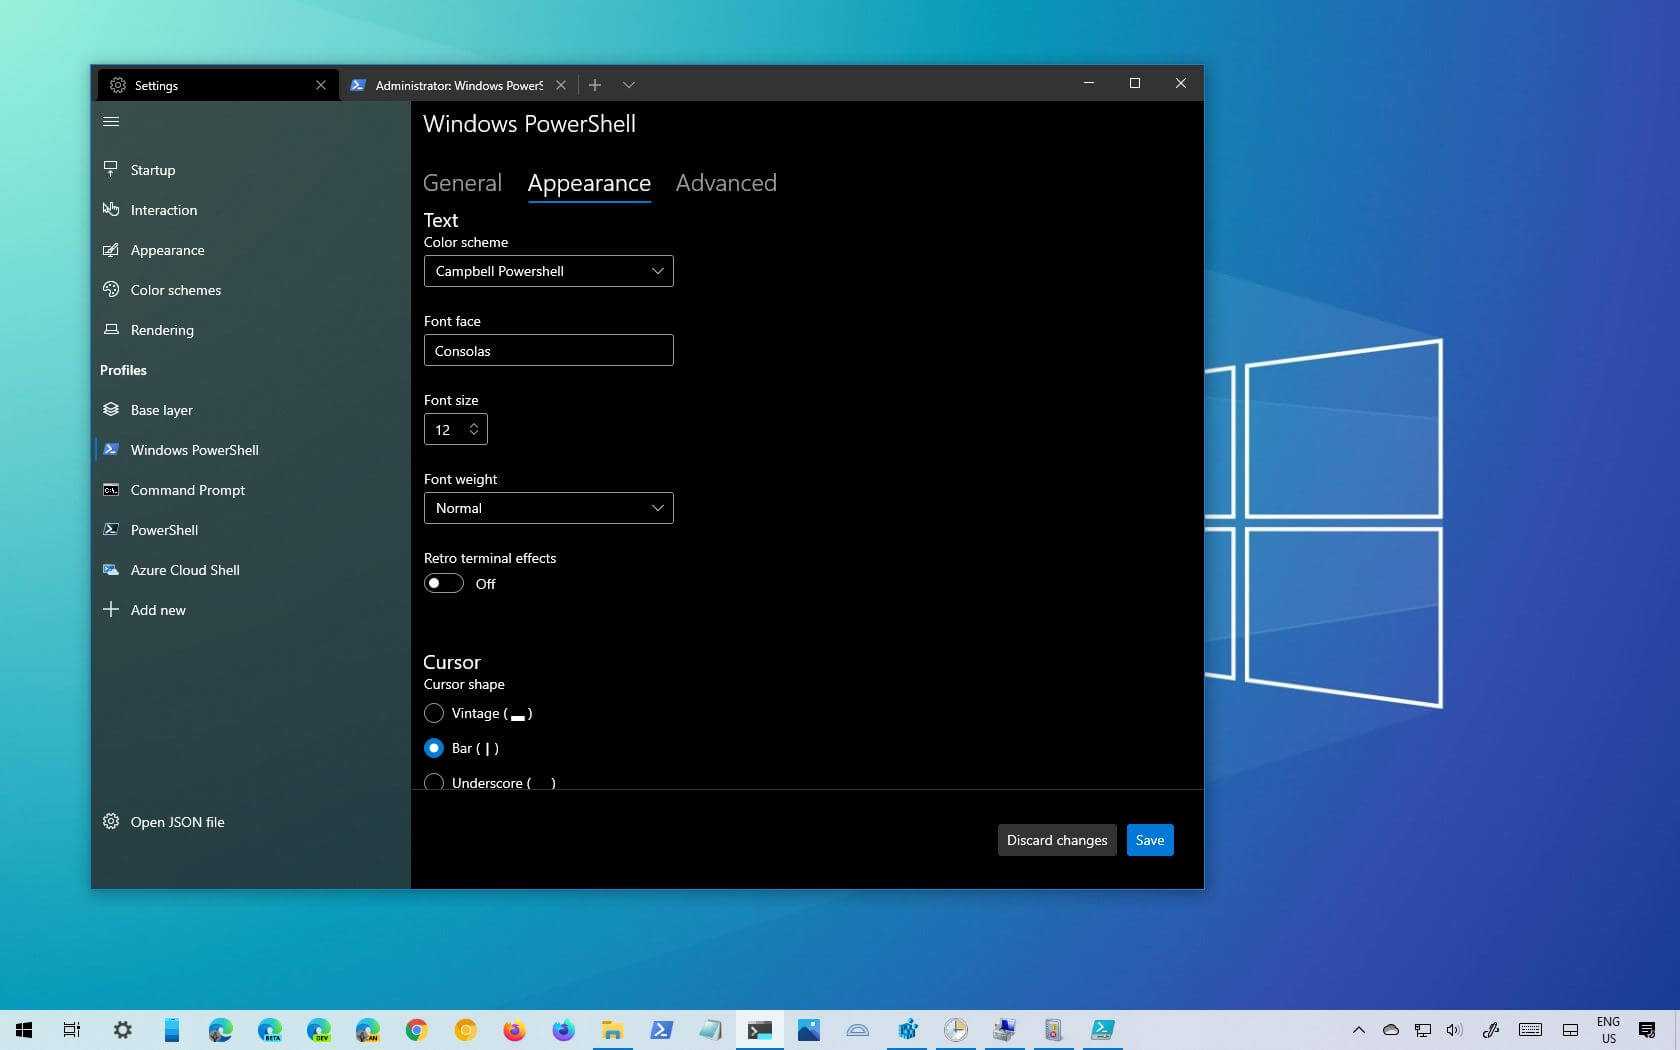
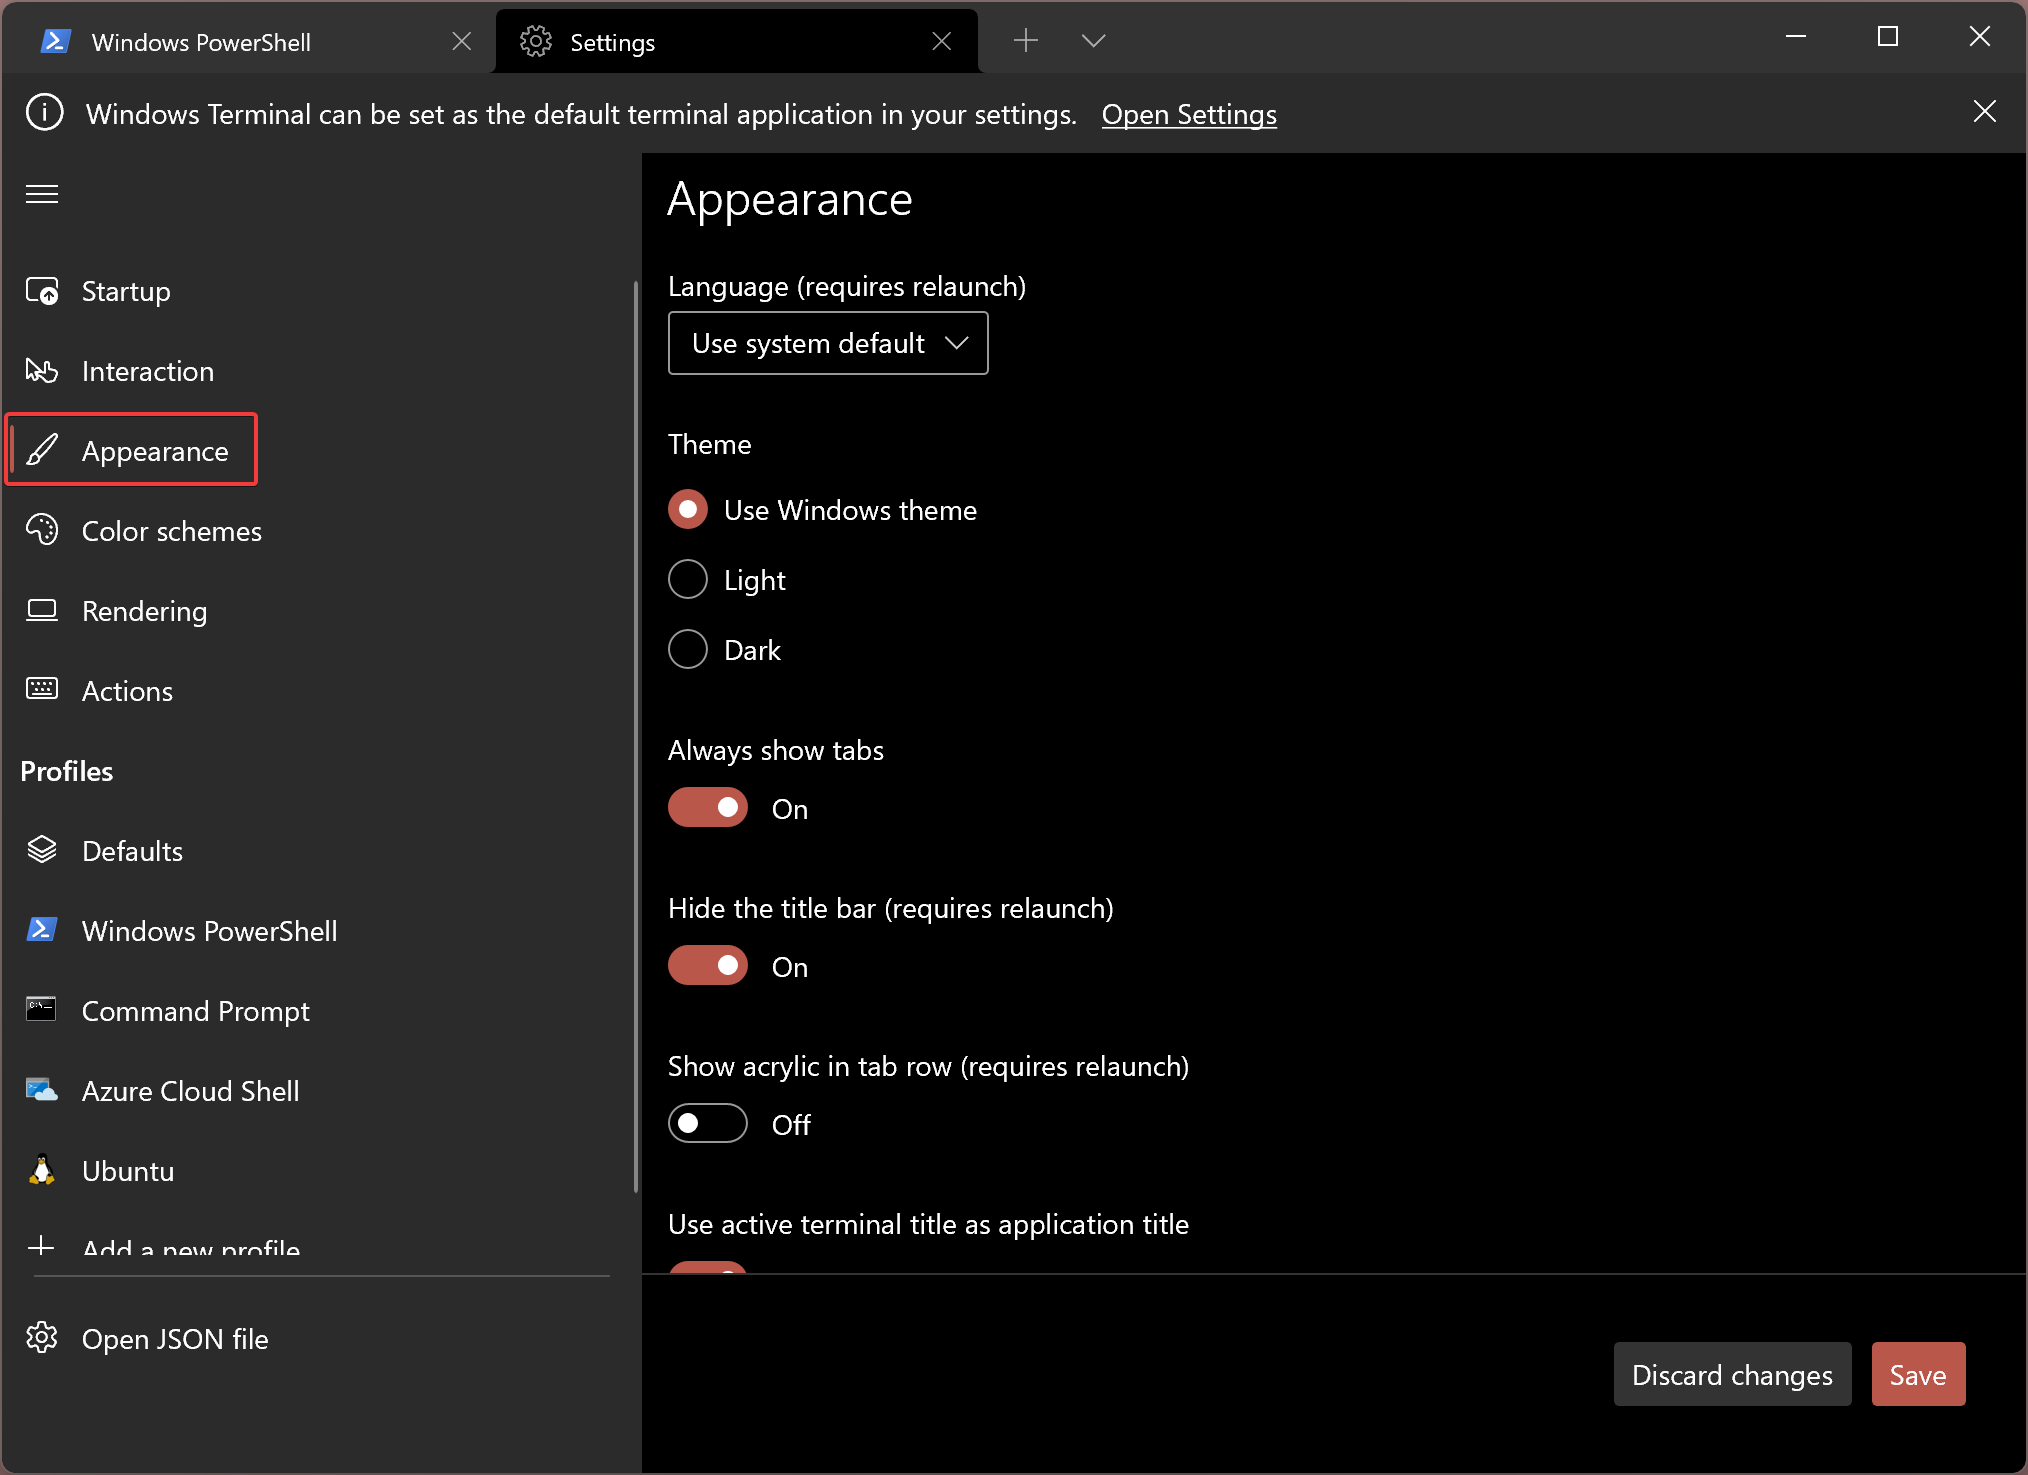
- Вкладки «Внешний вид» и «Цветовые схемы» позволяют изменить общий вид приложения, а также отредактировать цветовые схемы (их можно задать отдельно для каждой консоли в разделе «Профили») и, при необходимости, создать собственную цветовую схему.
- В разделе «Действия» — основные сочетания клавиш для работы в Windows Terminal. Эти комбинации можно отредактировать в файле конфигурации.
- Если перейти в подраздел «Профили», то для каждой «командной строки» мы можем настроить индивидуальные параметры оформления, пусковой установки, иконки, папки пусковой установки, прозрачности и др. Во внешнем виде вы можете не только выбрать цветовую схему и настроить прозрачность (акриловый эффект), но и установить обои для вкладок.
- Настройки достаточно гибкие, и скриншот ниже — это далеко не все, чего можно добиться.
- При нажатии кнопки «Добавить» можно добавить собственную консоль в Windows Terminal (или использовать системную — тот же PowerShell или Command Line, но с другим профилем конфигурации).
- кнопка «Открыть JSON-файл» позволяет открыть файл конфигурации для редактирования.
Если вам нужно сбросить все настройки терминала Windows к значениям по умолчанию после экспериментов с настройками, просто выполните следующие действия:
- Запустите Windows Terminal и зайдите в его опции.
- Нажмите «Открыть JSON файл» и откройте его в текстовом редакторе.
- Удалите все содержимое файла и сохраните файл.
- Закройте и запустите Windows Terminal снова — он запустится с настройками по умолчанию.
Использование горячих клавиш
Чтобы сменить пользователя в Windows 11 при помощи горячих клавиш, выполните следующие шаги:
- Нажмите клавишу “Win” + “L” на клавиатуре, чтобы заблокировать текущую учетную запись и открыть экран блокировки.
- На экране блокировки нажмите на значок смены пользователя в правом нижнем углу экрана.
- В открывшемся окне выберите нужную учетную запись.
- Введите пароль, если учетная запись защищена паролем.
- Нажмите “Вход” или клавишу “Enter”, чтобы войти в выбранную учетную запись.
- После входа в новую учетную запись рабочий стол и приложения будут отображаться для этой учетной записи.
Обратите внимание, что для использования этого способа смены пользователя в Windows 11, вам нужно будет иметь несколько аккаунтов на компьютере и знать их пароли, если они установлены
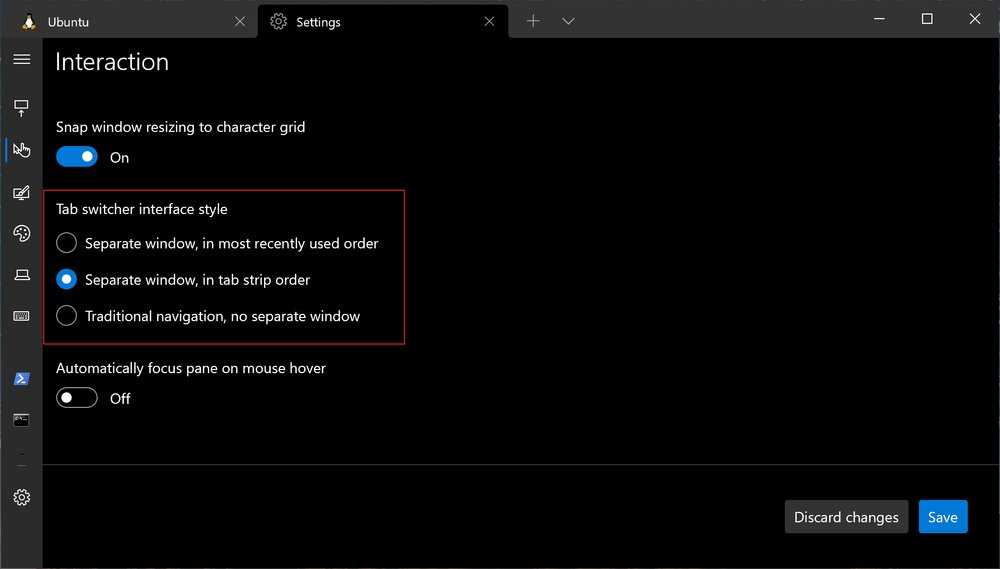
Customising the tab switcher
From v1.5, the Windows terminal tab switcher displays currently open tabs in
a vertical list, navigable with the keyboard or mouse. This feature had to be
activated in earlier versions by setting the property (now
deprecated) to .
Tab switcher mode enabled in Windows Terminal v1.5 and later
You can opt out of the tab switcher experience by setting to
or . When the tab switcher is disabled, pressing ctrl +
tab or ctrl + shift + tab will switch tabs in a similar manner
to most web browsers. If you want to control the order of the tabs in the tab
switcher, you can set to or which will list
the tabs either in most recently used order or in order of their layout in the
terminal.


settings.json
You can also search your open tabs with the command but you have to
create a binding for it first. This is useful if you usually have several tabs
open at same time.
settings.json
Customizing Profiles
The next section in our settings is where the profiles are stored. In here there are two sections: defaults and a list of our profiles. The defaults section allow configuring settings that will apply to each shell profile, allowing for a consistent experience across multiple environments. For example, let’s say I want all my profiles to use the new Cascadia Code font developed by the Windows Terminal and set the font size to 14. Under defaults I’ll add values for fontFace and fontSize:

Other options include configuring the cursor and appearance options like backgrounds, color schemes, and starting directory. For more information on available configuration options, .
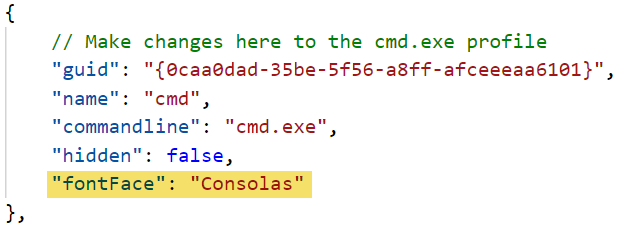
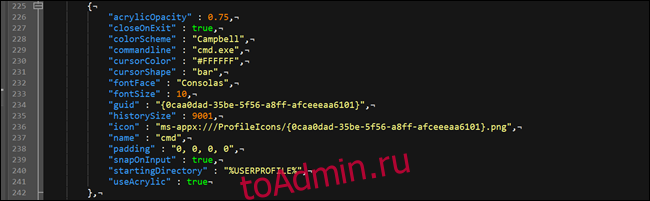
Next is the profiles section, and I feel this is where the real power with Windows Terminal lies. As I mentioned earlier in the post, Windows Terminal can accommodate multiple shell types all in the same window. While I have set the default font type and size for all profiles earlier, I can overwrite this by configuring the same option within the specific profile. For example, I want a more classic look for my Command Line/cmd profile, so I will add fontFace to that profile and set it to Consolas:
Let’s take a look at the Windows PowerShell profile and some of the components that go into making one:

First is the unique identifier or GUID. This doesn’t need to be anything special, and if you want to generate a GUID, use the PowerShell command New-Guid. Next is the name of the profile, this appears in the tab when the profile is opened. This is followed by the commandline setting, which determines what shell or executable is opened when the profile is launched. This could be PowerShell, cmd, Windows Subsystem for Linux (WSL) or any other shell you can install. Take a look at my previous article where I added one for the release candidate version of PowerShell 7:
Here are some additional blogs that outline adding different types of shells:
The default and custom profiles have quite a few settings to make each unique, such as assigning a color scheme, setting the background to an image or gif, or setting the icon for its tab.
Использование функции “Быстрый доступ” на экране блокировки
Для смены пользователя в Windows 11 с помощью функции “Быстрый доступ” на экране блокировки необходимо выполнить следующие шаги:
- На экране блокировки нажмите на значок “Быстрый доступ” в правом нижнем углу экрана.
- В открывшемся меню выберите учетную запись, на которую вы хотите переключиться. Если учетная запись не отображается, нажмите на ссылку “Другой пользователь” и введите логин и пароль для входа в систему.
- Нажмите на кнопку “Войти” или нажмите клавишу “Enter” на клавиатуре, чтобы войти в выбранную учетную запись.
- Если ваша учетная запись защищена паролем, введите пароль для входа в систему и нажмите на кнопку “Войти” или клавишу “Enter” на клавиатуре.
- После успешного входа в систему, вы попадете на рабочий стол новой учетной записи.
- Чтобы вернуться на экран блокировки, нажмите на значок “Пуск” в левом нижнем углу экрана, затем на значок своей учетной записи и выберите пункт “Выход”.
Использование функции “Быстрый доступ” на экране блокировки позволяет быстро и удобно переключаться между учетными записями, не заходя в систему под своей учетной записью.
Шаг 1. Выбор оборудования и подготовка сервера к работе
Выбор оборудования
Выбирая оборудование для данного типа серверов, необходимо опираться на требования приложений, которые будут запускаться пользователями и количество последних. Например, если устанавливается терминальный сервер для программы 1С, а количество одновременно работающих сотрудников равно 20, получим следующие характеристики (приблизительно):
- Процессор от Xeon E5.
- Памяти не менее 28 Гб (по 1 Гб на каждого пользователя + 4 для операционной системы + 4 запас — это чуть меньше 20%).
- Дисковую систему лучше построить на базе дисков SAS. Объем необходимо учесть индивидуально, так как это зависит от характера задач и методов их решения.
Также предлагаю для чтения статью Как выбрать сервер.
Подготовка сервера
Прежде чем начать установку операционной системы выполните следующее:
- Настройте отказоустойчивый RAID-массив (уровни 1, 5, 6 или 10, а также их комбинации). Данная настройка выполняется во встроенной утилите контроллера. Для ее запуска следуйте подсказкам на экране во время загрузки сервера.
- Подключите сервер к источнику бесперебойного питания (ИБП). Проверьте, что он работает. Отключите подачу питания на ИБП и убедитесь, что сервер продолжает работать.
Установка и запуск Windows Terminal
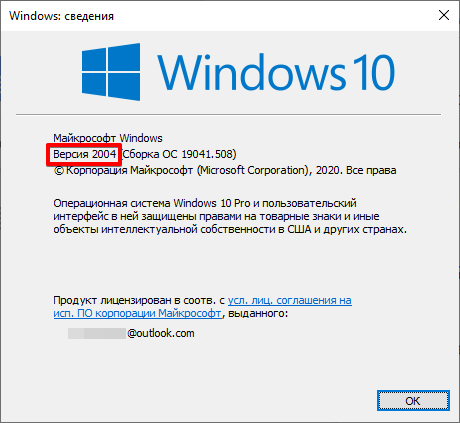
Перед установкой нового терминала нужно проверить версию операционной системы, так как новый терминал поддерживается только в Windows 10 версии не ниже 1903 (соответствующее обновление вышло в мае 2019 года). Для этого выполните команду winver, в результате которой откроется диалоговое окно с нужной информацией.
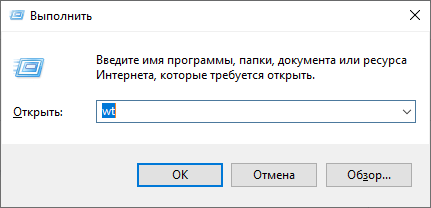
После установки в меню Пуск появится ярлык Windows Terminal:
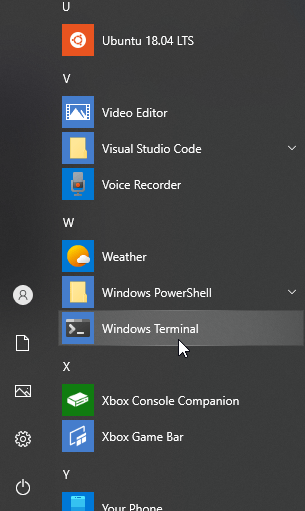
Для запуска Windows Terminal можно воспользоваться этим ярлыком или нажать комбинацию клавиш +R и в окне Выполнить ввести имя wt запускного файла терминала.
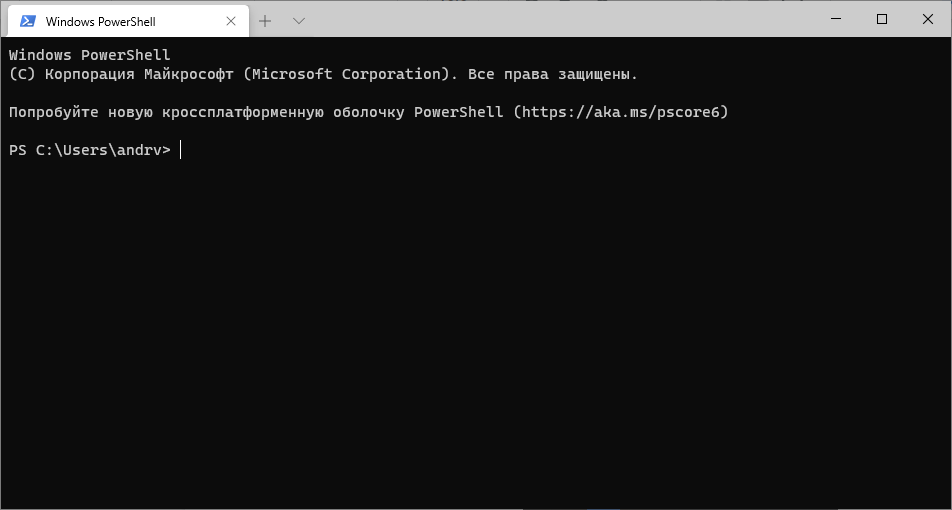
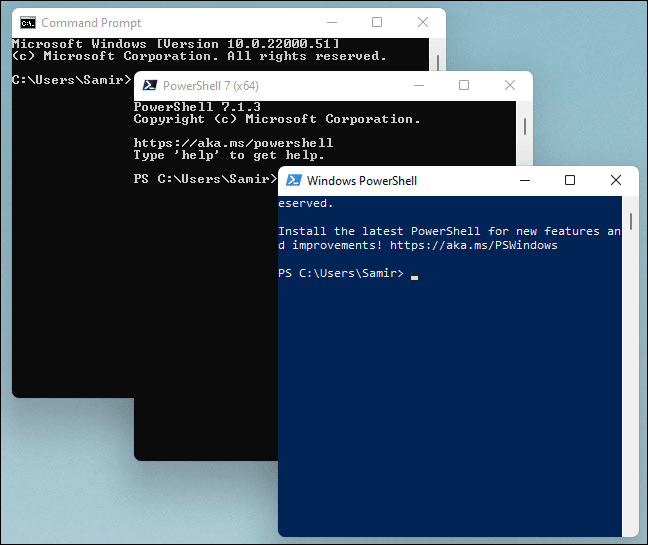
В результате откроется новое окно терминала с оболочкой Windows PowerShell:
Рассмотрим основные возможности Windows Terminal, которых не было в предыдущем терминале.
Install and get started setting up Windows Terminal
To try the latest preview features, you may also want to install Windows Terminal Preview.
If you don’t have access to the Microsoft Store, the builds are published on the GitHub releases page. If you install from GitHub, Windows Terminal will not automatically update with new versions. For additional installation options using a package manager (winget, chocolatey, scoop), see the Windows Terminal product repo.
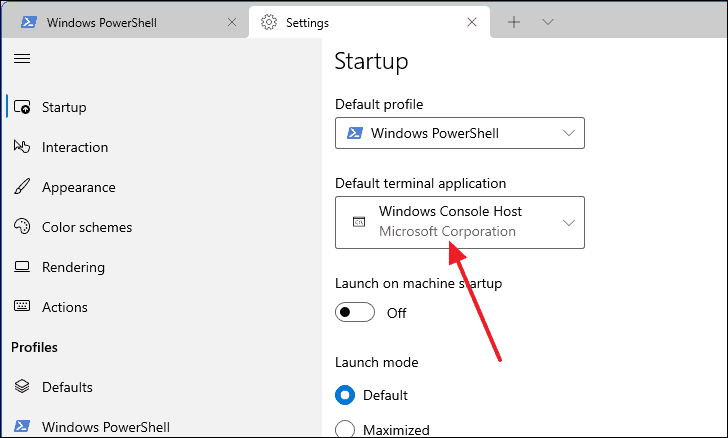
Set your default terminal application
This feature is only available in Windows 11.
To open any command line application with Windows Terminal, set it as your default terminal application.
- Open Windows Terminal and go to the Settings UI window.
- Select Startup and choose «Windows Terminal» as the Default terminal application setting.
Set your default terminal profile
After installation, when you open Windows Terminal, it will start with the PowerShell command line as the default profile in the open tab.
To change the default profile:
- Open Windows Terminal and go to the Settings UI window.
- Select Startup and choose the Default profile that you prefer.
You can also set your default profile in the Settings.json file associated with Windows Terminal if you prefer.
Add new profiles
Windows Terminal will automatically create profiles for you if you have WSL distributions or multiple versions of PowerShell installed.
Your command line profiles will be listed in the Settings UI, in addition to the option to + Add new profiles.
Learn more about dynamic profiles on the Dynamic profiles page.
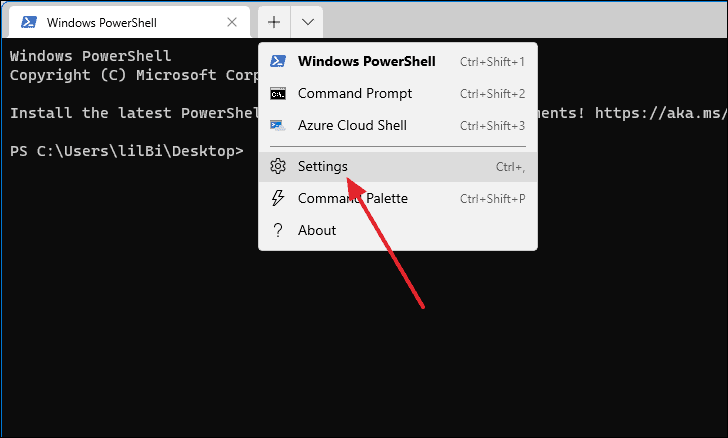
Open a new tab
You can open a new tab of the default profile by pressing Ctrl + Shift + T or by selecting the + (plus) button. To open a different profile, select the ˅ (arrow) next to the + button to open the dropdown menu. From there, you can select which profile to open.
Invoke the command palette
You can invoke most features of Windows Terminal through the command palette. The default key combination to invoke it is Ctrl + Shift + P . You can also open it using the Command palette button in the dropdown menu in Windows Terminal Preview.
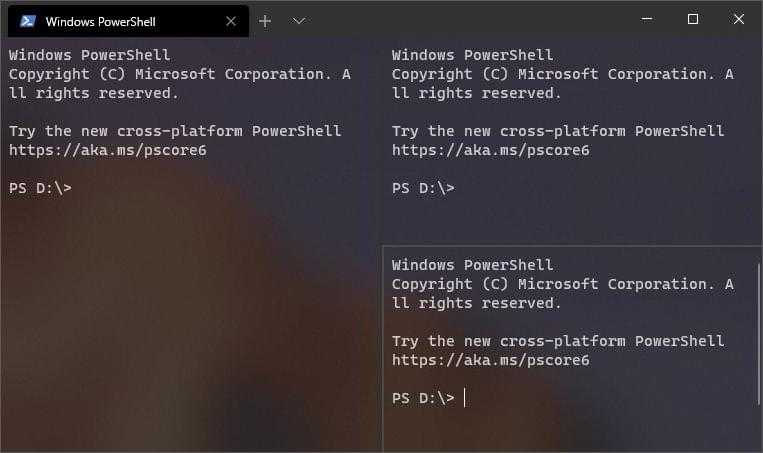
Open a new pane
You can run multiple shells side-by-side using panes. To open a pane, you can use Alt + Shift + + for a vertical pane or Alt + Shift + — for a horizontal one. You can also use Alt + Shift + D to open a duplicate pane of your focused profile. Learn more about panes on the Panes page.
Configuration
To customize the settings of your Windows Terminal, select Settings in the dropdown menu. This will open the settings UI to configure your settings. You can learn how to open the settings UI with keyboard shortcuts on the Actions page.
Settings JSON file
If you prefer to configure your Windows Terminal settings using code, rather than the graphic user interface, you can edit the settings.json file.
Select Settings in the Windows Terminal dropdown menu while holding Shift to open the settings.json file in your default text editor. (The default text editor is defined in your Windows settings.)
The path for your Windows Terminal settings.json file may be found in one of the following directories:
- Terminal (stable / general release): %LOCALAPPDATA%\Packages\Microsoft.WindowsTerminal_8wekyb3d8bbwe\LocalState\settings.json
- Terminal (preview release): %LOCALAPPDATA%\Packages\Microsoft.WindowsTerminalPreview_8wekyb3d8bbwe\LocalState\settings.json
- Terminal (unpackaged: Scoop, Chocolately, etc): %LOCALAPPDATA%\Microsoft\Windows Terminal\settings.json
- You can access the default settings for Windows Terminal by selecting Settings in the dropdown menu while holding Alt to open the defaults.json file in your default text editor. This file is auto-generated and any changes to it will be ignored.
- It is possible to create a JSON fragment extension in order to store profile data and color schemes in a separate file, which can be useful to prevent excessively large configuration files.
Command line arguments
You can launch the terminal in a specific configuration using command line arguments. These arguments let you open the terminal with specific tabs and panes with custom profile settings. Learn more about command line arguments on the Command line arguments page.
Troubleshooting
If you encounter any difficulties using the terminal, reference the Troubleshooting page. If you find any bugs or have a feature request, you can select the feedback link in the About menu of the terminal to go to the GitHub page where you can file a new issue.
Submit and view feedback for
Windows не может найти wt.exe; Терминал Windows не открывается
Если вы видите всплывающее окно с ошибкой Windows не может найти wt.exe; вот несколько советов по устранению этой проблемы с терминалом Windows:
Программы для Windows, мобильные приложения, игры — ВСЁ БЕСПЛАТНО, в нашем закрытом телеграмм канале — Подписывайтесь:)
- Выполните сканирование SFC
- Измените этот параметр Windows Terminal
- Восстановить или сбросить приложение Windows Terminal
- Переустановите терминал Windows
Теперь давайте подробно рассмотрим все эффективные решения.
1]Выполните сканирование SFC
Первое, что вы можете попробовать, это запустить сканирование SFC. Средство проверки системных файлов или sfc.exe используется для сканирования и восстановления поврежденных системных файлов Windows. И, как уже упоминалось, проблема может быть вызвана поврежденными системными файлами; выполнение SFC может быть идеальным решением в данной ситуации. Вот как это делается.


- Откройте меню «Пуск», нажав клавишу Windows.
- В строке поиска введите cmd и нажмите клавишу ввода.
- В результате щелкните правой кнопкой мыши cmd и выберите «Запуск от имени администратора».
- В появившемся окне командной строки введите sfc /scannow и нажмите клавишу ввода.
Теперь выполнение команд займет несколько секунд. И если какие-либо повреждения будут обнаружены, они будут заменены при перезагрузке. Проверьте, решает ли это проблему или нет. Если нет, попробуйте следующее решение в списке.
См.: Исправление msedgewebview2.exe перестало работать
2]Измените этот параметр терминала Windows.
Еще одна вещь, которая вызывает проблему, — это настройка. Вот изменения, которые необходимо внести для решения проблемы.
- Откройте окно настроек, нажав сочетание клавиш Windows + I.
- Нажмите «Приложения» на левой панели экрана.
- Выберите Приложения и функции.
- Нажмите на раскрывающийся значок рядом с дополнительными настройками.
- Выберите псевдонимы выполнения приложения.
- Найдите терминал Windows и отключите эту опцию; это было включено.
- Включите опцию снова.
- Теперь выйдите из окна.
- Откройте диалоговое окно «Выполнить», нажав сочетание клавиш Windows + R.
- Перейдите в указанное ниже место.
%USERPROFILE%\AppData\Local\Microsoft\WindowsApps
Проверьте, видите ли вы там wt.exe или нет. Если нет, попробуйте следующее решение в списке.
Читать: Добавить «Открыть терминал Windows» в качестве администратора в контекстном меню.
3]Восстановить или сбросить приложение Windows Terminal
Вы можете рассмотреть возможность восстановления или сброса Windows Terminal следующим образом:
- Открыть настройки
- Открытые приложения
- Найдите терминал Windows
- Выберите Дополнительные параметры
- Нажмите кнопку Восстановить или Сбросить.
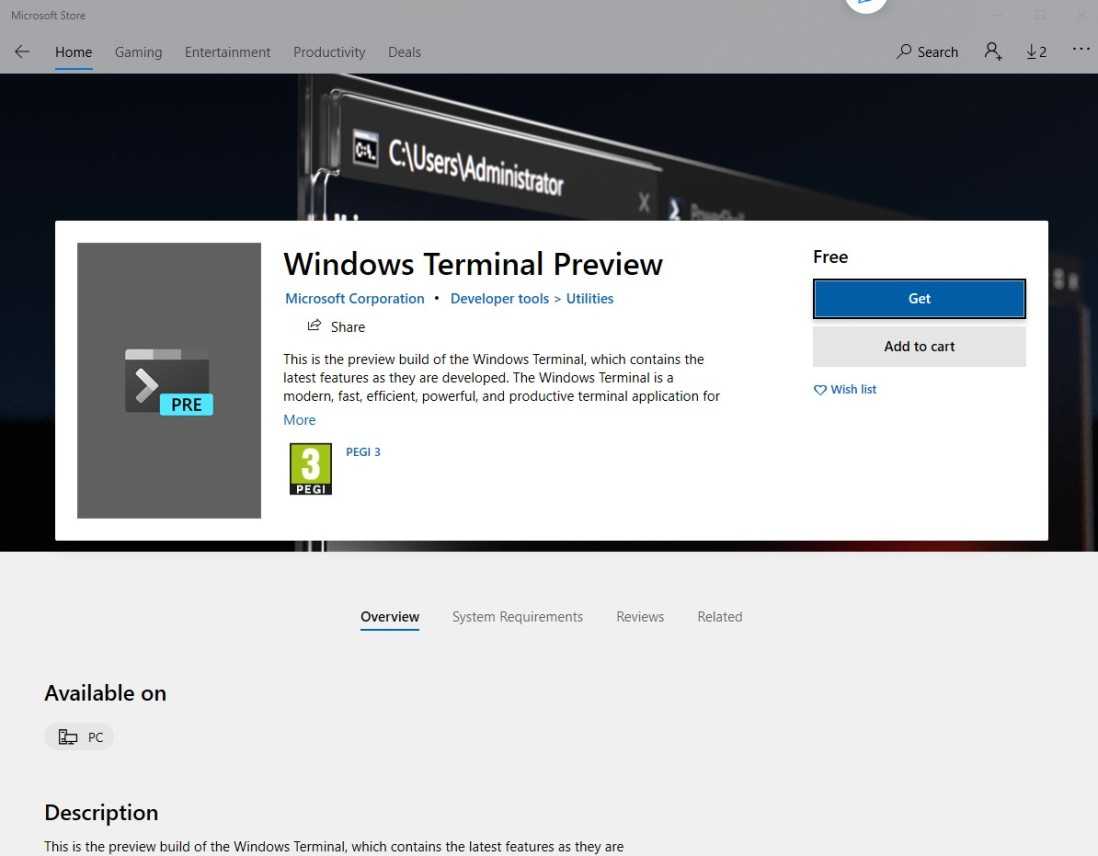
4]Переустановите терминал Windows
Переустановка Терминала Windows — еще одно эффективное решение в данной ситуации. Но убедитесь, что вы следуете этому шагу, если ни одно из вышеупомянутых решений не помогло. Вот как это делается.
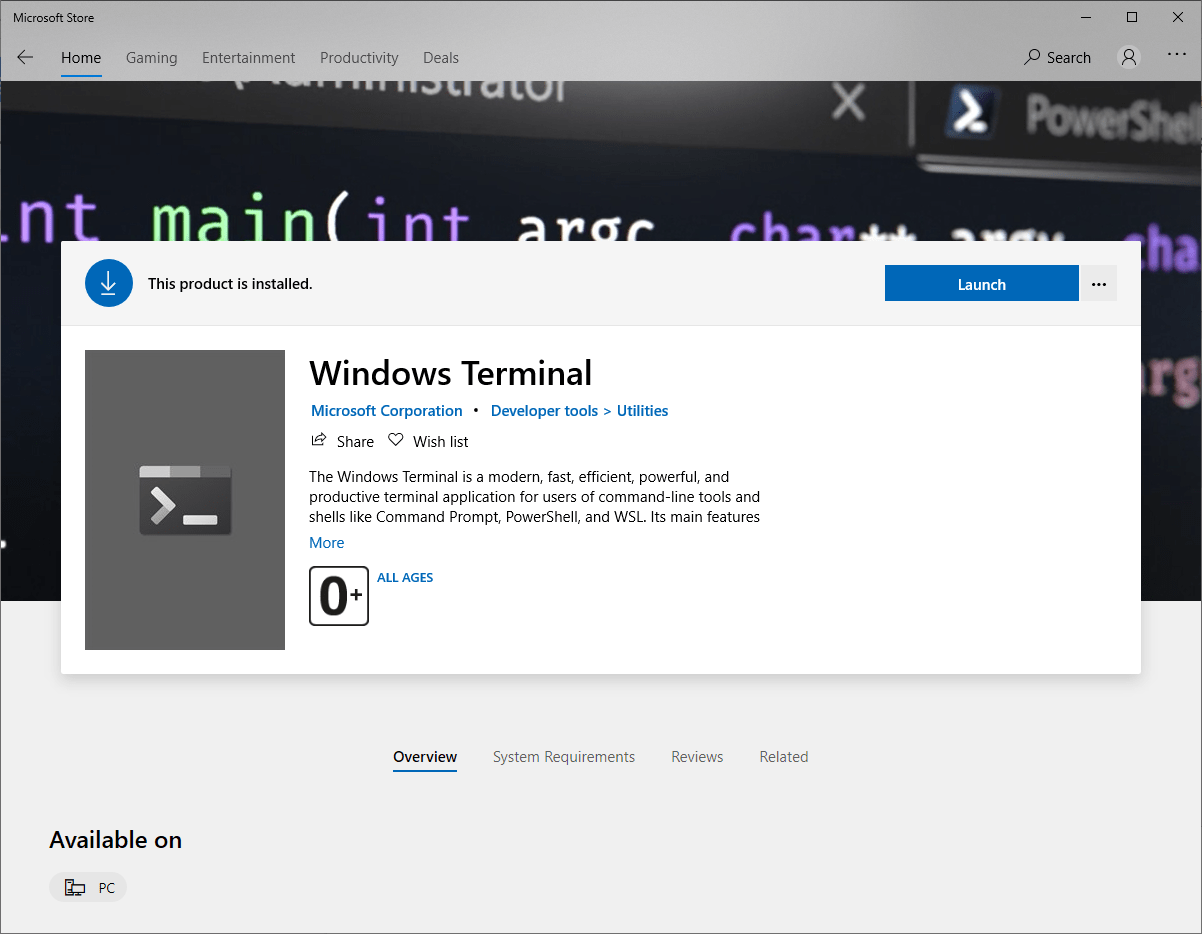
- Откройте Microsoft Store в своей системе и найдите Windows Terminal.
- Откройте официальное приложение и нажмите кнопку «Получить».
- Дождитесь завершения процесса установки; после этого перезагружает вашу систему.
Теперь проверьте, устранена ли проблема.
Как сбросить настройки Windows Terminal по умолчанию?
Чтобы сбросить настройки терминала Windows, сначала откройте терминал Windows и перейдите на страницу настроек. Теперь откройте файл настроек терминала Windows и удалите все его содержимое. Вот и все, теперь сохраните файл настроек и перезапустите Терминал Windows.
Читать дальше: добавьте «Открыть терминал Windows», чтобы открыть ЛЮБОЙ профиль в контекстном меню
Как открыть терминал Windows от имени администратора?
Очень легко открыть Windows Terminal от имени администратора. Прежде всего, нажмите Win + X, чтобы открыть центр управления. Выберите Windows Terminal (admin) из списка. Кроме того, вы можете выбрать: меню «Пуск»> «Терминал Windows»> «Запуск от имени администратора».
Программы для Windows, мобильные приложения, игры — ВСЁ БЕСПЛАТНО, в нашем закрытом телеграмм канале — Подписывайтесь:)
Ways to Install Windows Terminal
There are different ways to install Windows Terminal on your Windows 10 system, from the easy to the slightly more complex. Knowing these different strategies is important, as it would help you correctly install the latest versions and achieve more customization with additional themes and third-party software support.
1. From Microsoft Store
Of course, the easiest way to install the integrated Windows Terminal is to download it from Microsoft Store. The download link can be found here.
In case your Store is not working properly, you can troubleshoot with these tips.
Downloading Windows Terminal from Microsoft Store
Once the software is installed, you can readily launch it from the Store itself.
Windows Terminal Installed and Ready to Launch
You can always go back to the Windows search box to open the Windows Terminal app and even choose its default console window. Run it in “Administrator” mode for best results.
Windows Terminal Open Searc Box
2. Through GitHub
The various release builds for Microsoft Windows Terminal can also be manually downloaded. The GitHub Releases link is here. Search for the latest Windows Terminal version under “Assets” as shown here. Click the “msixbundle” link to proceed.
GitHub Bundle Download for Windows Terminal
The “msixbundle” package is quickly downloaded and saved on your system.
GitHub Bundle Downloading
When you click to install, you will receive a preview of the Windows Terminal. This would proceed smoothly from here.
Install Preview – Windows Terminal
It takes just a few minutes for the package to be completely installed. You are now ready to deploy Windows Terminal.
Installing App Package – Windows Terminal
Once opened, you will notice a “do you want to close all tabs?” option after you close the terminal window. This would never happen with individual Command Prompt or PowerShell windows.
Windows Terminal Close All Tabs
3. Through Chocolatey
Chocolatey is one of the most versatile tools to install any third-party software. It can be used to make Discord bots, launch Power Toys, and provide a component of lightweight browsers.
Whether or not Chocolatey is installed on your system, you can always find out using a fresh set of instructions in Windows PowerShell. Copy the following into a PowerShell window and click “Enter:”
Set-ExecutionPolicy Bypass -Scope Process -Force; System.Net.ServicePointManager::SecurityProtocol = System.Net.ServicePointManager::SecurityProtocol -bor 3072; iex ((New-Object System.Net.WebClient).DownloadString('https://chocolatey.org/install.ps1'))
Chocolatey Upgrade
As shown here, Chocolatey was already installed, so it just got upgraded. To install Windows Terminal using Chocolatey, the following command will do:
choco install microsoft-windows-terminal
Installing Windows Terminal through Chocolatey
Click “Y” to any requests for “Yes to all.”
Press Y
You will be able to view the success screen once the latest Windows Terminal package is launched through Chocolatey.
Windows Terminal through Chocolatey Install Successful
Schemes
Below the profiles section is the schemes section. This is where we can define custom color schemes and control what the profile window looks like. Each color scheme requires a unique name followed by setting foreground and background colors, then specifying individual colors for black, red, green, yellow, etc. These are some of the color schemes available in by default:
- Campbell
- Campbell PowerShell
- Vintage
- One Half Dark
- One Half Light
- Solarized Dark
- Solarized Light
People have gotten pretty creative with schemes and setting their profile backgrounds to pictures and gifs, but I’m pretty boring and usually stick with the defaults. However, I was recently working on a custom color scheme for presenting demos and taking screenshots of code examples. I wanted something with a lighter background with darker text so it would appear more distinct (sometimes those red errors messages on dark blue backgrounds are hard to see). I started experimenting with a custom color scheme, and these are what I found for which colors control the different text in PowerShell:

Note: another thing I love about VS Code is the color preview for the hex color codes.
Как изменить цветовую схему по умолчанию
Терминал Windows поставляется с несколькими цветовыми схемами, которые изменяют цвет шрифта, цвет фона, форму курсора и т. Д. Вы можете выбирать темы индивидуально для командной строки, Bash и PowerShell.
Чтобы переключить тему по умолчанию, сначала найдите профиль оболочки, который вы хотите, прокрутив вниз до раздела «профили:» и просмотрев запись командной строки в каждом подразделе.
Командная строка находится, например, в: «commandline»: «cmd.exe». Затем измените «colorScheme»: «Campbell» на цвет по вашему выбору. Вы можете выбрать Кэмпбелл, Половину тьмы, Половину света, Соляризованную тьму и Соляризованный свет. Например, если вам нужен солнечный свет, вы должны изменить строку цветовой схемы на «colorScheme»: «Solarized Light. Это те же цветовые схемы, которые использует утилита Microsoft colortool.


Терминал Windows довольно интересен, и он дает вам небольшой вкус прежней функции Microsoft Windows Sets. Функциональность с вкладками здесь не такая надежная, но это намек на то, что могло быть. По крайней мере, теперь вам не нужно переключать программы для перехода между командной строкой, Powershell и Bash.
What Is Windows Terminal?
The Windows Terminal is a multi-tabbed terminal emulator that is developed by Microsoft for Windows 10 and the later Windows version. It is designed as a replacement for Windows Terminal.
The Windows Terminal is preconfigured to run Command Prompt, PowerShell, WSL, SSH, and Azure Cloud Shell Connector. It has its own rendering back-end. Since the version 1.11 on Windows 11, the command-line apps can run by using the new back-end rather than the old Windows console.
- Windows PowerShell download
- Command Prompt download
The Windows Terminal is preinstalled on Windows 11 but not on Windows 10. If you want to use it, you can download and install Windows Terminal on your device.
Managing Tabs and Panes
Open a new tab for the default profile by clicking the + icon or Ctrl + Shift + T. To open a tab for a different profile, choose it from the drop-down menu or press Ctrl + Shift + N, where N is the profile’s number.
Press Alt + Shift + D to duplicate and split the pane. The active pane is split in two along the longest axis each time it is used:
To force creation of a:
- vertical pane, press Alt + Shift + +, or
- horizontal pane, press Alt + Shift + -
To open another profile in a new pane, hold down the Alt key when choosing it from the drop-down menu.
Hold down Alt and use the cursor keys to switch between active panes from the keyboard. The size of a pane can be adjusted by holding Alt + Shift and using the cursor keys to resize accordingly.
Tabs can be renamed by double-clicking the text. You can also change the name or color by right-clicking the tab and choosing a menu option:
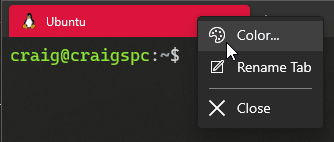
This only affects the current tab; it doesn’t permanently change the profile.
To close the active pane or tab, press Alt + Shift + W or enter the terminal’s standard exit command (usually exit).
Windows Terminal Overview
With the application installed, let’s take a quick overview of the console’s layout.
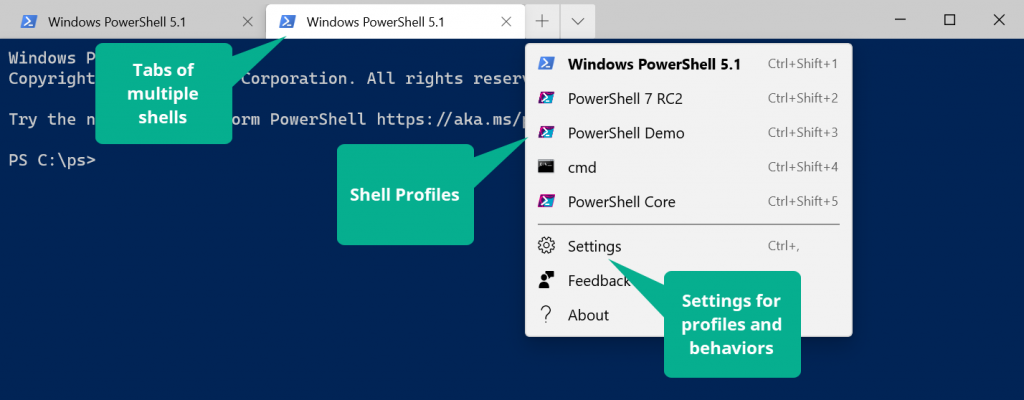
Windows Terminal Showing Tabs, Profiles, and Settings
On first open, it may appear to be like the Command Line or PowerShell console, but at the top you’ll notice the availability of tabs within the window. That’s right, no more dozens of console windows open taking up screen and taskbar real estate. Each tab also does not have to be the same type of console; one tab could be for PowerShell, another for traditional Windows command line, and another for a Linux shell.
To the right of the tabs is a down arrow/caret for accessing Terminal’s menu, which includes access to the default shell profiles, settings, feedback, and about. Some of the default shell profiles include:
- Windows PowerShell 5.1
- Command Line (cmd)
- PowerShell Core
- Azure Cloud Shell (the CLI version)
Each of these profiles has a shortcut key will open a new tab of that profile and shell. Later in this post I’ll discuss adding your own custom profiles.
Also in this menu is where we can access our Settings for Terminal. Settings for the Terminal are saved in a profiles.json file in a folder named LocalState in the AppData/Local folder mentioned earlier in this article. Selecting Settings will open the file in your default JSON editor.
Zooming in or out within the Terminal tabs is accomplished using Ctrl + and Ctrl –, or holding Ctrl and using the mouse wheel. The Terminal window can be resized like a typical Windows app. Individual tabs can be closed by click the X on their tab, and the entire Terminal can be closed using the X in the upper right corner of the application. By default, Terminal will prompt if you want to close all the tabs when doing so, much like a browser might when trying to close with multiple tabs open. Tabs can also be split horizontally and vertically to create multiple shells within a tab. To split the current tab into a horizontal pane, use the shortcut key ALT SHIFT –, and for a vertical split, use ALT SHIFT +.
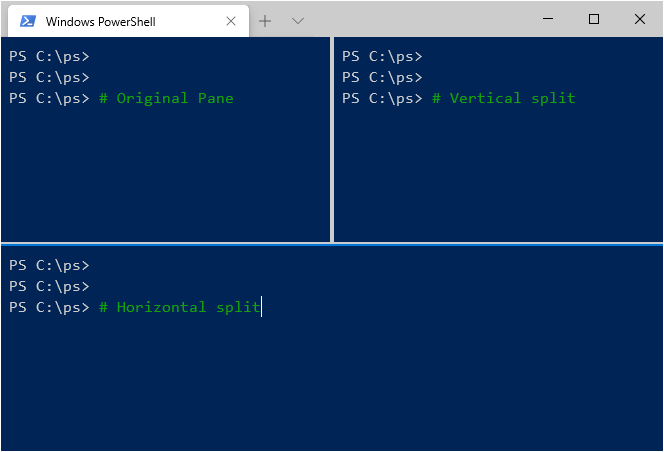
Single tab with horizontal and vertical panes
Использование нового терминала Windows
Интерфейс приложения New Windows Terminal невероятно прост. По умолчанию это будет выглядеть как обычное окно Windows PowerShell.
Это потому, что по умолчанию первая открываемая вкладка будет представлять собой терминал PowerShell. Вы можете использовать Windows PowerShell для выполнения задач системного администрирования, с тем дополнительным преимуществом, что вы можете открывать несколько вкладок PowerShell в одном окне.
Это реальное преимущество нового терминала Windows, позволяющего переключаться между различными приложениями и оболочками терминала в одном и том же окне. Вы можете открыть командную строку старой школы на второй вкладке Windows Terminal, а также облачную оболочку Azure для удаленного управления виртуальными машинами Microsoft Azure.
Если у вас установлены дистрибутивы Windows Subsystem для Linux, они также будут отображаться, предоставляя вам легкий доступ к терминалу Linux в Windows.
Чтобы открыть новое окно PowerShell, нажмите кнопку «плюс» справа от последней вкладки. Чтобы открыть вкладки других типов, нажмите кнопку со стрелкой вниз и выберите одну из списка доступных опций.