
Keep the installer from being deleted
Like all recent versions of OS X, Yosemite is distributed through the Mac App Store.
As with the Mavericks installer, if you leave the Yosemite beta installer in its default location (in the main Applications folder) when you install OS X 10.10, the installer will delete itself after the installation finishes. If you plan to use that installer on other Macs, or—in this case—to create a bootable drive, be sure to copy the installer to another drive, or at least move it out of the Applications folder, before you install. If you don’t, you’ll have to redownload the installer from the Mac App Store before you can create a bootable installer drive.
Booting from the installer drive
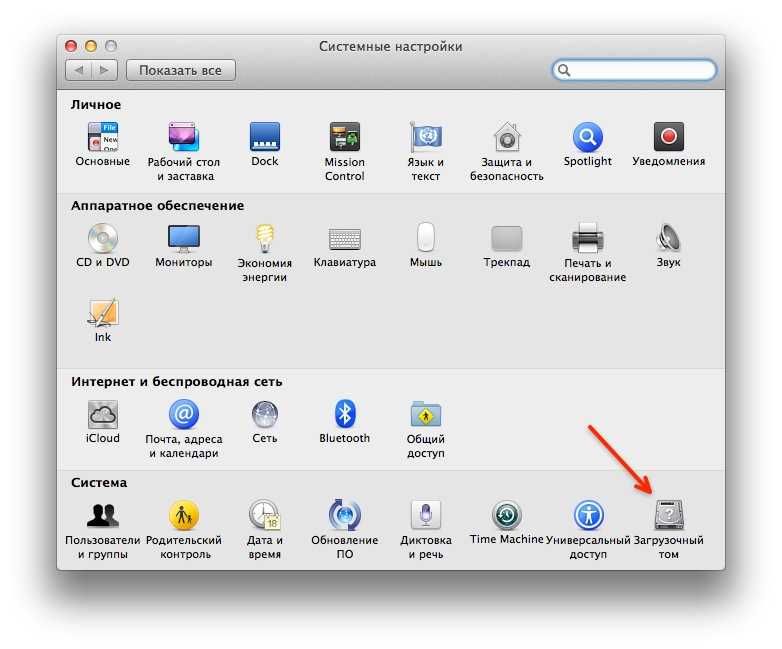
Whichever of the above processes you’ve used, you can now boot any Yosemite-compatible Mac from the resulting drive: Just connect the drive to your Mac and either (if your Mac is already booted into OS X) choose the install drive in the Startup Disk pane of System Preferences or (if your Mac is currently shut down) hold down the Option key at startup and choose the install drive when OS X’s Startup Manager appears.
When your Mac is booted from your installer drive, you can, of course, install the OS, but you can also use any of the OS X installer’s special
recovery and restore features. Depending on how you made your installer drive, when you boot from that drive, you may even see the same OS X Utilities screen you get when you boot into OS X Recovery (recovery mode). However, unlike with recovery mode, your bootable installer includes the entire installer.
Как создать загрузочную флешку с OS X Yosemite
1. С использованием программы DiskMaker X
Скачайте программу DiskMaker X, которая позволит создать загрузочную флешку с OS X Yosemite в несколько кликов. Затем подключите флешку к компьютеру и откройте программу. Выберите дистрибутив «Install OS X Yosemite.app», выберите флешку и нажмите кнопку «Create a disk». Подождите, пока программа создаст загрузочную флешку.
2. С использованием командной строки в Терминале
Откройте программу Терминал и введите команду «sudo /Applications/Install OS X Yosemite.app/Contents/Resources/createinstallmedia —volume /Volumes/MyUSB —applicationpath /Applications/Install OS X Yosemite.app —nointeraction», где /Volumes/MyUSB — это путь к вашей флешке. Затем введите пароль администратора, если это требуется, и подождите, пока процесс создания загрузочной флешки завершится.
3. С помощью программы UNetbootin в Windows
Скачайте и установите программу UNetbootin на свой компьютер с Windows. Подключите флешку и запустите программу. Выберите операционную систему OS X Yosemite и выберите путь к дистрибутиву «Install OS X Yosemite.app». Выберите флешку и нажмите кнопку «OK». Подождите, пока программа создаст загрузочную флешку.
Создание загрузочных накопителей в OS X
Наверняка каждый сталкивался с необходимостью создания загрузочных носителей. На OS X я впервые столкнулся с этой задачей, когда хотел начисто обновить ОС с Mavericks на Yosemite.
Для содания загрузочной флешки с OS X необходимо скачать с AppStore app пакет с системой, смонтировать накопитель и выполнить в терминале:
'/Applications/Install OS X Yosemite.app/Contents/Resources/createinstallmedia' \
--volume '/Volumes/YOURVOLUME' \
--applicationpath '/Applications/Install OS X Yosemite.app' \
--nointeraction
Конечно, с помощью терминала можно создать загрузочные флешки и для других систем.
Посмотрим доступные диски и выберем необходимый, на который будем заливать образ
diskutil list
И размонтируем его
diskutil unmountDisk /dev/diskN
Далее только следует выполнить:
sudo dd if=Disr.iso of=/dev/rdiskN bs=1m
Последним шагом извлекаем накопитель
diskutil eject /dev/diskN
Обратите внимание на то, что некоторые дистрибутивы ОС имеют специальные образы для USB накопителей. Например, мне попадались Oracle Solaris и Haiku
Так же не стоит забывать, что dd достаточно агрессивная утилита и может испортить Ваш накопитель.
Создавать загрузочные накопители можно и с GUI, стандартный «Disk Utility.app» годится, разве что на создание загрузочных накопителей собственного из собственного dmg.
Для ISO образов можно использовать UNetbootin.
Есть и другая возможность создать ISO образ для установки. Для этого необходимо скачать образ установщика операционной системы в AppStore и предложенный код скопировать в файл, например
Пример создания ISO образа OS X Yosemite (10.10.2)


![[инструкция] установка macos с флешки](https://kubwheel.ru/wp-content/uploads/0/b/9/0b9d39ccf2758c1271516d1645a54e84.png)
![Как создать загрузочную флешку с установщиком mac os x [инструкция]](https://kubwheel.ru/wp-content/uploads/6/4/b/64b28c076128b309f249b8db3dfd088f.jpeg)
- CreateISO.sh
-
# Mount the installer image
hdiutil attach ApplicationsInstall\ OS\ X\ Yosemite.appContentsSharedSupportInstallESD.dmg -noverify -nobrowse -mountpoint Volumesinstall_app

# Convert the boot image to a sparse bundle
hdiutil convert Volumesinstall_appBaseSystem.dmg -format UDSP -o tmpYosemite

# Increase the sparse bundle capacity to accommodate the packages
hdiutil resize -size 8g tmpYosemite.sparseimage

# Mount the sparse bundle for package addition
hdiutil attach tmpYosemite.sparseimage -noverify -nobrowse -mountpoint Volumesinstall_build

# Remove Package link and replace with actual files
rm Volumesinstall_buildSystemInstallationPackages
cp -rp Volumesinstall_appPackages Volumesinstall_buildSystemInstallation

# Unmount the installer image
hdiutil detach Volumesinstall_app

# Unmount the sparse bundle
hdiutil detach Volumesinstall_build

# Resize the partition in the sparse bundle to remove any free space
hdiutil resize -size `hdiutil resize -limits tmpYosemite.sparseimage | tail -n 1 | awk '\{ print $1 \}'`b tmpYosemite.sparseimage

# Convert the sparse bundle to ISO/CD master
hdiutil convert tmpYosemite.sparseimage -format UDTO -o tmpYosemite

# Remove the sparse bundle
rm tmpYosemite.sparseimage

# Rename the ISO and move it to the desktop
mv tmpYosemite.cdr ~DesktopYosemite.iso
Остаётся только разрешить данному файлу исполнение:
chmod +x CreateISO.sh
После этого можно будет запустить этот файл в терминале на исполнение.
Проверено на следующих конфигурациях:
| Версия ОС |
|---|
| Apple OS X Yosemite (10.10) |
Автор первичной редакции:Виталий Якоб
Время публикации: 09.03.2016 15:12
Способы записи дистрибутива OS X на USB
Способ 1: С помощью программы DiskMaker X
Этот способ подходит для пользователей Mac. Сначала нужно скачать и установить программу DiskMaker X. Затем нужно загрузить дистрибутив OS X Yosemite из App Store. После этого нужно запустить DiskMaker X и выбрать версию OS X, которую нужно загрузить на флешку.
Далее нужно выбрать USB-накопитель, куда будет записываться дистрибутив. DiskMaker X выполнит все необходимые операции автоматически. В конце процесса можно получить загрузочную флешку с OS X Yosemite.
Способ 2: С помощью командной строки
Этот способ подходит для пользователей Mac и Windows. Сначала нужно загрузить дистрибутив OS X Yosemite. Затем нужно подключить флешку к компьютеру и открыть командную строку.
В командной строке нужно ввести команду для определения имени флешки и создания раздела:
diskutil list
Затем нужно размонтировать раздел флешки:
diskutil unmountDisk /dev/diskN
Здесь N – номер флешки, который определяется из вывода предыдущей команды.
Далее нужно записать дистрибутив на флешку с помощью команды:
sudo dd if=/path/to/file.dmg of=/dev/rdiskN bs=1m
В этой команде /path/to/file.dmg – путь к загруженному дистрибутиву, а N – номер флешки.
Способ 3: С помощью программы TransMac
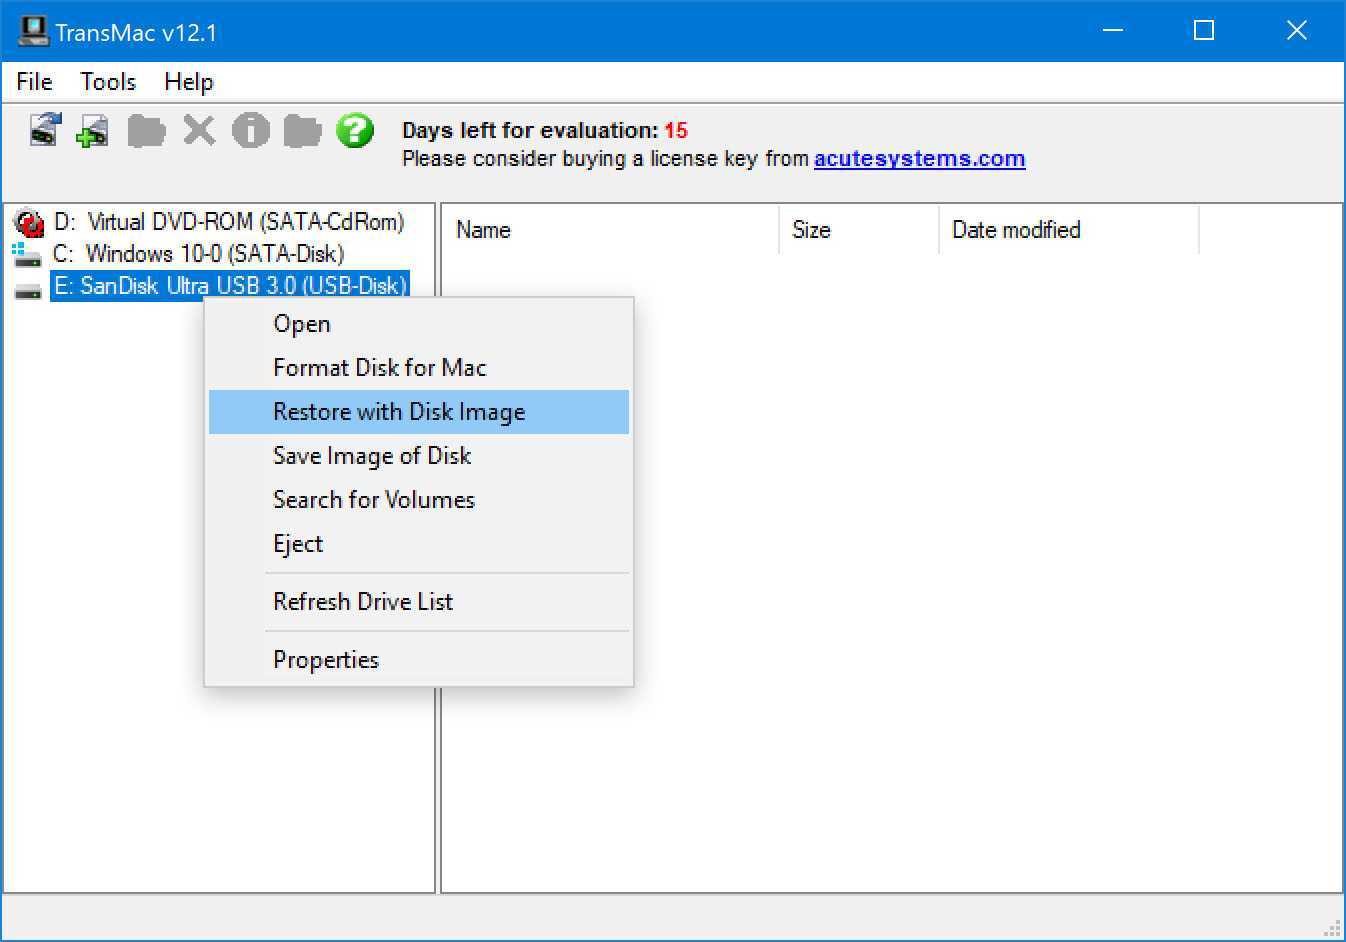
Этот способ подходит для пользователей Windows. Сначала нужно скачать и установить программу TransMac. Затем нужно подключить флешку к компьютеру.
![Как создать загрузочную флешку с установщиком mac os x [инструкция]](https://kubwheel.ru/wp-content/uploads/c/4/3/c43ce9bfac3db2edbea17cb225dd36f2.png)


![[установка] создание загрузочной флешки для хакинтоша. mac os x 10.10 yosemite на intel pc](https://kubwheel.ru/wp-content/uploads/b/1/8/b187d401cd4d8127252d803c43cba184.png)
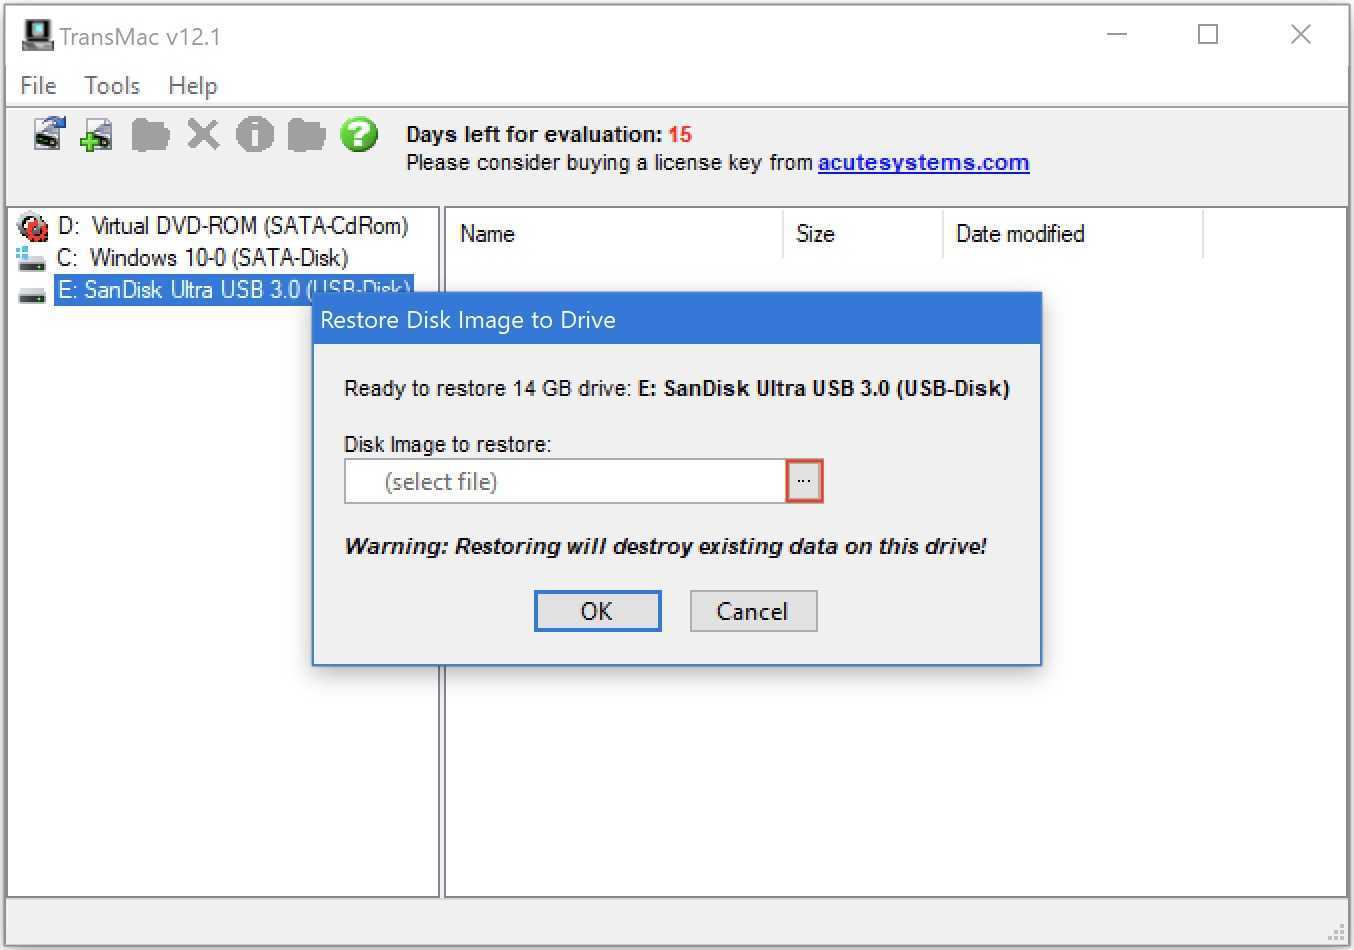
В TransMac нужно выбрать флешку и выполнить команду «Format with Disk Image». Затем нужно выбрать загруженный дистрибутив и выполнить команду «Restore with Disk Image». После этого можно получить загрузочную флешку с OS X Yosemite.
Here are the required steps:
- Connect to your Mac a properly formatted 8GB (or larger) drive, and rename the drive . (The Terminal command used here assumes the drive is named Untitled.) Also, make sure the Yosemite installer, called Install OS X Yosemite.app, is in its default location in your main Applications folder (/Applications). This means that if you moved it before installing Yosemite, you need to move it back before making your installer disk.
- Select the text of this Terminal command and copy it:
sudo /Applications/Install OS X Yosemite.app/Contents/Resources/createinstallmedia --volume /Volumes/Untitled --applicationpath /Applications/Install OS X Yosemite.app --nointeraction
- Launch Terminal (in /Applications/Utilities).
- Warning: This step will erase the destination drive or partition, so make sure that it doesn’t contain any valuable data. Paste the copied command into Terminal and press Return.
- Type your admin-level account password when prompted, and then press Return.
- The Terminal window displays the progress of the process, in a very Terminal sort of way, by displaying a textual representation of a progress bar: Erasing Disk: 0%… 10 percent…20 percent… and so on. The program then tells you it’s copying the installer files, making the disk bootable, and copying boot files. Wait until you see the text Copy Complete. Done. (see the screenshot above), which could take as long as 20 or 30 minutes, depending on how fast your Mac can copy data to your destination drive.
You now have a bootable Yosemite install drive. If you like, you can rename the drive from its default name of Install OS X Yosemite, though I think it’s kind of a catchy name.
Вопрос-ответ:
Можно ли сделать загрузочную флешку OS X Yosemite на Windows?
Да, существуют несколько способов записи дистрибутива OS X на USB с помощью программ для Windows, например, TransMac, Boot Disk Creator или Win32 Disk Imager.
В каком случае нужно создавать загрузочную флешку OS X Yosemite на Mac, а не на Windows?
Для создания загрузочной флешки OS X Yosemite на Mac лучше использовать официальную утилиту Disk Utility, чтобы было меньше проблем с некоторыми частными разделами и прописными буквами дисков на Windows.
Как записать дистрибутив OS X Yosemite на загрузочную флешку?
Можно использовать несколько способов: с помощью официальной утилиты Disk Utility на Mac, через терминал на Mac, использовать программы для создания загрузочной флешки на Windows. Инструкции по каждому из методов можно найти в статье.
Могут ли возникнуть проблемы при создании загрузочной флешки OS X Yosemite?
Да, могут возникнуть некоторые проблемы с форматированием флешки, записью дистрибутива, настройкой BIOS и т.д. Но если следовать инструкции и быть внимательным, то все должно получиться.
Option 3: Use Terminal
If you’re a Terminal jockey, you likely know that most of Disk Utility’s features can be accessed using shell commands—which means that you can perform the Disk Utility procedure using a few commands in Terminal.
- Download the Yosemite installer from the Mac App Store and make sure it’s in your main Applications folder (/Applications)—it’s called Install OS X Yosemite.app.
- Connect to your Mac a properly formatted 8GB (or larger) drive. Rename the drive to . (The Terminal commands I provide here assume the drive is named Untitled.)
- Open Terminal and type (or copy and paste) the following commands, one by one, pressing return after each to run it. Make sure each command finishes—in other words, you see a command prompt—before running the next command. Enter your admin-level account password when prompted.
sudo hdiutil attach /Applications/Install OS X Yosemite.app/Contents/SharedSupport/InstallESD.dmg
sudo asr restore -source /Volumes/OS X Install ESD/BaseSystem.dmg -target /Volumes/Untitled -erase -format HFS+
(During this step, you’ll be prompted to confirm that you want to erase the contents of Untitled. Type and press Return.)
sudo rm /Volumes/OS X Base System/System/Installation/Packages
sudo cp -a /Volumes/OS X Install ESD/Packages /Volumes/OS X Base System/System/Installation/Packages
sudo cp -a /Volumes/OS X Install ESD/BaseSystem.chunklist /Volumes/OS X Base System
sudo cp -a /Volumes/OS X Install ESD/BaseSystem.dmg /Volumes/OS X Base System
hdiutil detach /Volumes/OS X Install ESD
You now have a bootable Yosemite install drive. If you like, you can rename the drive from its default name of OS X Base System to something more descriptive, such as Yosemite Installer.
Запись дистрибутива на флешку в Mac
С помощью Дисковой утилиты
Дисковая утилита – это стандартное приложение в Mac OS X, которое позволяет работать с жесткими дисками и другими устройствами хранения данных, включая флешки. Для создания загрузочной флешки с OS X Yosemite выполните следующее:
- Подключите флешку к компьютеру.
- Откройте Дисковую утилиту. Ее можно найти в папке “Программы” → “Утилиты”.
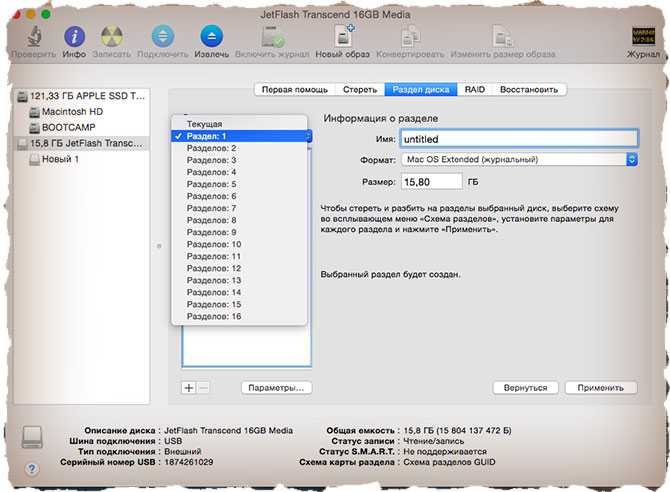
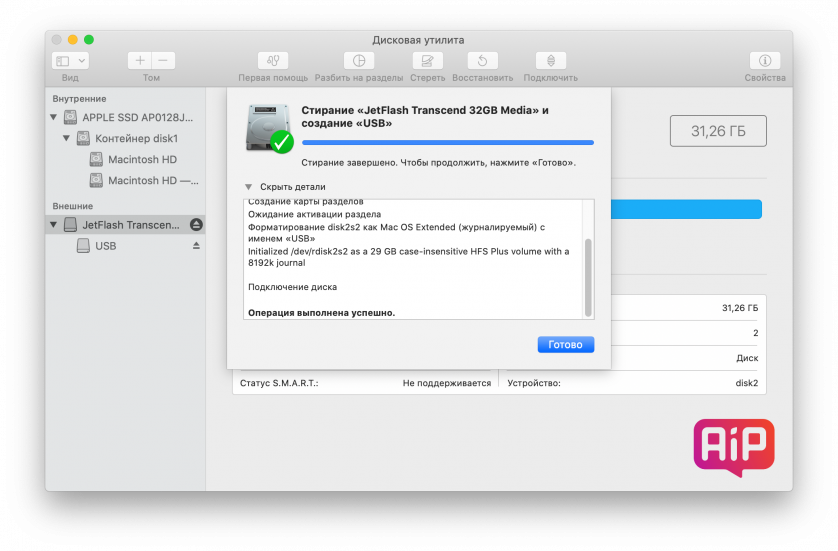
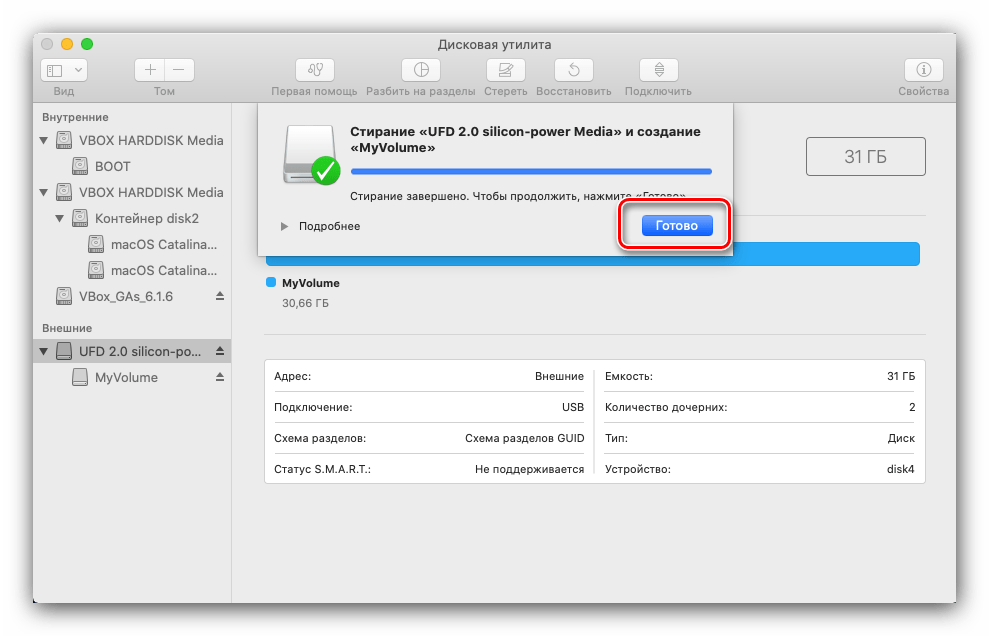
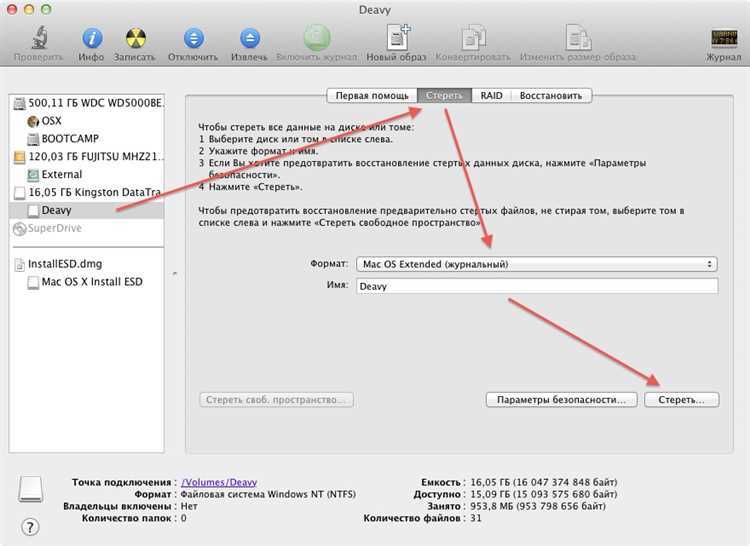
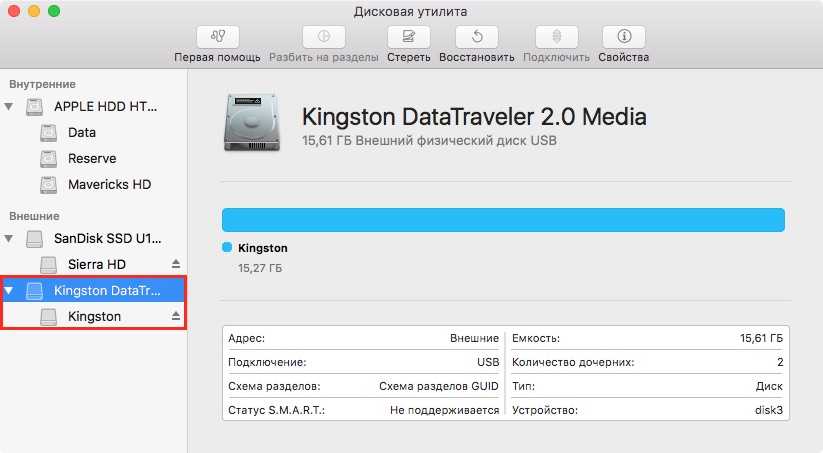
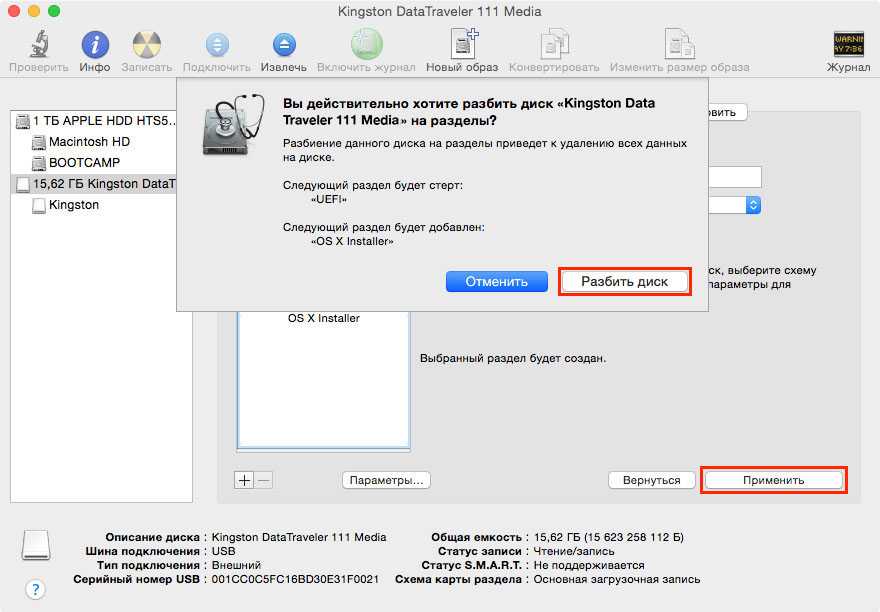
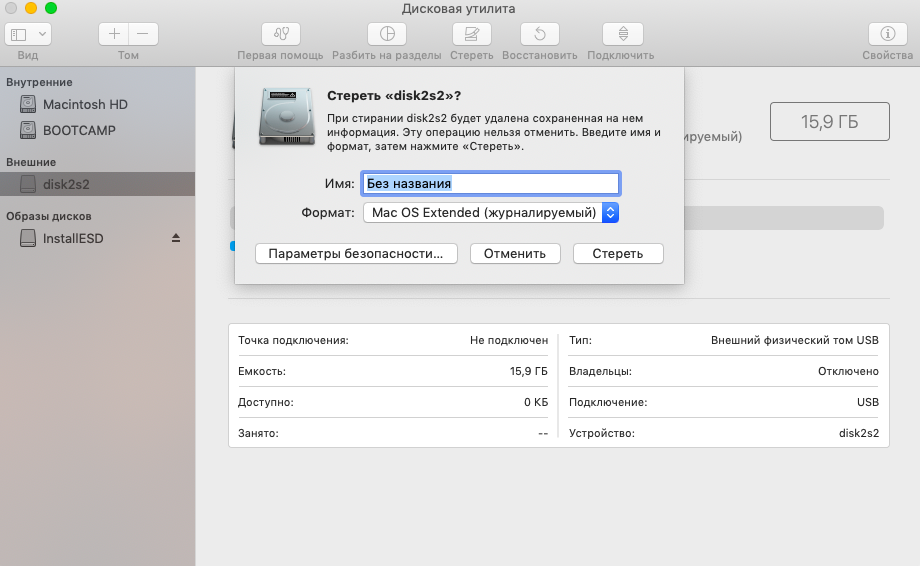
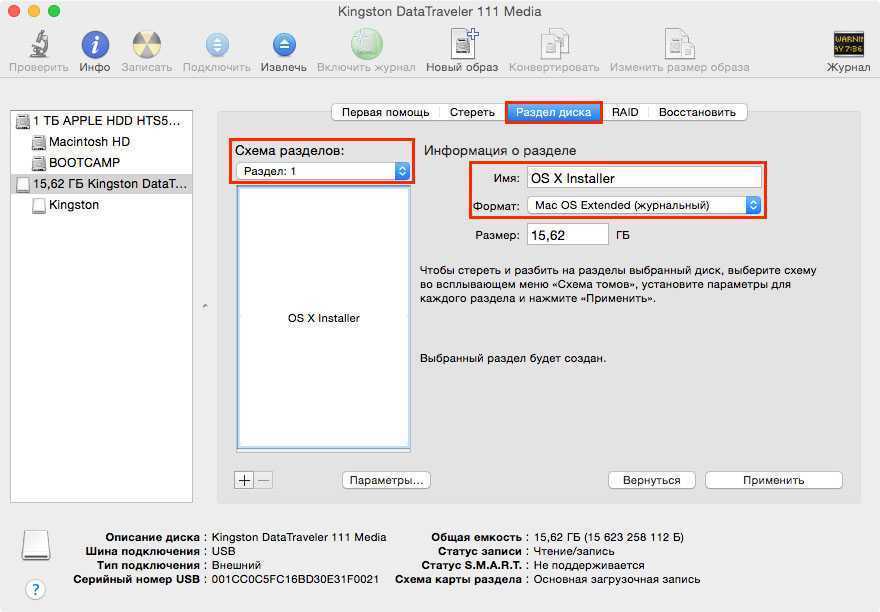
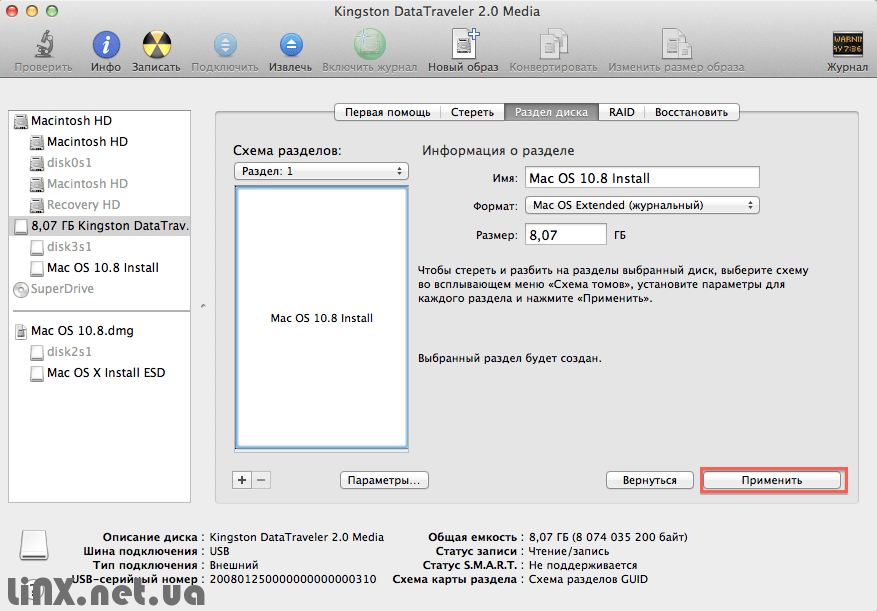
- Выберите флешку и нажмите на кнопку “Стереть”.
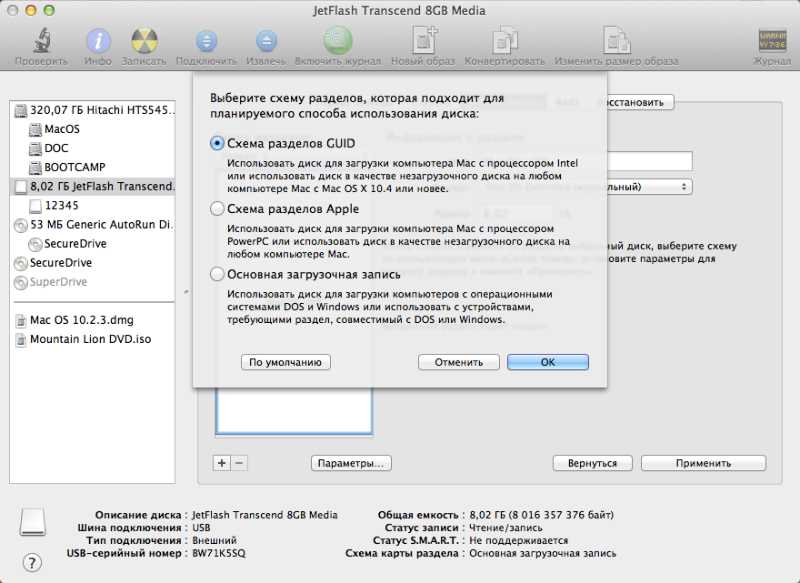
- Назовите флешку, выберите формат «Mac OS Extended (журналирующий)» и схему «GUID Partition Map».
- Нажмите на кнопку “Стереть”.
- Скачайте дистрибутив OS X Yosemite из App Store и запустите его.
- В мастере установки выберите флешку как место установки OS X Yosemite.
- Дождитесь окончания установки.
С помощью Terminal
Для записи дистрибутива на флешку в Mac OS X можно использовать командную строку Terminal:
- Подключите флешку к компьютеру.
- Откройте приложение Terminal, находящееся в папке “Программы” → “Утилиты”.
- Скопируйте и вставьте эту команду в Terminal:
- Замените “Untitled” на название вашей флешки, если оно не “Untitled”.
- Нажмите Enter и введите пароль.
- Дождитесь окончания установки.
Создание загрузочной флешки OS X с помощью Install Disk Creator
По сравнению с предыдущим способом, этот еще проще, так как все операции производятся в одном окне программы:
- Шаг 1 Запускаем программу Install Disk Creator, скачать ее можно с официального сайта, разработчиком которой является компания MacDaddy
- Шаг 2 Выбираем USB-носитель, который должен стать загрузочным
- Шаг 3 Указываем место на диске, где находиться установщик с системой macOS (OS X). Если образ скачан из Mac App Store (он в папке «Программы»), то программа сама его найдет, если нет, тогда нужно нажать кнопку Select the OS X Installer и указать путь
- Шаг 4 Нажимаем Create Installer и вводим наш пароль администратора, чтобы приступить к выполнению
После чего остается немного подождать пока загрузочная флешка Mac OS X будет создана.
Option 2: Use Disk Utility
You’ll find Disk Utility, a handy app that ships with OS X, in /Applications/Utilities. Here are the steps for using it to create your installer drive. The procedure is a bit more involved with Yosemite than it was for Mavericks (which was itself a bit more involved than under Mountain Lion and Lion).
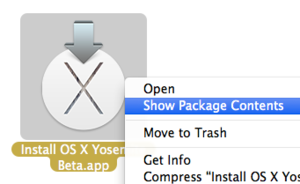 Right-click (or Control+click) the Yosemite installer to view its contents.
- Once you’ve downloaded Yosemite, find the installer on your Mac. It’s called Install OS X Yosemite.app and it should have been downloaded to your main Applications folder (/Applications).
- Right-click (or Control+click) the installer, and choose Show Package Contents from the resulting contextual menu.
- In the folder that appears, open Contents, then open Shared Support; you’ll see a disk image file called InstallESD.dmg.
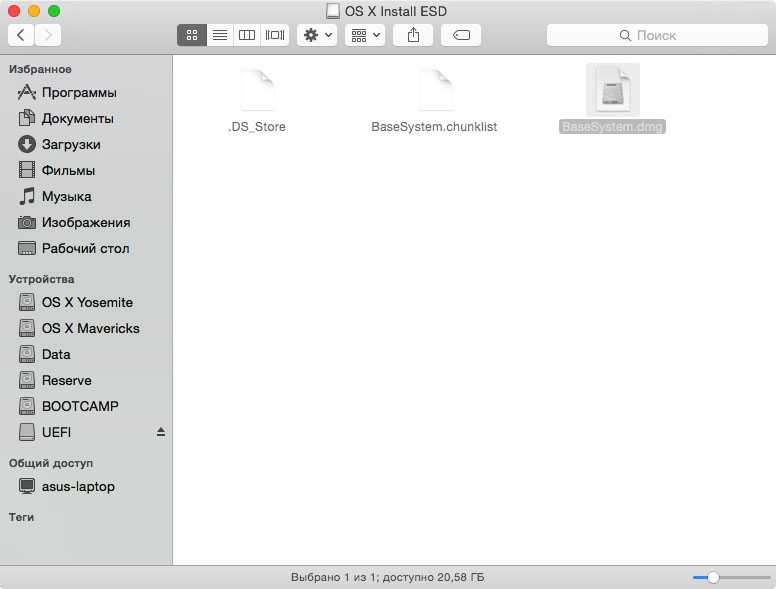
- Double-click InstallESD.dmg in the Finder to mount its volume. That volume will appear in the Finder as OS X Install ESD; open it to view its contents.
- Several of the files you’ll need to work with are hidden in the Finder, and you need to make them visible. Open the Terminal app (in /Application/Utilities), then type (or copy and paste) the following command, and then press Return:
defaults write com.apple.finder AppleShowAllFiles 1 && killall Finder
(This tells the Finder to show hidden files—we’ll re-hide such files later.)
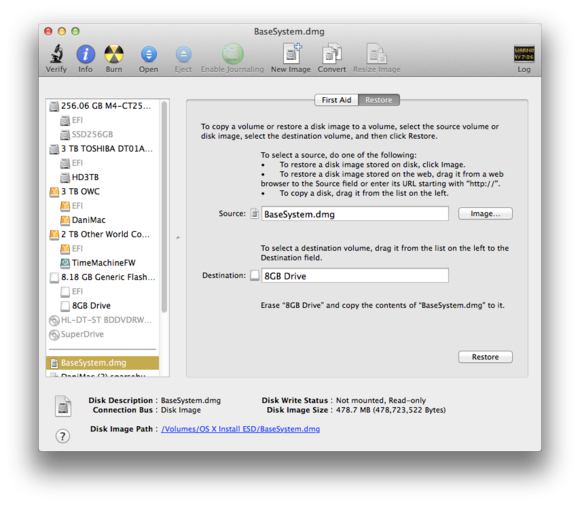
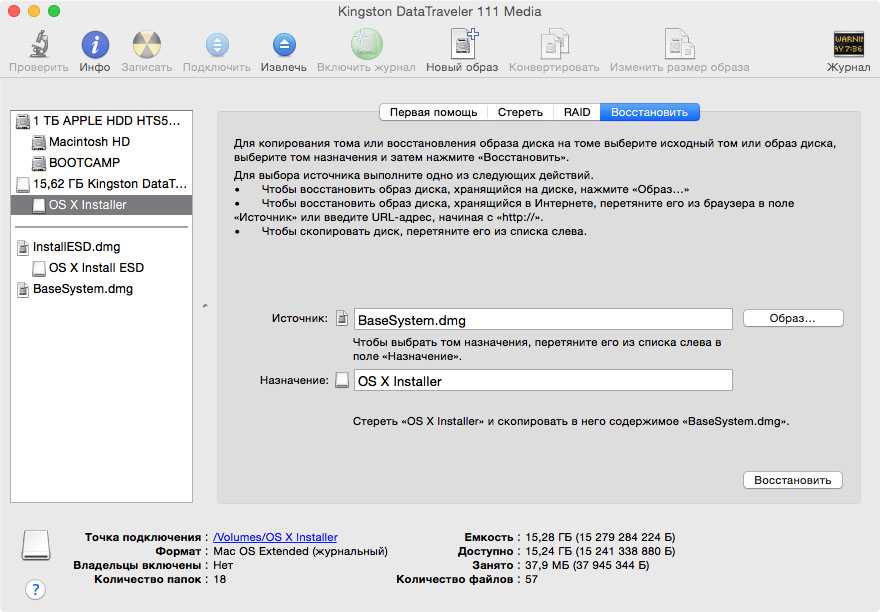
- Launch Disk Utility (in /Applications/Utilities) and then drag BaseSystem.dmg (in the OS X Install ESD volume) into Disk Utility’s left-hand sidebar.
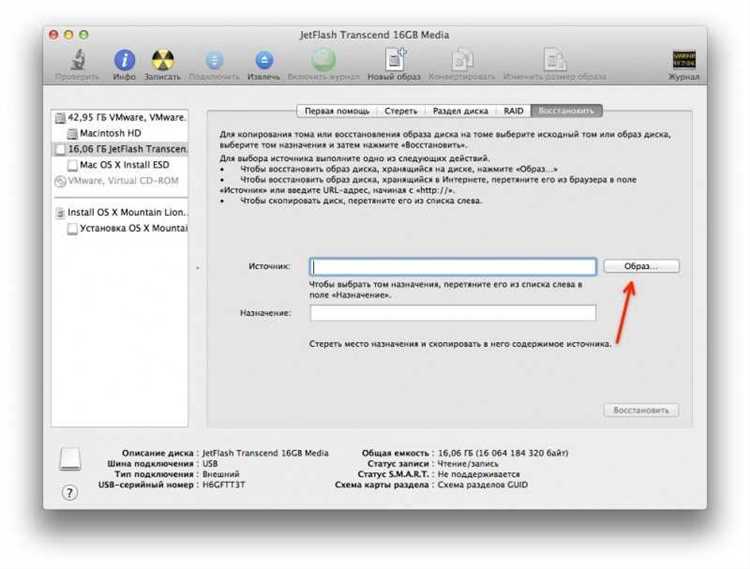
- Select BaseSystem.dmg in Disk Utility’s sidebar, and then click the Restore button in the main part of the window.
- Drag the BaseSystem.dmg icon into the Source field on the right (if it isn’t already there).
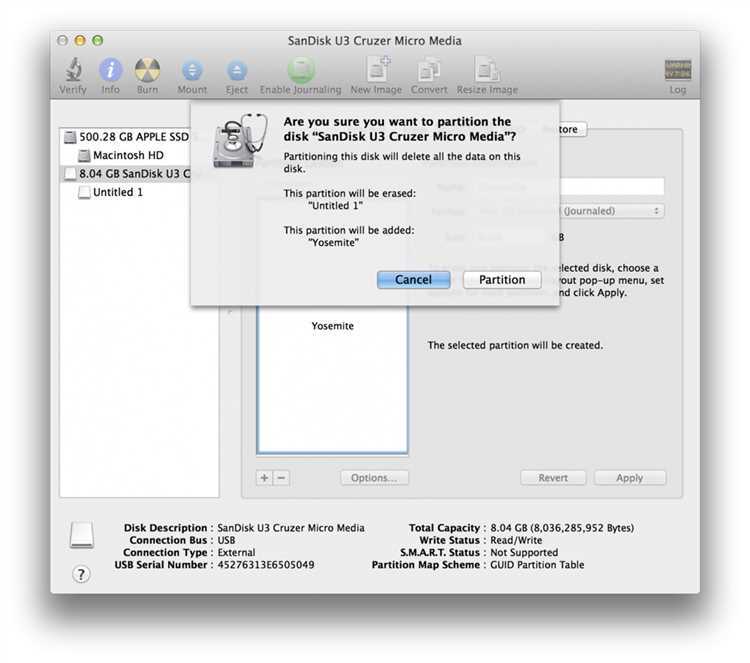
- Connect to your Mac the properly formatted hard drive or flash drive you want to use for your bootable Yosemite installer.
- In Disk Utility, find this destination drive in the left sidebar. You may see a couple partitions under the drive: one named EFI and another with the name you see for the drive in the Finder. Drag the latter—the one with the drive name—into the Destination field on the right. (If the destination drive has additional partitions, just drag the partition you want to use as your bootable installer volume.)
- Warning: This step will erase the destination drive or partition, so make sure that it doesn’t contain any valuable data. Click Restore, and then click Erase in the dialog box that appears; if prompted, enter an admin-level username and password.
- Wait for the restore procedure to finish, which should take just a few minutes.
- Open the destination drive—the one you’re using for your bootable installer drive, which has been renamed OS X Base System. Inside that drive, open the System folder, and then open the Installation folder. You’ll see an alias called Packages. Delete that alias.
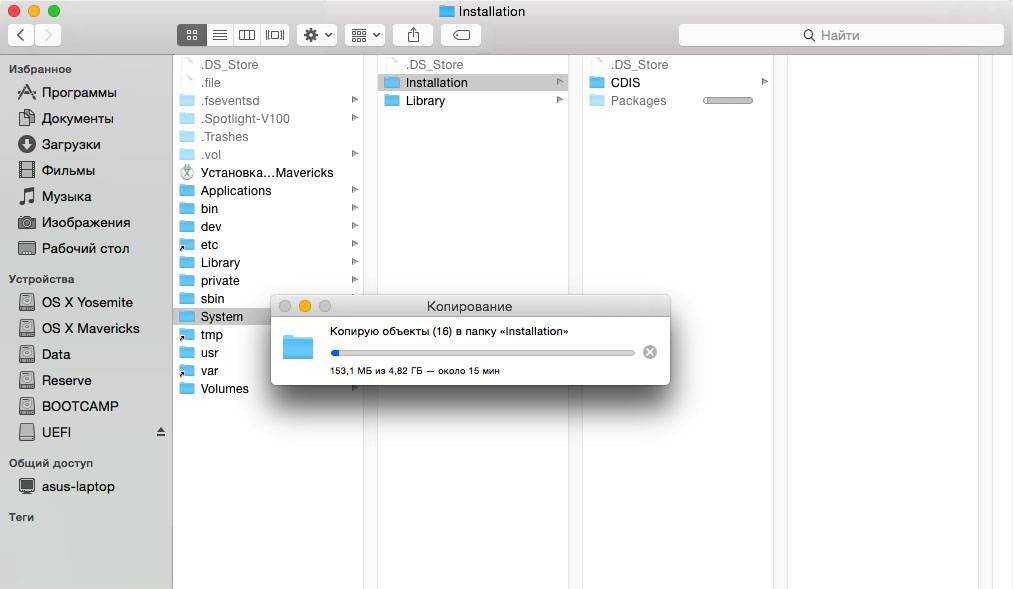
- Open the mounted OS X Install ESD volume, and you’ll see a folder called Packages. Drag that folder into the Installation folder on your destination drive. (You’re replacing the deleted Packages alias with this Packages folder.) The folder is about 4.6GB in size, so the copy will take a bit of time, especially if you’re copying to a slow thumb drive.
- Also in the mounted OS X Install ESD volume, you’ll find files named BaseSystem.chunklist and BaseSystem.dmg. Copy these files to the root (top) level of your install drive (OS X Base System, not into the System or Installation folder).
- Eject the OS X Install ESD volume.
- You’ll likely want to re-hide invisible files in the Finder. Open the Terminal app, type (or copy and paste) the following command, and then press Return:
defaults write com.apple.finder AppleShowAllFiles 0 && killall Finder
You now have a bootable Yosemite install drive. If you like, you can rename the drive from OS X Base System to something more descriptive, such as Yosemite Installer.
 You can use Disk Utility’s Restore screen to create a bootable Yosemite installer drive.
Запись дистрибутива на флешку в Windows
Для записи дистрибутива OS X Yosemite на флешку в ОС Windows вам понадобится программа TransMac и файл образа диска с расширением .dmg. Скачать программу вы можете с официального сайта.
![Создание загрузочных накопителей в os x [вики it-kb]](https://kubwheel.ru/wp-content/uploads/d/5/f/d5f953b9ecda83a078dc0a9c4fd527a2.png)
![[инструкция] установка macos с флешки](https://kubwheel.ru/wp-content/uploads/8/6/e/86e5d600b7a5114155101456412439e4.jpeg)
Шаг 1: Вставьте флешку в USB-порт компьютера. Запустите программу TransMac.
Шаг 2: В левой части программы выберите флешку и нажмите правой кнопкой мыши. В контекстном меню выберите «Форматировать диск для Mac».
Шаг 3: После форматирования вы можете приступить к записи образа диска. Для этого выберите в левой части программы образ диска в формате .dmg и перетащите его на правую часть программы.
Шаг 4: После перетаскивания образа диска вам будет предложено выбрать режим записи. Выберите «Записать образ диска на USB-накопитель».
Create the Yosemite install drive: The options
I’ve come up with three ways you can create a bootable OS X install drive for the Yosemite: using the installer’s built-in createinstallmedia tool; using Disk Utility; or performing the Disk Utility procedure using Terminal.
The createinstallmedia method is the easiest; if you’re at all comfortable using Terminal, it’s the approach that I recommend you try first. (Note that the createinstallmedia tool doesn’t work under OS X 10.6 Snow Leopard—it requires OS X 10.7 Lion or later.)
The Disk Utility method is the way to go for people who are more comfortable in the Finder (though it does require a couple Terminal commands), and it works under Snow Leopard, Lion, Mountain Lion, Mavericks, and Yosemite. The Disk Utility-via-Terminal approach is for the shell junkies out there.
Whichever method you use, you need a Mac-formatted drive (a hard drive, solid-state drive, thumb drive, or USB stick) that’s big enough to hold the installer and all its data—I recommend at least an 8GB flash drive. That drive must also be formatted with a GUID Partition Table. (Follow
this tutorial to properly format the drive.) Your OS X user account must also have administrator privileges.