
Error while running apache2ctl configtest
This error is related to the last fix detailed above and can be solved in the same manner, if you encounter a message like the following:
Error while running apache2ctl configtest.
Action 'configtest' failed.
The Apache error log may have more information.

AH00526: Syntax error on line 30 of /etc/apache2/sites-enabled/000-default-le-ssl.conf:
SSLCertificateFile: file '/etc/letsencrypt/live/mydomain.com/fullchain.pem' does not exist or is empty
Simply delete the old config and try again
During the Webdock Let’s Encrypt SSL installation, a Certbot rollback command hasn’t completely cleared an old default config file. You can resolve this by removing the file /etc/apache2/sites-enabled/000-default-le-ssl.conf and run Certbot once more.
How can I verify a certificate online?
HOW IT WORKS
- Select your Institute. & upload certificate.
- Make payment & request verification.
- Receive your e-verified. certificate.
What happens during certificate verification?
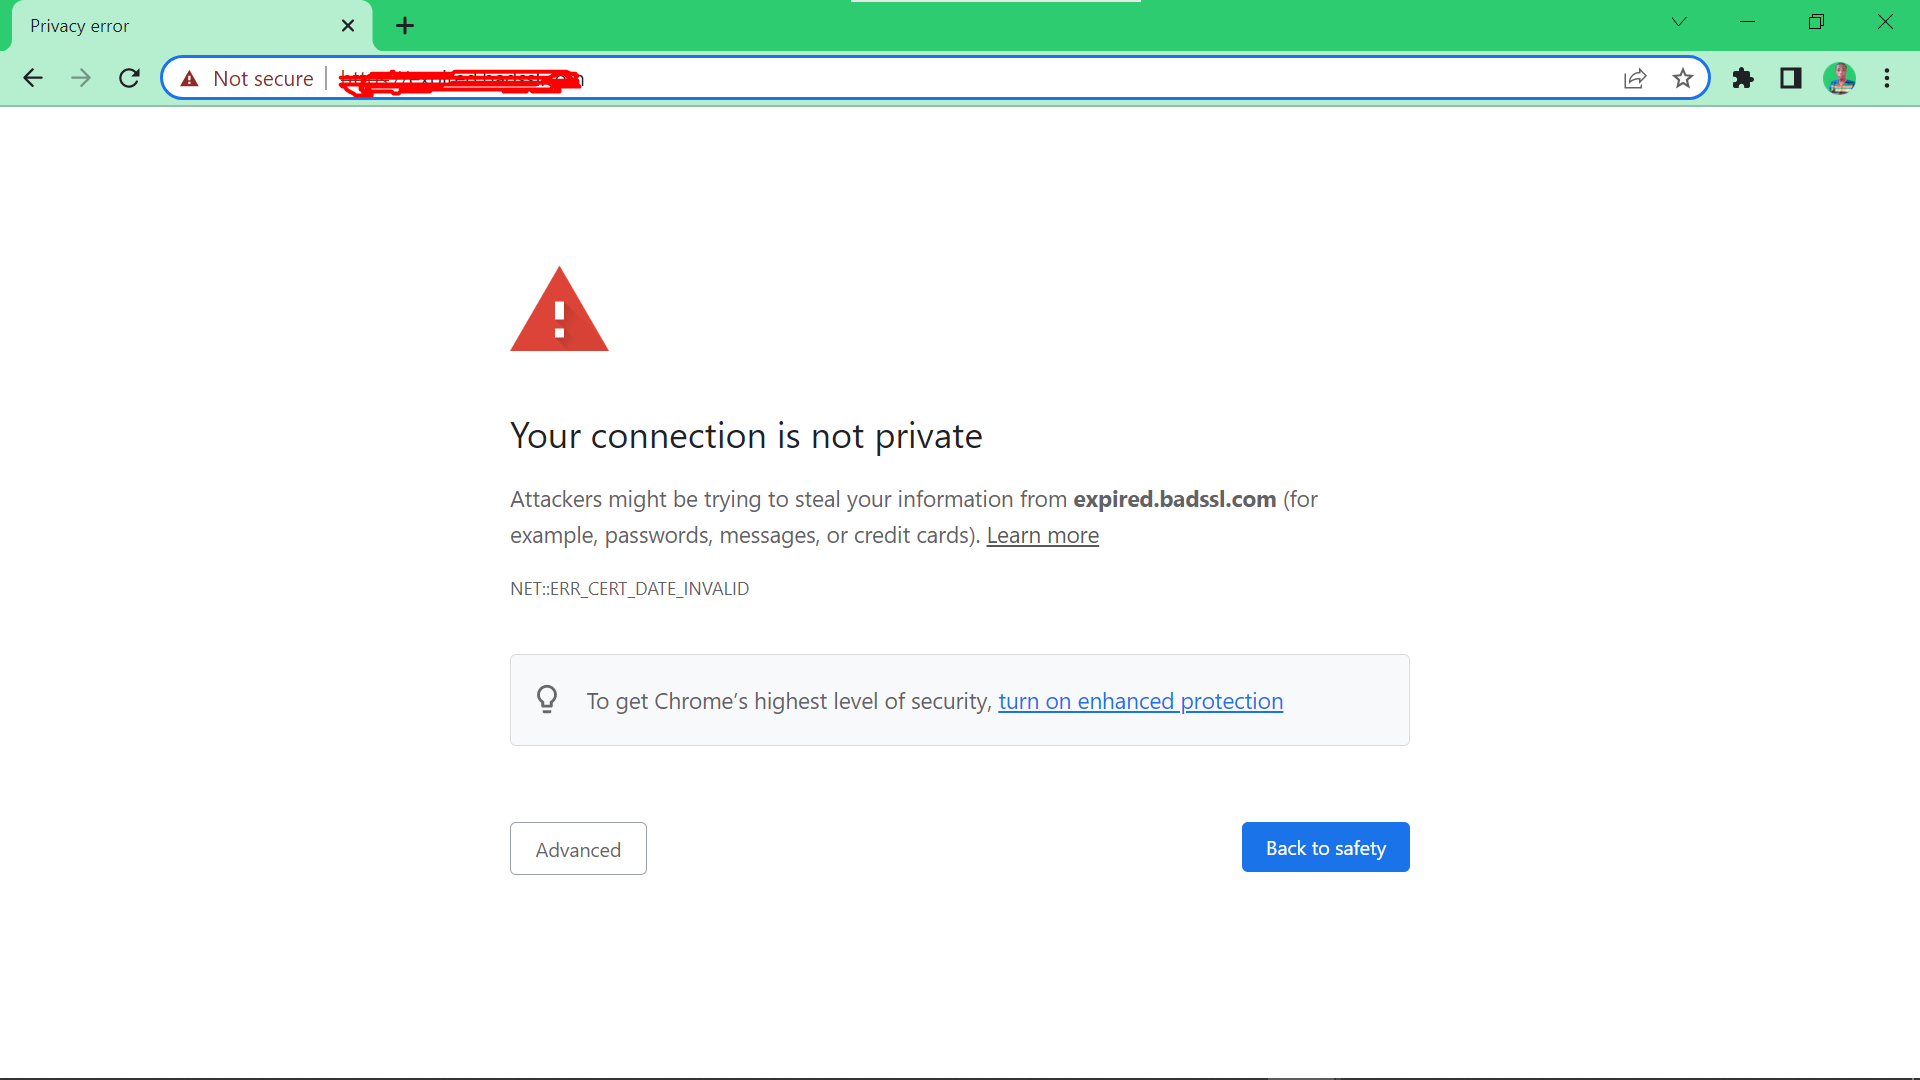
The client checks to ensure that the server’s certificate is not expired and that the domain name or IP address on the certificate matches the server’s information. Then, the client attempts to verify that the server’s certificate has been properly signed by the certificate authority who authorized it.
Why is postman unable to verify SSL certificate?
It’s locally isolated to me; the rest of my team does not have any issues. In the Settings, I already turned off SSL certificate verification, but it still doesn’t work. Any ideas? Postman v7.16.1 I have just installed PostMan a I have the same problem. My solution was only in wrong settings: Maybe it will help you.
How to add a CA certificate to a server?
(Settings -> Certificates -> Client Certificates) And if you are trying to request an untrusted host (e.g, localhost) add the CA certificate of the server. (Settings -> Certificates -> CA Certificates)
Запустите /usr/lib/vmware-vmca/bin/certificate-manager
-
- Выбирите пункт 4 Regenerate a new VMCA Root Certificate and replace all certificates и введите пароль для administrator@vsphere.local
- Далее последовательно заполните поля с учетом того, что Name, Hostname и VMCA должны соответствовать Primary Network Identifier PNID .
- Значение PNID можно посмотреть выполнив /usr/lib/vmware-vmafd/bin/vmafd-cli get-pnid —server-name localhost
-
Please configure certool.cfg file with proper values before proceeding to next step.
Press Enter key to skip optional parameters or use Default value.
Enter proper value for 'Country'  : (Note: Value for Country should be only 2 letters)
Enter proper value for 'Name'  :
Enter proper value for 'Organization'  :
Enter proper value for 'OrgUnit'  :
Enter proper value for 'State'  :
Enter proper value for 'Locality'  :
Enter proper value for 'IPAddress'  :
Enter proper value for 'Email'  :
Enter proper value for 'Hostname'  :
Enter proper value for VMCA 'Name':
- Нажмите Y (Yes) для продолжения.
- В случае неактуального сертификата в веб-консоли vCenter перезагрузите vCenter.
-
Если Вы хотите валидный сертификат полученный через центр сертификации
- В меню выберите пункт 1. Replace Machine SSL certificate with Custom Certificate и введите пароль для administrator@vsphere.local
- Укажите директорию, где будут помещены запросы на выпуск,
например /tmp/ssl/ - Далее последовательно заполните поля с учетом того, что Name, Hostname и VMCA должны соответствовать Primary Network Identifier PNID .
-
Значение PNID можно посмотреть выполнив /usr/lib/vmware-vmafd/bin/vmafd-cli get-pnid —server-name localhost
-
Country      : Two uppercase letters only (Eg. US), the country where your company is located.
Name         : FQDN of the vCenter Server(This will be your Certificate Subject Alternate Name)
Organization : Company Name
OrgUnit      : The name of your department within the organization. Example: "IT"
State        : The state/province where your company is located
Locality     : The city where your company is located.
IPAddress    : IP Address of vCenter Server, this field is Optional
Email        : Email Address
Hostname     : FQDN of vCenter Server(This field accepts multiple entries separated by comma.
- Файл /tmp/ssl/vmca_issued_csr.csr передаем в центр сертификации для выпуска SSL сертификата.
- Помещаем выпущенный сертификат на систему, например, в /tmp/ssl/ в отдельной сессии
- Продолжаем импорт
Provide a valid custom certificate for Machine SSL.
File : /tmp/ssl/machine_name_ssl.cer

Provide a valid custom key for Machine SSL.
File : /tmp/ssl/machine_name_ssl.key

Provide the signing certificate of the Machine SSL certificate.
File : /tmp/ssl/Root64.cer
- Нажмите Y (Yes) для продолжения.
- В случае неактуального сертификата в веб-консоли vCenter перезагрузите vCenter.
Unable to perform Git operations due to an internal or self-signed certificate
If your GitLab instance is using a self-signed certificate, or if the
certificate is signed by an internal certificate authority (CA), you might
experience the following errors when attempting to perform Git operations:
To fix this problem:
- If possible, use SSH remotes for all Git operations. This is considered more
secure and convenient to use. - If you must use HTTPS remotes, you can try the following:
-
Copy the self-signed certificate or the internal root CA certificate to a
local directory (for example, ) and configure Git to trust your
certificate: -
Disable SSL verification in your Git client. This is intended as a
temporary measure, as it could be considered a security risk.
-
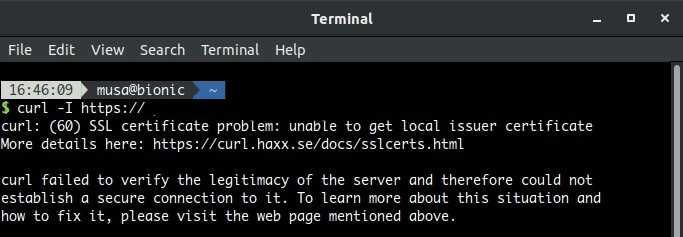
What causes ‘ssl certificate problem unable to get local issuer certificate’
The error is caused by the misconfiguration of the SSL certificate on your local machine. When pushing, pulling, or cloning, Git cannot verify your SSL certification, which leads to the error.
A valid HTTPS handshake requires both the client and the server to create a secure connection, allowing for safe communication between your local machine and where the source code is hosted. When the SSL certificate cannot be verified, for example because it is self-signed or issued by the corporate Certificate Authority (CA), Git cannot complete the HTTPS handshake with the server that hosts the repository.
When the occurs in VS Code, it is often because Visual Studio cannot locate the SSL certificate. This may be due to the path being misconfigured on the local machine.
Troubleshooting (Cluster)Issuers
First of all check if the (Cluster)Issuer you’re using is in a ready state:
$ kubectl get issuer$ kubectl get clusterissuerNAME READY AGEletsencrypt True 38mletsencrypt-http False 32m
If you see check the status using . For example:
$ kubectl describe issuer letsencrypt-http$ kubectl describe clusterissuer letsencrypt-httpName:         letsencryptAPI Version:  cert-manager.io/v1Kind:         IssuerSpec:  Acme:    Email:            cert-manager@example.com    Private Key Secret Ref:      Name:  letsencrypt    Server:  https://acme-staging-v02.api.letsencrypt.org/directoryStatus:  Acme:  Conditions:    Message:               Failed to update ACME account:400 urn:ietf:params:acme:error:invalidEmail: Unable to update account :: invalid contact domain. Contact emails @example.com are forbidden    Reason:                ErrUpdateACMEAccount    Status:                False    Type:                  ReadyEvents:  Type     Reason                Age                  From          Message  ----     ------                ----                 ----          -------
  Warning  ErrUpdateACMEAccount  101s (x3 over 106s)  cert-manager  Failed to update ACME account:400 urn:ietf:params:acme:error:invalidEmail: Unable to update account :: invalid contact domain. Contact emails @example.com are forbidden
Common errors
- : the email you specified in the Issuer configuration isn’t valid.
- : there might be a leftover account from a previous issuer that is no longer valid, you should remove the secret so it can be recreated.
- : this suggests that the authorization was not in ‘pending’ state at a time when cert-manager sent a request to the ACME server to accept the challenge. This may be because the domain validation has already failed and the authorization has been marked as ‘invalid’. Check the authorization URL on the status of the or to see the status of the authorization and any additional information.
Conclusion
In this guide, you have covered the different causes and solutions for the unable to verify the first certificate error. Here is a summary of the key points covered in the article:
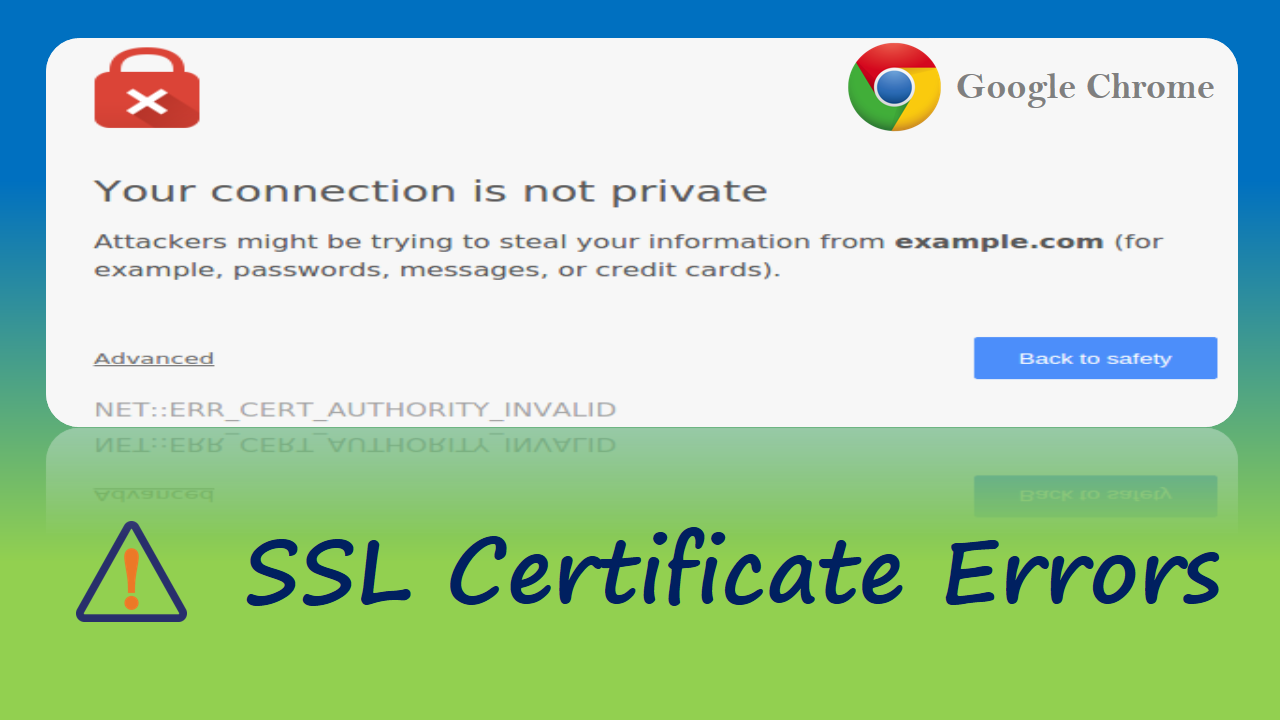
- This error is a warning that there is a security vulnerability on the website or server you are trying to connect to.
- The main causes of this error include expired or invalid certificates, self-signed certificates, and incorrectly configured certificate chains.
- To solve this error, consider obtaining a new certificate from a trusted certificate authority.
- Also, as a website or server administrator, you should replace the self-signed certificate with a valid one.
- Another solution involves properly configuring the certificate chain.
With this understanding, you can take the necessary steps to ensure the security of your website or server and fix this error if you encounter it.
3) EasyRSA (версия 2) + OpenSSL
Не нашел специальной команды на обновление CRL с помощью EasyRSA 2, пришлось использовать openssl.
# cd /etc/openvpn/easy-rsa/2.0/ # . /etc/openvpn/easy-rsa/2.0/vars # echo $KEY_CONFIG /etc/openvpn/easy-rsa/2.0/openssl-1.0.0.cnf
По-умолчанию, обновление списка отозванных сертификатов производится раз в 30 дней. Это указано в конфиге в секции :
Можно увеличить этот интервал, например:
# openssl ca -gencrl -keyfile keys/ca.key -cert keys/ca.crt -out keys/crl.pem -config openssl-1.0.0.cnf
error on line 145 of /etc/openvpn/easy-rsa/openssl-1.0.0.cnf 4352345234545:error:0E065068:configuration file routines:STR_COPY:variable has no value:conf_def.c:618:line 145
Это из-за того, что скрипт vars не экспортировал переменную, которую использует конфиг openssl-1.0.0.cnf. В скрипте vars раскомментировал директиву export KEY_CN=»CommonName» (была в самом конце файла). Еще раз выполнил экспорт:
# openssl ca -gencrl -keyfile keys/ca.key -cert keys/ca.crt -out keys/crl.pem -config openssl-1.0.0.cnf
Можно просмотреть выпущенный сертификат CRL:
# openssl crl -inform PEM -in keys/crl.pem -text -noout
В информации будет указан список отозванных ключей (серийные номера), дата обновления и ближайшая необходимая дата регенерации CRL.
Далее файл crl.pem скопируем в рабочее расположение OpenVPN и рестартуем OpenVPN-сервер:
# service openvpn restart
What causes the ‘The Server you are Connected to is Using a Security Certificate that Cannot be Verified’ Error Message?
- Wrong Hostname: Many times, when users are configuring MS Outlook for a new account, they mistakenly type the hostname wrong and since when the hostname is wrong, there is no chance of any connection.
- ISP Changed the mail server’s name: Another cause would be that the ISP has changed their mail server i.e its name and thus, you are being redirected from an old address to new ones, and that new address is not in their SSL certificate list
- Ports Blockage: If you are in a school or university or any other such place which is under restrictions and some of the SSL ports which MS Outlook’s email client uses are blocked, then you will not be able to connect to the email account and you will get this error.
- Wrong Ports in Configuration: If you have entered the wrong port numbers for your mail server while you were configuring an account, then you are going to get this error. As wrong port numbers mean no connection of the email client and the mail server.
- Time/Date Issue: If your computer’s day/time is not correct, that might result in this error message.
- Certificate issues: Sometimes, invalid certificates between the mail server and the email client can cause this issue. If your MS Outlook’s certificates are not valid for the mail server that you want to connect to, then you will get this error.
Now, in order to fix the issue, you can use the solutions given down below.
Solution 1: Match Certificate Name
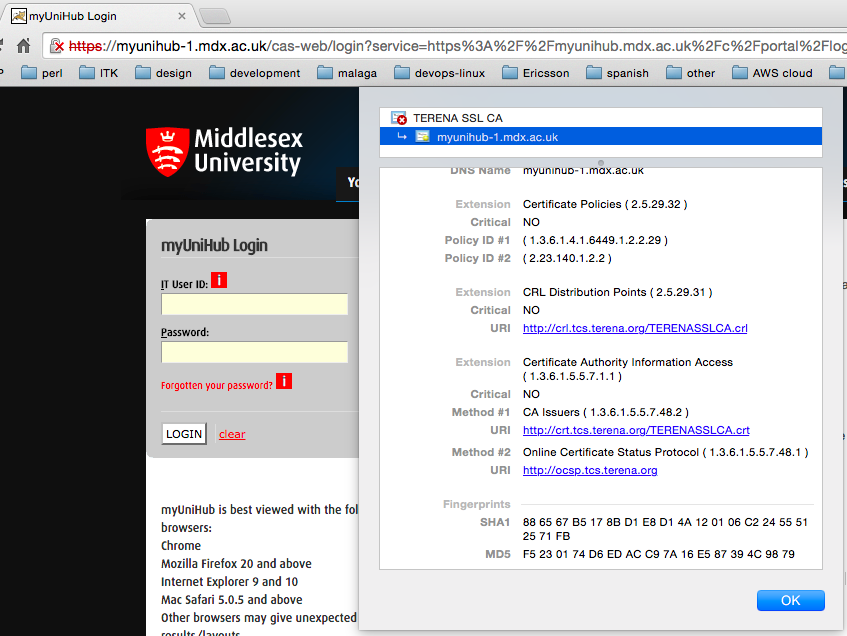
- Once you get the error, click on View Certificate.
- Then, click on “Issued to Name” and make sure that the name there is the same as the name of the mail server.
- If it is not, change it and then try connecting again. Hopefully, it is going to fix your issue.
It is important to note that this might not work if the certificate has multiple names. In such a scenario, you need to try different names that are available and see if any among them works out. In case they don’t, you should contact your ISP regarding any changes made in their DNS and ask for further assistance.

![Error: test failed: [ssl: certificate_verify_failed] certificate verify failed: unable to get local issuer certificate (_ssl.c:1091) – linuxhowto.net](https://kubwheel.ru/wp-content/uploads/1/8/9/189848e8f84ab41fda17ad5e8419a9b6.png)
Solution 2: Use domain of your hosting company as mail server (if using a shared web hosting)
Therefore, it’s recommended to use the domain name of your hosting as your mail server:
For example:

mail.yourhostingdomain.com

Instead of

mail.yourdomain.com
Solution 3: Add Non SSL ports
Sometimes, in universities, schools and other places, there are some restrictions and many popular mail servers’ ports are blocked and the most common SSL ports as well for example SSL POP port 995, IMAP 993 and SMPTP 465. In such a case, what you can do is that you can try adding non-SSL ports and connect with these ports as they might not be blocked on your network. You can do this by following the instructions in the next solution. The ports are:
Non SSL POP Port: 110

Non SSL IMAP Port: 143

Non SSL SMTP Port: 587
Solution 4: Change Outgoing SMTP Port to 26
Many ISPs block the SMTP port 25 because of spamming etc, so if your ISP has blocked it as well, then you need to change the SMTP outgoing to port to 26. Here’s how to do that:
- Go to File and in the Info tab, click Account Settings and afterward select Account Settings again from the drop-down list.
- Highlight your email account and click Change.
- Now, click on More Settings and switch to the Advanced tab.
- Change the SMTP Outgoing Port to 26.
- Click OK.
Note:
It is recommended that you don’t install certificates unless it is a custom certificate or a certificate only particular to a certain mail server.
The good thing is that you don’t need installing certificates at all while connecting to many of the popular mail servers.
Подчистую
Данный способ подходит для тех, у кого на устройстве не сохранено никаких важных данных. Хотя, по сути, фото и видео всегда можно перенести на компьютер, а приложения скачать заново, особенно если вы синхронизировали свои данные с Google-аккаунтом. Тогда даже при переустановке все данные приложений должны будут сохраниться. Итак, существует два способа того, как устранить ошибку «Не удается установить надежное соединение с сервером».
- Сброс телефона до заводских настроек. Можете воспользоваться специальными программами, которые предлагают разработчики приложений, либо найти инструкцию, подходящую конкретно под вашу модель «Андроид»-устройства. Ведь у каждого производителя свои хитрости и механизмы защиты.
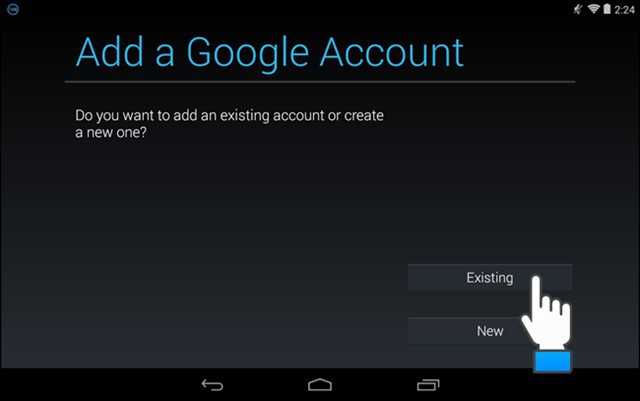
- Добавить новый аккаунт. Как понимаете, старые данные не будут скопированы в новые версии приложений, но зато вы сможете избежать проблем с переносом другой информации, которую необходимо сохранить при полной очистке телефона. Для добавления нового аккаунта делайте следующее:
Помимо кардинальных методов, существует и менее опасное решение. «Не удалось установить надежное соединение с сервером» — это ошибка, которая связана с временными и личными данными приложения. Поэтому и возможные выходы из проблемной ситуации можно поискать в другой области.
Ошибки «Invalid CSR» при генерации сертификата из панели управления облачного провайдера
В процессе активации сертификата можно столкнуться с ошибкой «Invalid CSR». Такая ошибка возникает по следующим причинам:
- Неправильное имя FQDN (полное имя домена) в качестве Common Name (в некоторых панелях управления это поле может также называться Host Name или Domain Name). В этом поле должно быть указано полное доменное имя вида domain.com или subdomain.domain.com (для субдоменов). Имя домена указывается без https://. В качестве данного значения нельзя использовать интранет-имена (text.local). В запросе для wildcard-сертификатов доменное имя необходимо указывать как *.domain.com.
- В CSR или пароле есть не латинские буквы и цифры. В CSR поддерживаются только латинские буквы и цифры – спецсимволы использовать запрещено. Это правило распространяется и на пароли для пары CSR/RSA: они не должны содержать спецсимволов.
- Неверно указан код страны. Код страны должен быть двухбуквенным ISO 3166-1 кодом (к примеру, RU, US и т.д.). Он указывается в виде двух заглавных букв.
- В управляющей строке не хватает символов. CSR-запрос должен начинаться с управляющей строки ——BEGIN CERTIFICATE REQUEST—— и заканчиваться управляющей строкой ——END CERTIFICATE REQUEST——. С каждой стороны этих строк должно быть по 5 дефисов.
- В конце или начале строки CSR есть пробелы. Пробелы на концах строк в CSR не допускаются.
- Длина ключа меньше 2048 бит. Длина ключа должна быть не менее 2048 бит.
- В CRS-коде для сертификата для одного доменного имени есть SAN-имя. В CSR-коде для сертификата, предназначенного защитить одно доменное имя, не должно быть SAN (Subject Alternative Names). SAN-имена указываются для мультидоменных (UCC) сертификатов.
- При перевыпуске или продлении сертификата изменилось поле Common Name. Это поле не должно меняться.
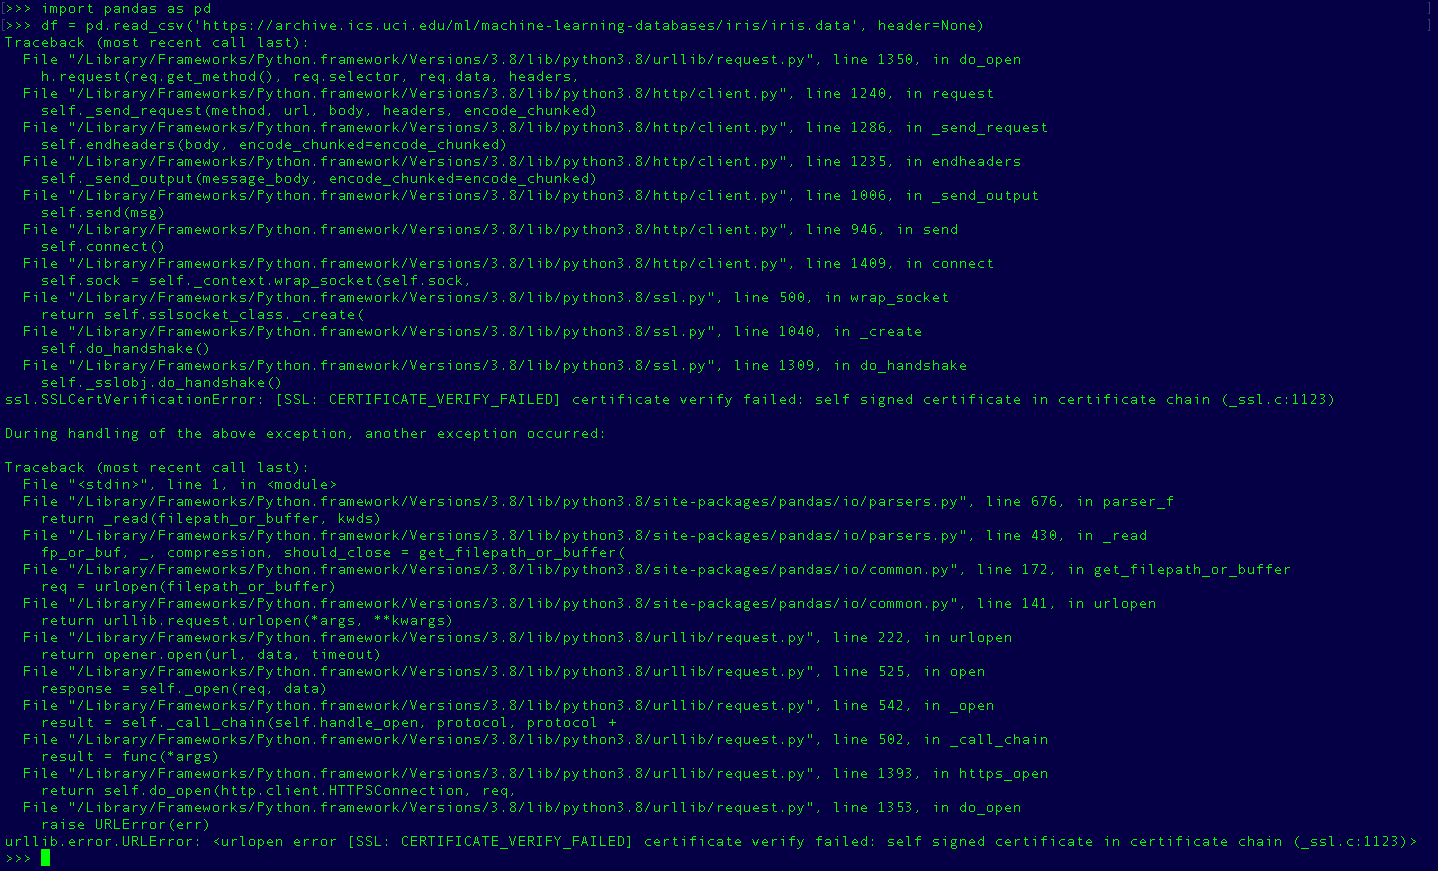
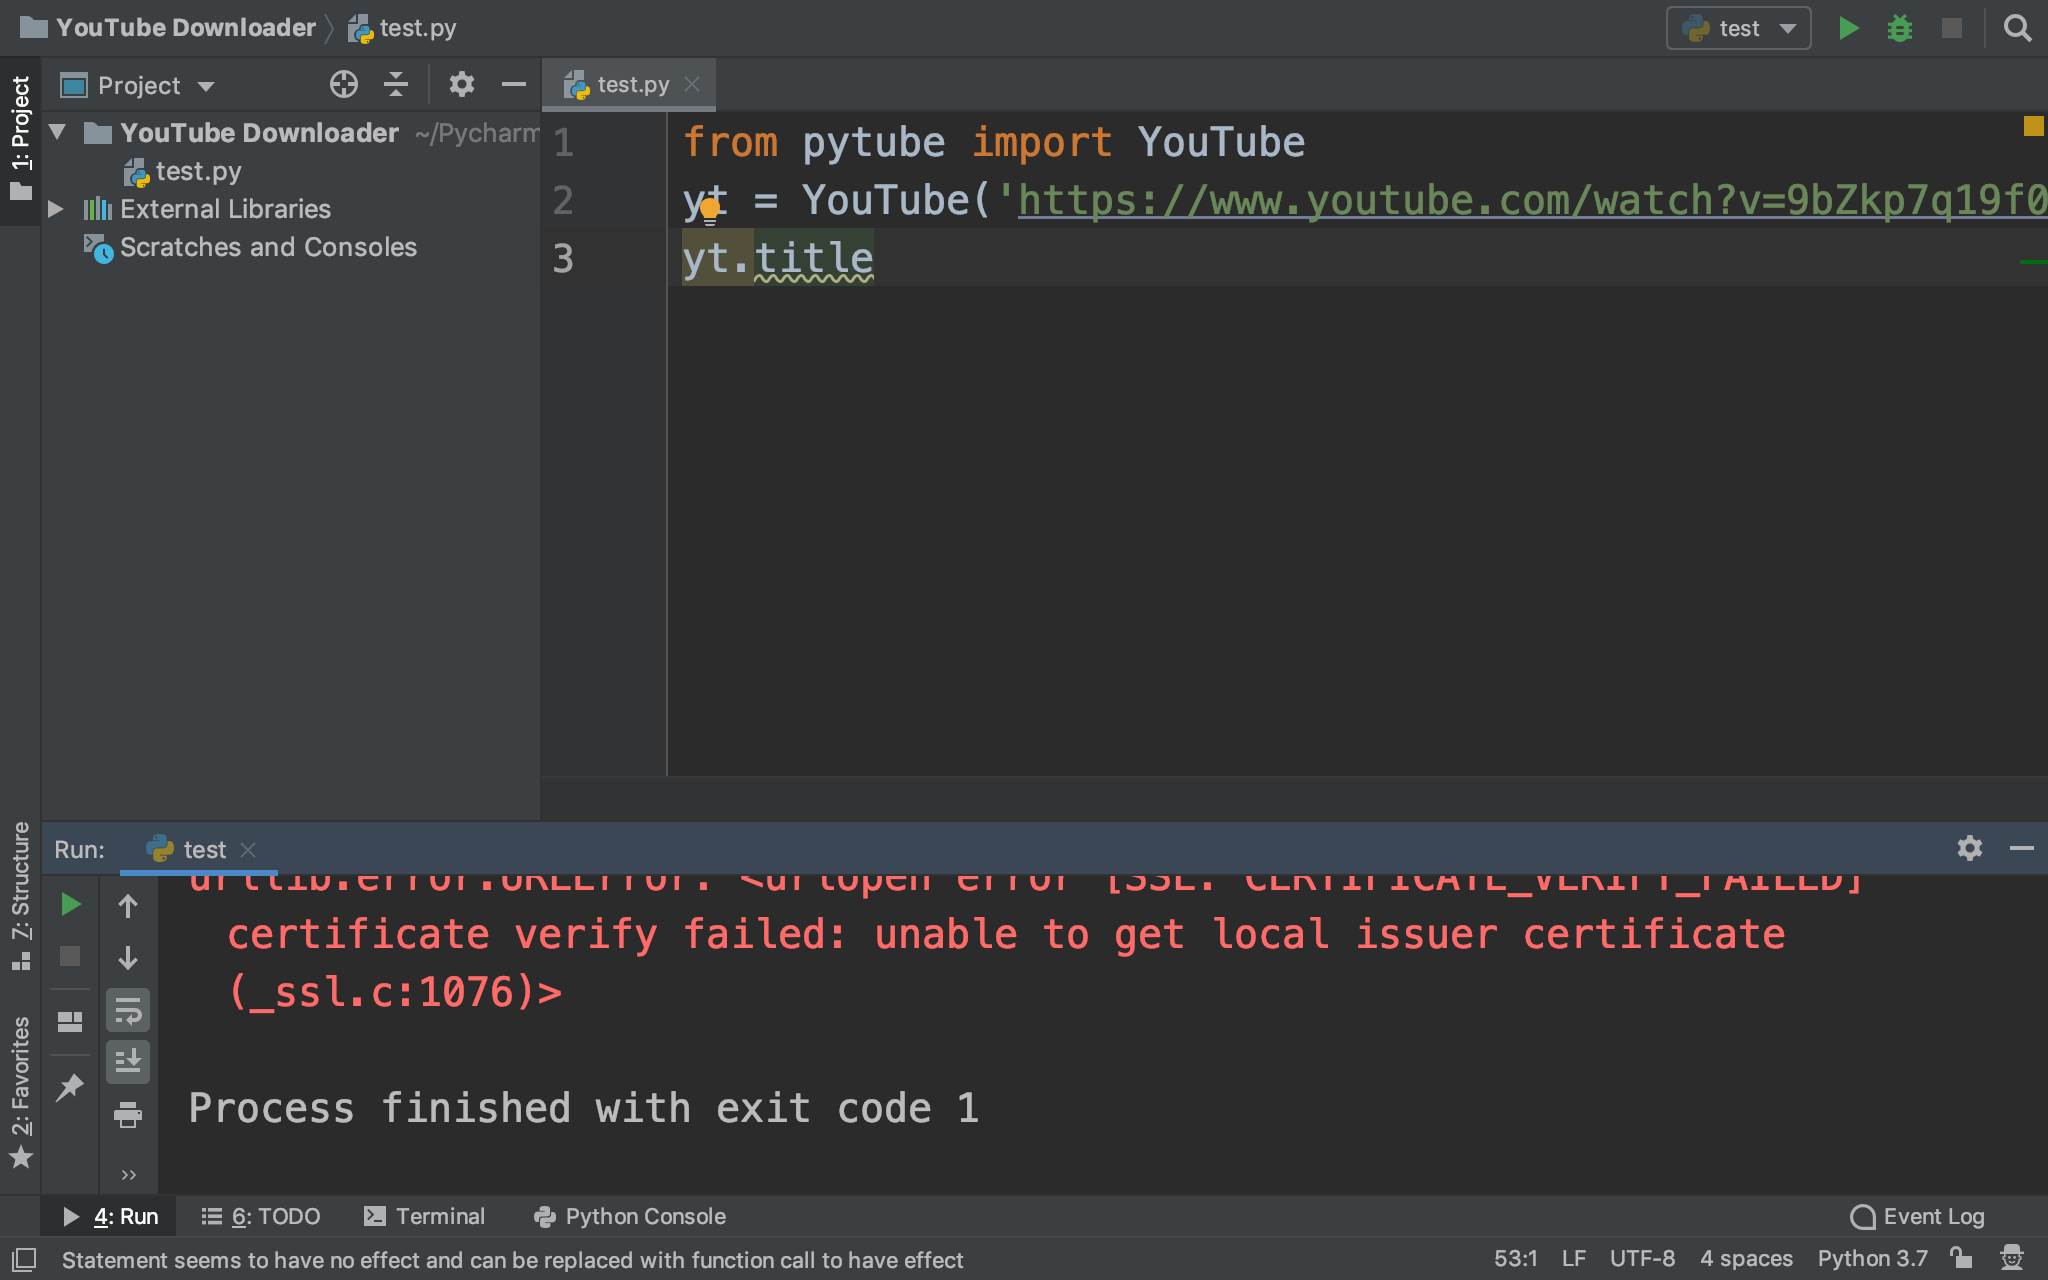
How Can I Fix the SSL Certificate_verify_failed Error?
Some people might suggest that you
simply disable the certificate verification function. But this tactic not only
fails to resolve the issue, but also means that you’re no longer verifying the
certificate, which can lead to a variety of other issues.
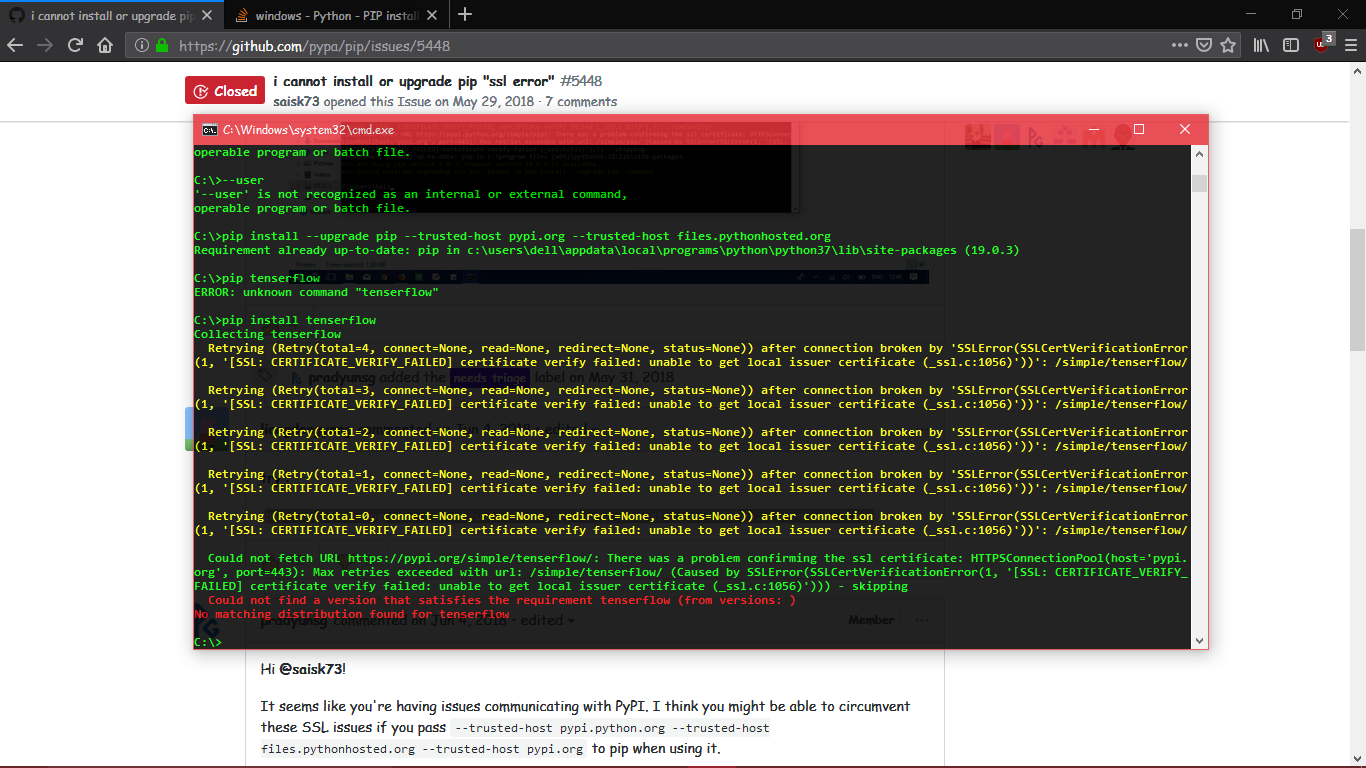
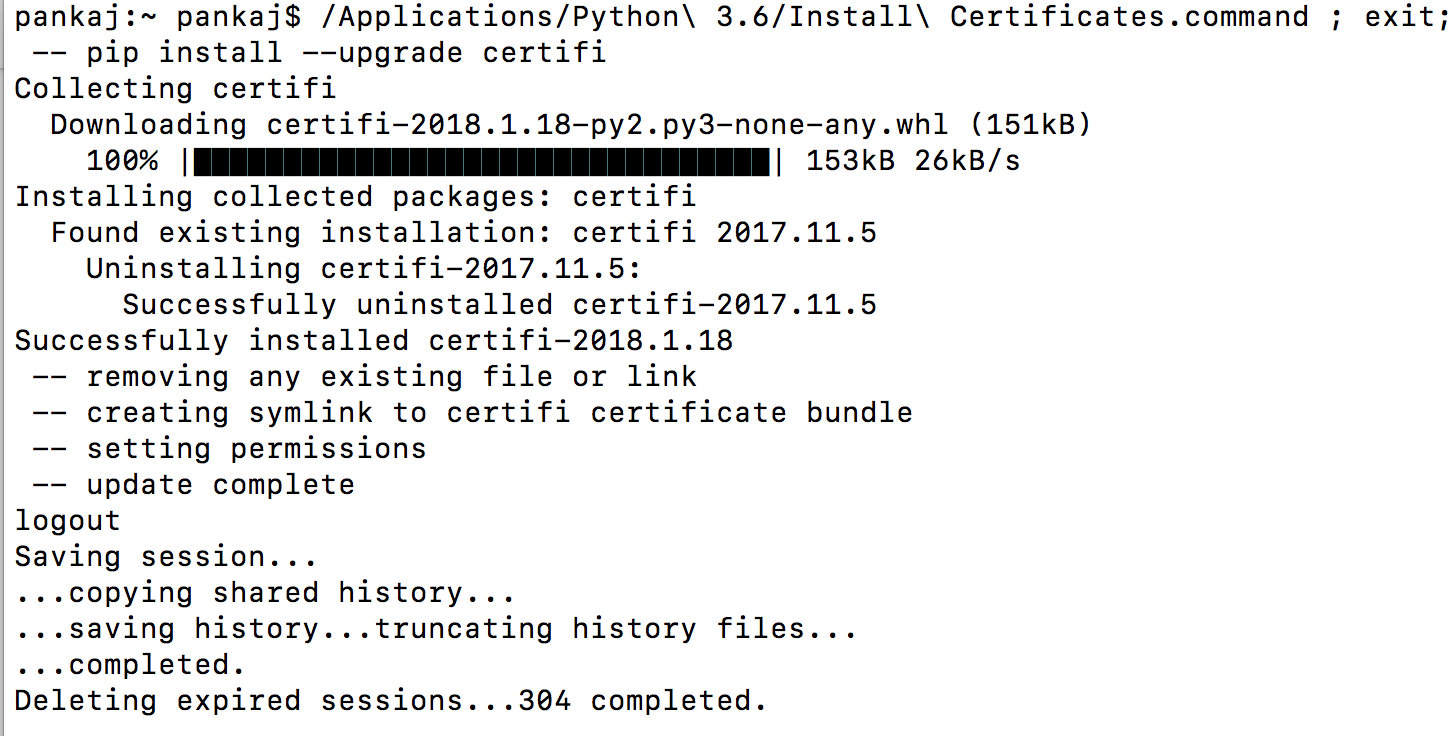
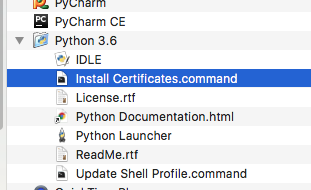
To fix this this problem, you may
need to upgrade your SSL certificate directory. The most common way to do so is
to use the following PIP code.
PIP,
which stands for “Python Package Installer,” is exactly how it sounds — it’s a
package installer for Python. This command allows for easy installation of
packages — or, in this case, our updated SSL certificates. With PIP, all you
would have to do to update your SSL certificate directory is input the
following piece of code:
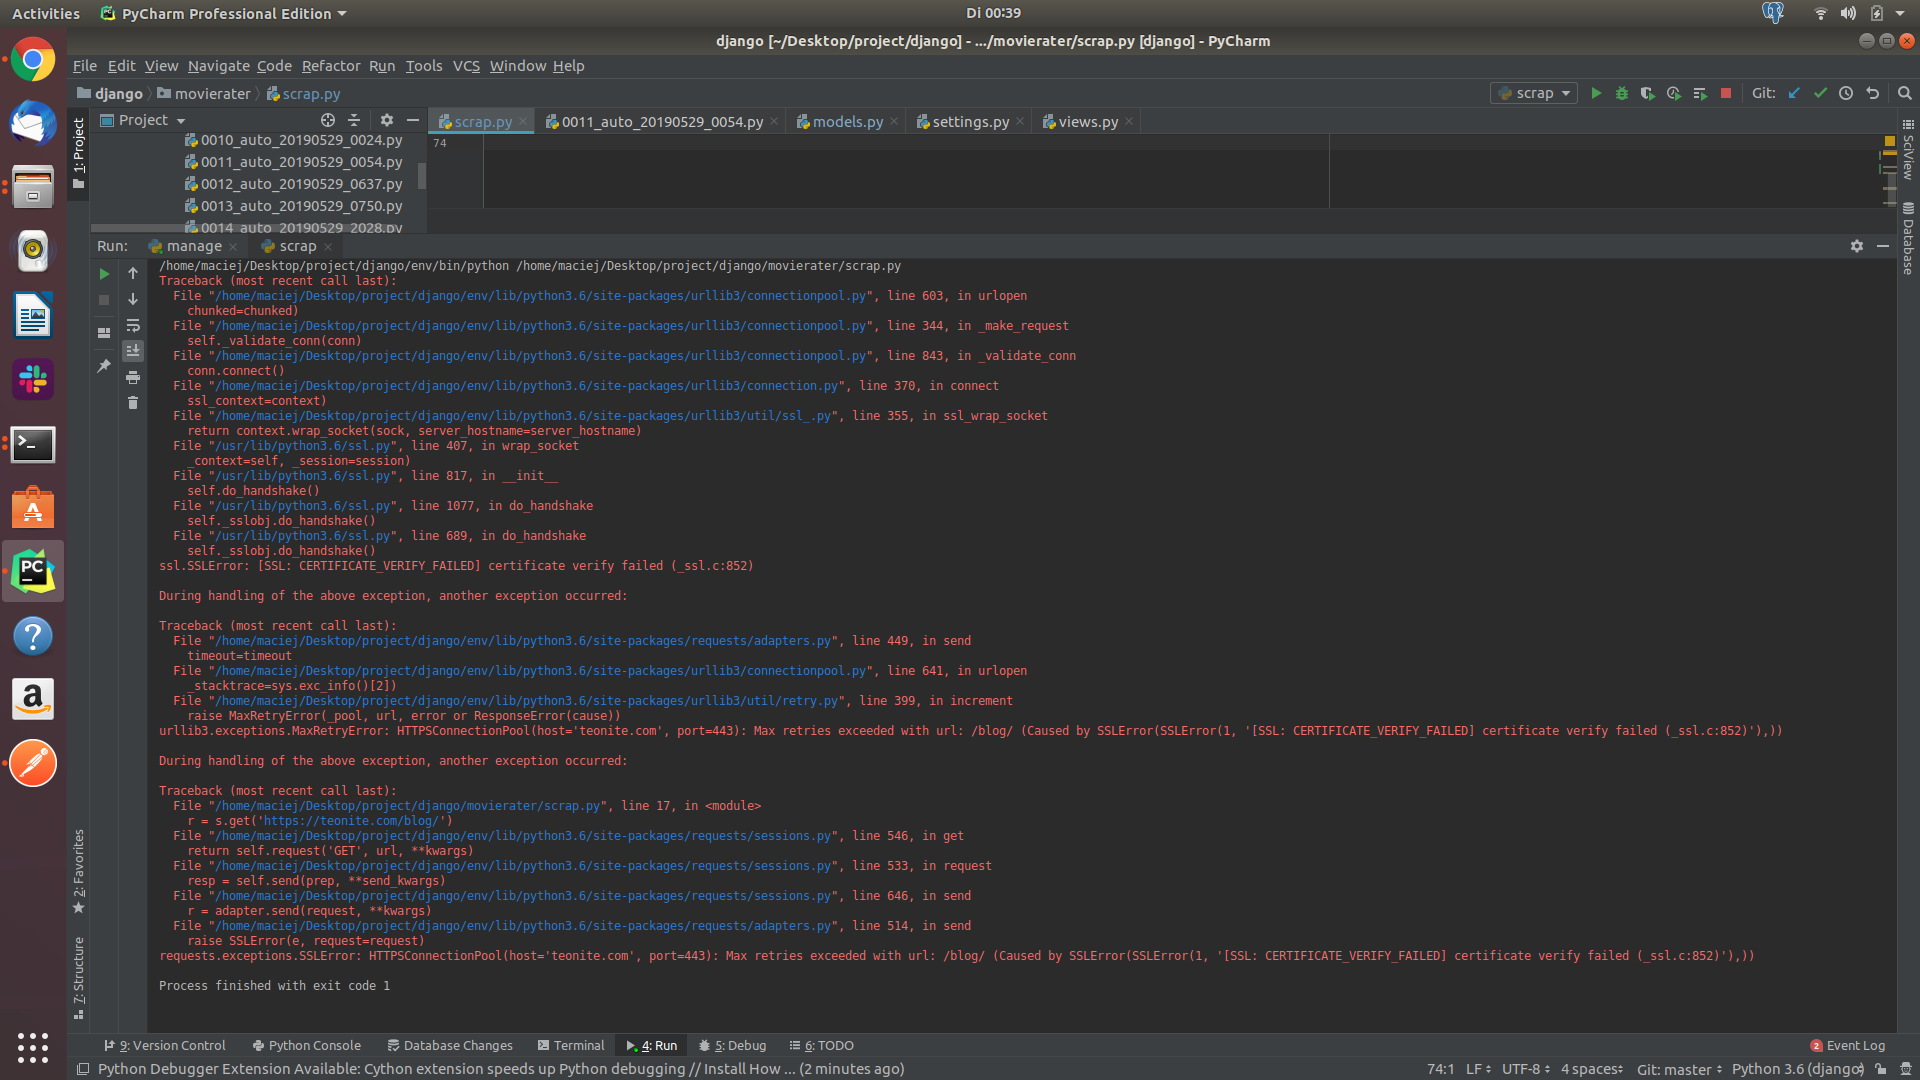
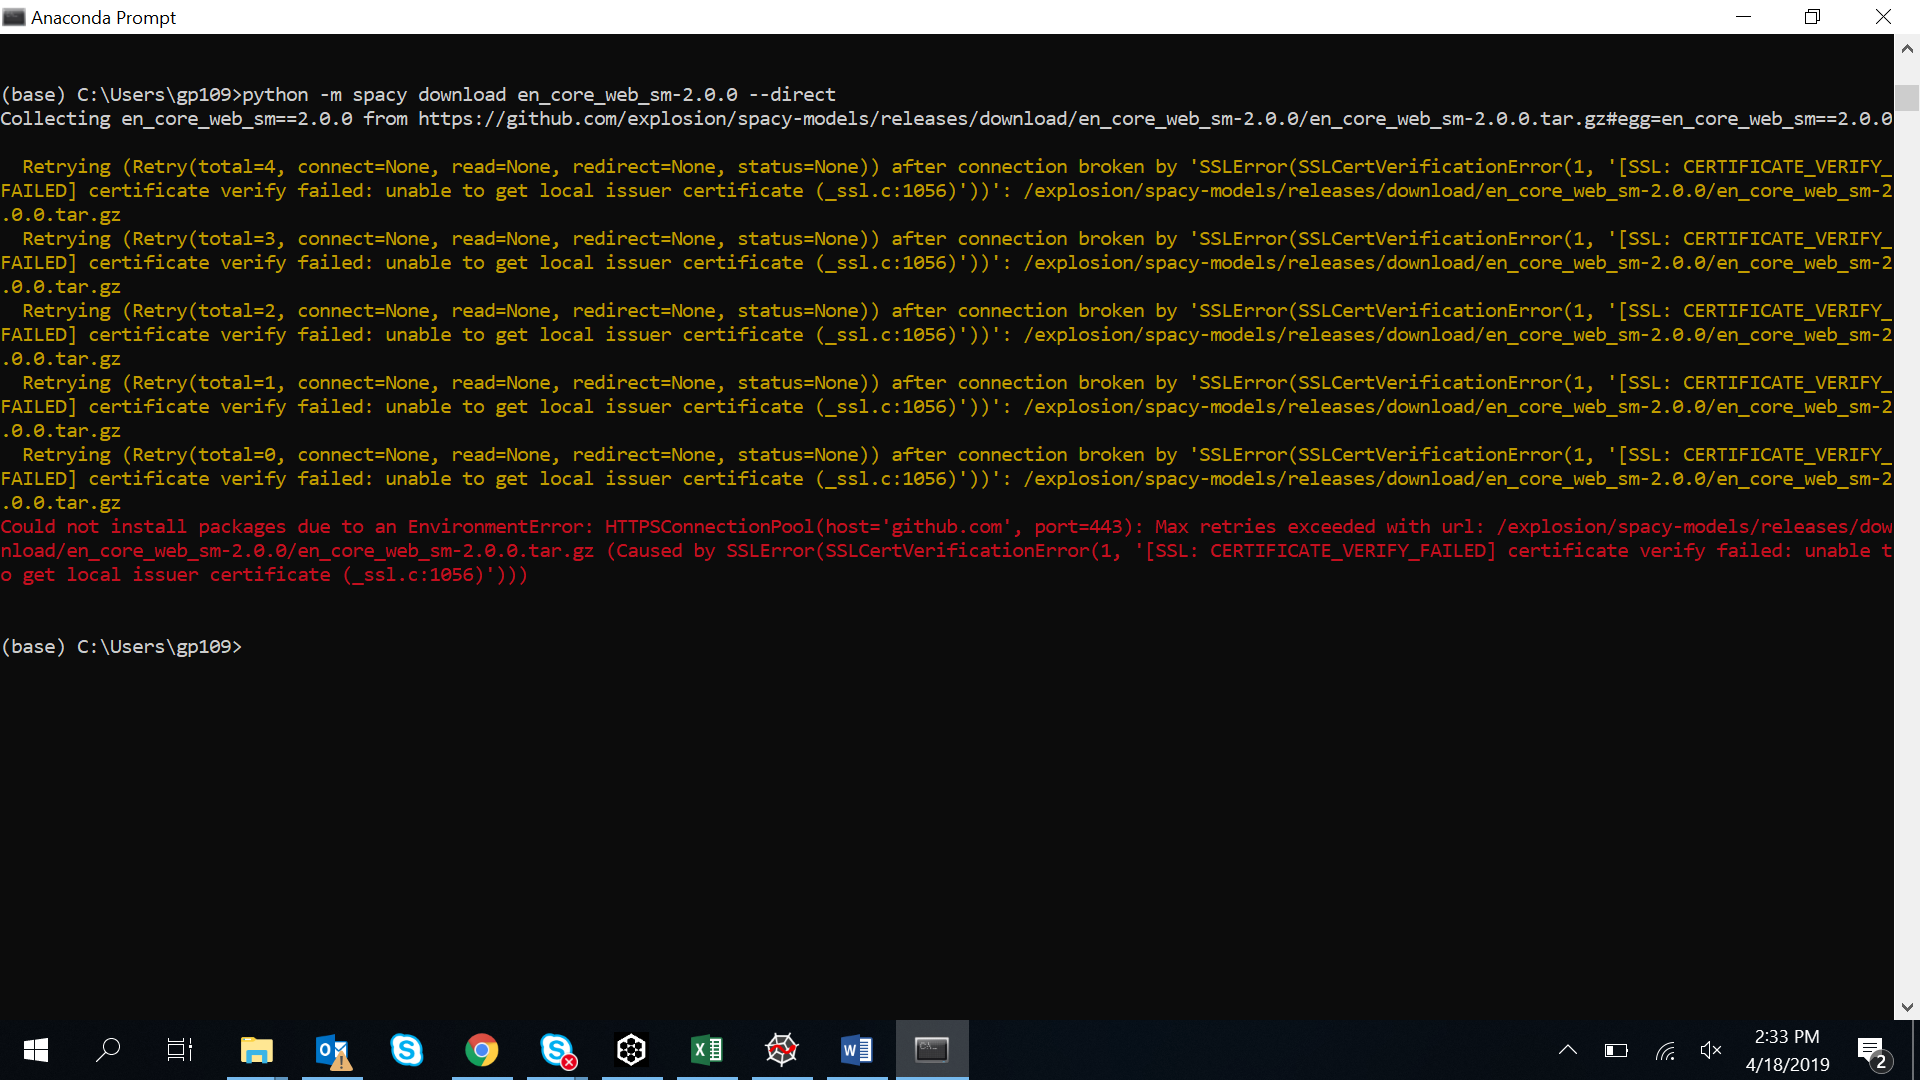
What
this command does is update your system’s SSL certificate directory. This allows
you to download the files that were previously being denied as a result of the
lack of an SSL certificate (which, in this case, was the page scraper).
After
executing the code, the error should be gone.
That wasn’t so hard, was it?
Troubleshooting Guides
- How to Resolve SSL_ERROR_RX_RECORD_TOO_LONG as a Site Visitor
- How to Fix the ERR_SSL_PROTOCOL_ERROR in 8 Easy Steps (2020 Edition)
Steps to skip certificate check in wget:
-
Test downloading https page using wget.
$ wget https://www.simplified.guide
--2021-03-29 11:31:11--  https://www.simplified.guide/
Resolving www.simplified.guide (www.simplified.guide)... 127.0.0.1
Connecting to www.simplified.guide (www.simplified.guide)|127.0.0.1|:443... connected.
ERROR: cannot verify www.simplified.guide's certificate, issued by ‘CN=mkcert name@hostname (Your Name),OU=name@hostname (Your Name),O=mkcert development CA’:
  Unable to locally verify the issuer's authority.
To connect to www.simplified.guide insecurely, use `--no-check-certificate'.
-
Use —no-check-certificate option to ignore certificate error for SSL.
$ wget --no-check-certificate https://www.simplified.guide
--2021-03-29 11:32:21--  https://www.simplified.guide/
Resolving www.simplified.guide (www.simplified.guide)... 127.0.0.1
Connecting to www.simplified.guide (www.simplified.guide)|127.0.0.1|:443... connected.
WARNING: cannot verify www.simplified.guide's certificate, issued by ‘CN=mkcert name@hostname (Your Name),OU=name@hostname (Your Name),O=mkcert development CA’:
  Unable to locally verify the issuer's authority.
HTTP request sent, awaiting response... 200 OK
Length: unspecified [text/html]
Saving to: ‘index.html’

index.html                  31.01K  --.-KB/s    in 0s

2021-03-29 11:32:21 (100 MB/s) - ‘index.html’ saved
The same message is still displayed but as WARNING instead of ERROR and the command was a success.
--no-check-certificate Don't check the server certificate against the available certificate authorities. Also don't require the URL host name to match the common name presented by the certificate. As of Wget 1.10, the default is to verify the server's certificate against the recognized certificate authorities, breaking the SSL handshake and aborting the download if the verification fails. Although this provides more secure downloads, it does break interoperability with some sites that worked with previous Wget versions, particularly those using self-signed, expired, or otherwise invalid certificates. This option forces an "insecure" mode of operation that turns the certificate verification errors into warnings and allows you to proceed. If you encounter "certificate verification" errors or ones saying that "common name doesn't match requested host name", you can use this option to bypass the verification and proceed with the download. Only use this option if you are otherwise convinced of the site's authenticity, or if you really don't care about the validity of its certificate. It is almost always a bad idea not to check the certificates when transmitting confidential or important data. -
Add option to skip certificate check into config file.
$ echo "check-certificate = off" >> ~/.wgetrc
Only use this method in development setting or wherever security is not critical.
-
Test against https page with error again without using —no-check-certificate.
$ wget https://www.simplified.guide
--2021-03-29 11:42:29--  https://www.simplified.guide/
Resolving www.simplified.guide (www.simplified.guide)... 127.0.0.1
Connecting to www.simplified.guide (www.simplified.guide)|127.0.0.1|:443... connected.
WARNING: cannot verify www.simplified.guide's certificate, issued by ‘CN=mkcert name@hostname (Your Name),OU=name@hostname (Your Name),O=mkcert development CA’:
  Unable to locally verify the issuer's authority.
HTTP request sent, awaiting response... 200 OK
Length: unspecified [text/html]
Saving to: ‘index.html.1’

index.html                31.01K  --.-KB/s    in 0s

2021-03-29 11:42:29 (115 MB/s) - ‘index.html’ saved
How to fix NodeBB unable to verify first certificate?
Can a Node.js server verify a certificate?
Node.js can not verify the certificate of your SMTP server. You can skip certificate verification by using rejectUnauthorized: false option where getting there …. I’ve been able to send mails with this conf:
How to include Certificate in the code to verify?
Error: unable to verify the first certificate in nodejs Ask Question Asked5 years, 10 months ago Active11 days ago Viewed362k times 179 45 I’m trying to download a file from jira server using an URL but I’m getting an error. how to include certificate in the code to verify? Error:
What is Unable_to_verify_leaf_signature?
How to prevent ‘ssl certificate problem unable to get local issuer certificate’ errors
The main purpose of a SSL certificate is to confirm authentication so that the information passed between client and server is secure. When an occurs, a secure connection cannot be established, and the git client rejects your attempt to push, pull, or clone a repository for security reasons.
While disabling SSL certificates altogether is an option and common fix, it is not recommended. It opens up a security vulnerability for your repository and your local machine. Nevertheless, you can negate the unable to get local issuer certificate error by disabling SSL certificates at a local and global level. If SSL certificates are disabled at a global level, it is good to always enable them again so that other projects are not impacted by the intentional security disablement.
To prevent the error, ensure that you have a valid SSL certificate in your certificate store. Alternatively, you can reinstall your Git Bash with SSL Transport backend selected during the installation process.
If you are using Git via Visual Studio Code and have a valid SSL certificate in your certificate store but still encounter the error, use the flag on your SSL certificate configuration to grant the Git server accessibility.
Ненадежный SSL-сертификат
Иногда при переходе на сайт, защищенный протоколом HTTPS, появляется ошибка «SSL-сертификат сайта не заслуживает доверия».

Одной из причин появления такой ошибки, как и в предыдущем случае, может стать неправильное время. Однако есть и вторая причина — браузеру не удается проверить цепочку доверия сертификата, потому что не хватает корневого сертификата. Для избавления от такой ошибки необходимо скачать специальный пакет GeoTrust Primary Certification Authority, содержащий корневые сертификаты. После скачивания переходим к установке. Для этого:
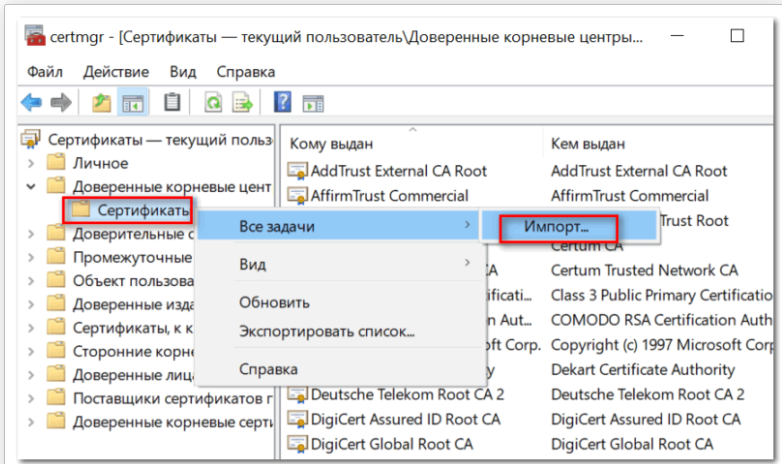
- Нажимаем сочетание клавиш Win+R и вводим команду certmgr.msc, жмем «Ок». В Windows откроется центр сертификатов.
- Раскрываем список «Доверенные корневые центры сертификации» слева, выбираем папку «Сертификаты», кликаем по ней правой кнопкой мышки и выбираем «Все задачи — импорт».
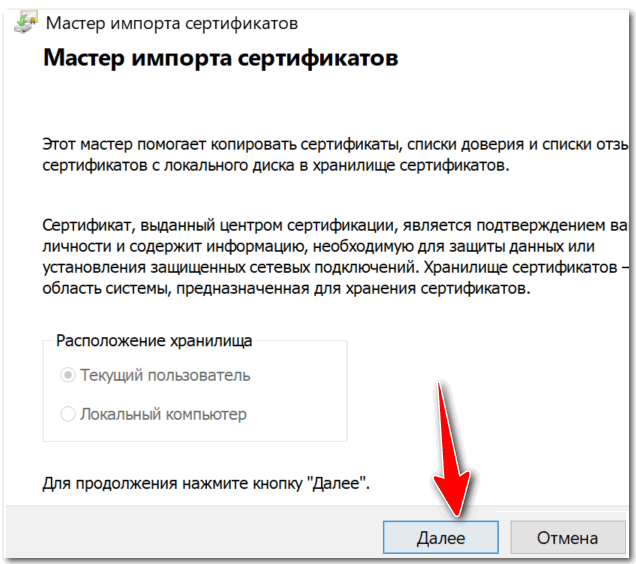
Запустится мастер импорта сертификатов. Жмем «Далее».
Нажимаем кнопку «Обзор» и указываем загруженный ранее сертификат. Нажимаем «Далее»:
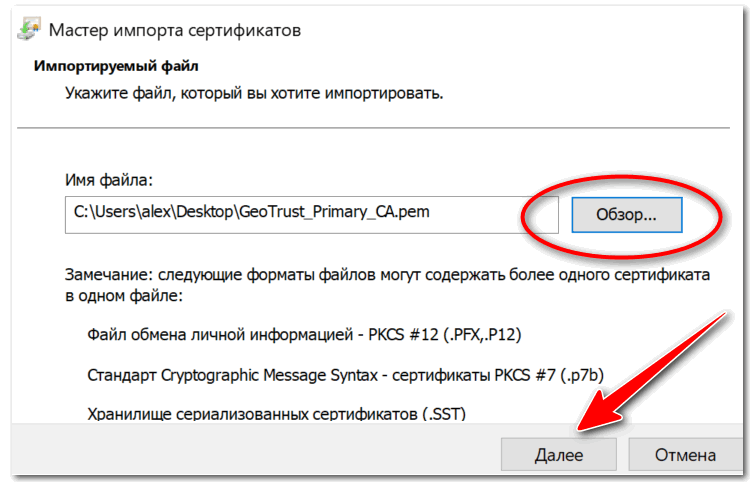
В следующем диалоговом окне указываем, что сертификаты необходимо поместить в доверенные корневые центры сертификации, и нажимаем «Далее». Импорт должен успешно завершиться.

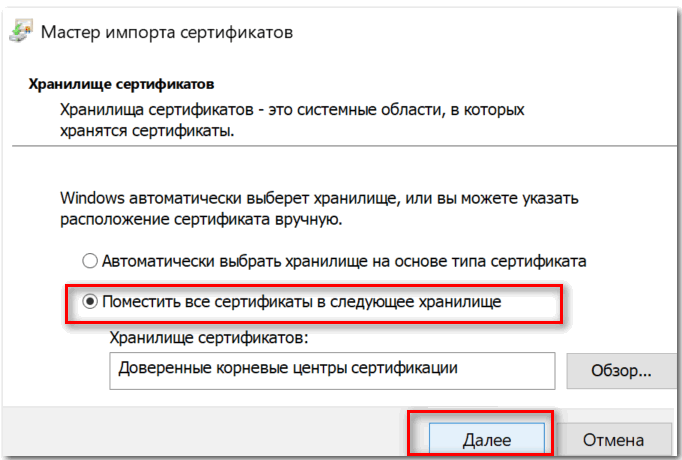
После вышеперечисленных действий можно перезагрузить устройство и проверить отображение сайта в браузере.
Убедитесь, что вы используете правильные данные для входа:
- Если у вас не включена двухфакторная аутентификация, вы не использовали пароль приложения, и выбрали Портальный пароль», используйте свой обычный пароль для входа в Spark.
- Если у вас включена двухфакторная аутентификация или вы выбрали «Пароли приложений и QAuth-токены» как способ авторизации, создайте специальный пароль для Spark и вставьте его в необходимое поле для входа в Spark:
- Откройте страницу Управление аккаунтом.
- В разделе Пароли и авторизация выберите Включить пароли приложений. Подтвердите действие и нажмите Создать новый пароль.
- Если вы включили двухфакторную аутентификацию, просто нажмите Создать пароль приложения.
- Выберите тип приложения Почта.
- Придумайте название пароля, например, «Спарк». С этим названием пароль будет отображаться в списке.
- Нажмите кнопку Создать. Пароль приложения отобразится во всплывающем окне.
- Нажмите Скопировать и используйте этот пароль для входа в Spark.
Обратите внимание: Созданный пароль можно увидеть только один раз. Если вы ввели его неправильно во время входа в Спарк и закрыли окно с созданным паролем приложения, удалите текущий пароль и создайте новый
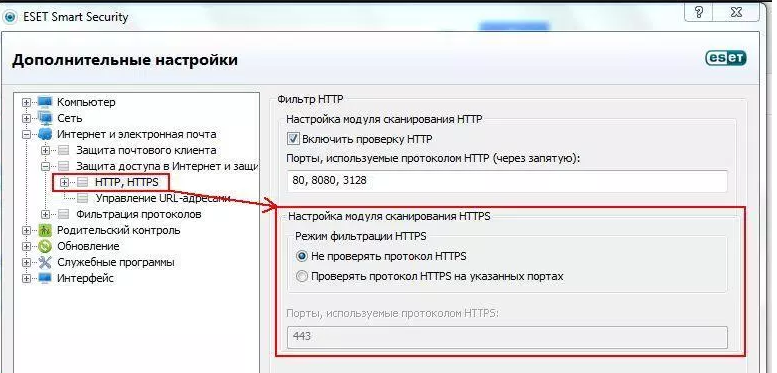
Брандмауэр или антивирус, блокирующие сайт
Некоторые сайты блокируются брандмауэром Windows. Для проверки можно отключить брандмауэр и попробовать зайти на нужный сайт. Если SSL-сертификат начал работать корректно, значит дело в брандмауэре. В браузере Internet Explorer вы можете внести некорректно работающий сайт в список надежных и проблема исчезнет. Однако таким образом вы снизите безопасность своего устройства, так как содержимое сайта может быть небезопасным, а контроль сайта теперь отключен.
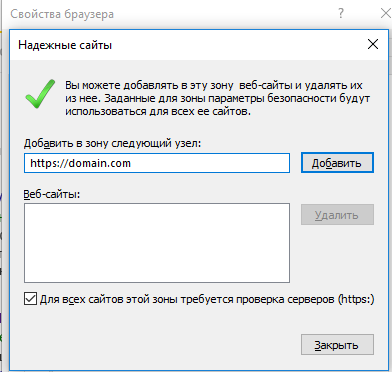
Также SSL может блокировать антивирусная программа. Попробуйте отключить в антивирусе проверку протоколов SSL и HTTPS и зайти на сайт. При необходимости добавьте сайт в список исключений антивируса.
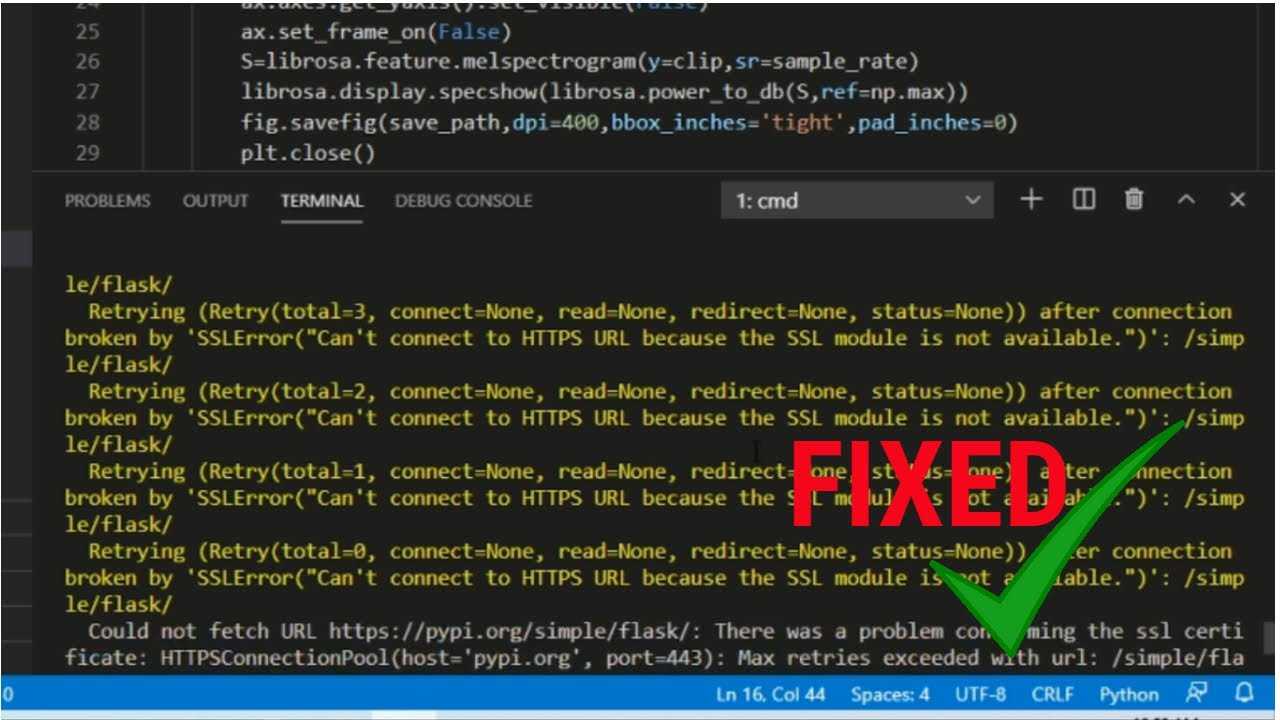
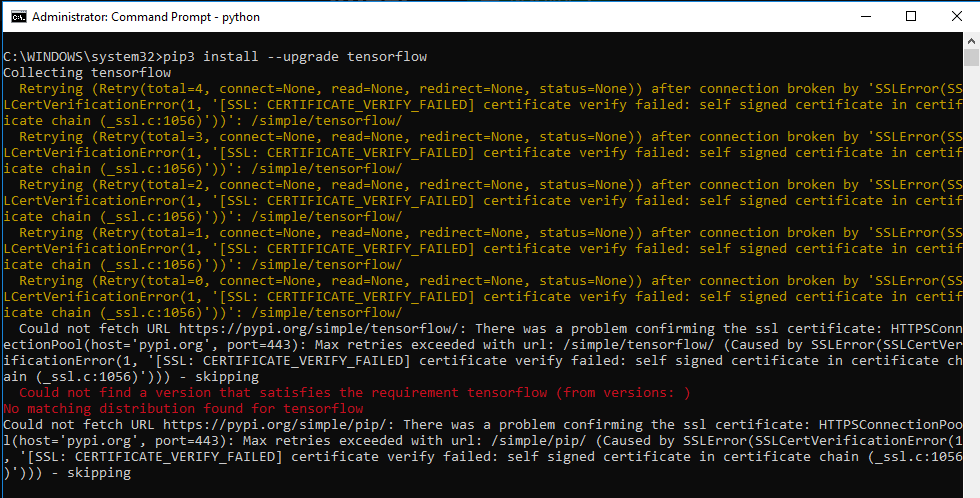
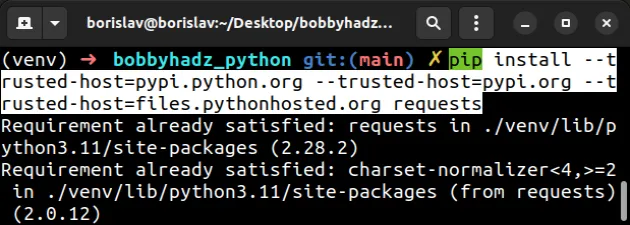
# [Fixed] Connection error: [SSL CERTIFICATE_VERIFY_FAILED]
The «connection error: certificate verify
failed» occurs when a firewall is preventing you from reaching the
servers when trying to install a package.
To solve the error, run the command with the
option.
shell
Copied!
Open your shell and run one of the following commands, depending on your
operating system and your version of Python.
Note that the commands contain placeholder. Make sure to
replace the placeholder with the name of the package you’re trying to install.
shell
Copied!
If you get a permissions error, try prefixing the command with , or use
the option.
shell
Copied!
The
option marks a host as trusted.
This helps when you try to reach the servers from behind a firewall.
Alternatively, you can add the trusted hosts to your (macOS and Linux) or (Windows) file, so you don’t have to do it every time you need to install a package.
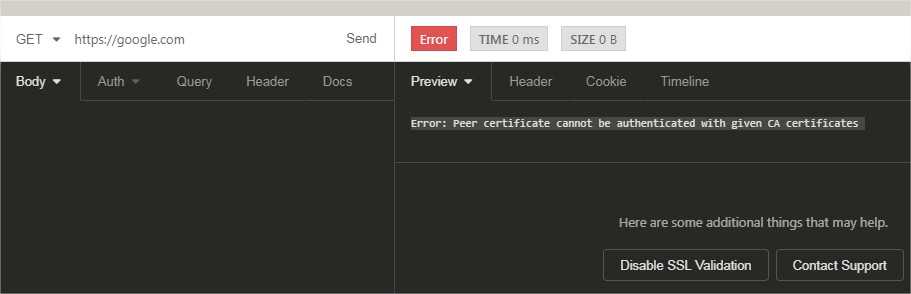
How do I pass my postman certificate?
To add a new client certificate, click the Add Certificate link. In the Host field, enter the domain (without protocol) of the request URL for which you want to use the certificate, for example, https://postman-echo.com (view Collection for Postman Echo).
How do you troubleshoot certificate issues?
How to Fix SSL Certificate Error
- Diagnose the problem with an online tool.
- Install an intermediate certificate on your web server.
- Generate a new Certificate Signing Request.
- Upgrade to a dedicated IP address.
- Get a wildcard SSL certificate.
- Change all URLS to HTTPS.
- Renew your SSL certificate.
How would you troubleshoot SSL certificate and server connection issues postman?
SSL Certificate Issues If you’re using HTTPS connections, you can turn off SSL verification under Postman settings. If that doesn’t resolve the issue, your server may be using a client-side SSL connection which you can configure under Postman Settings.
How do I test my postman console?
You can open the console from the button on the bottom left of Postman, by clicking (CMD/CTRL + ALT + C) , or selecting View > Show Postman Console. The console pane will open.
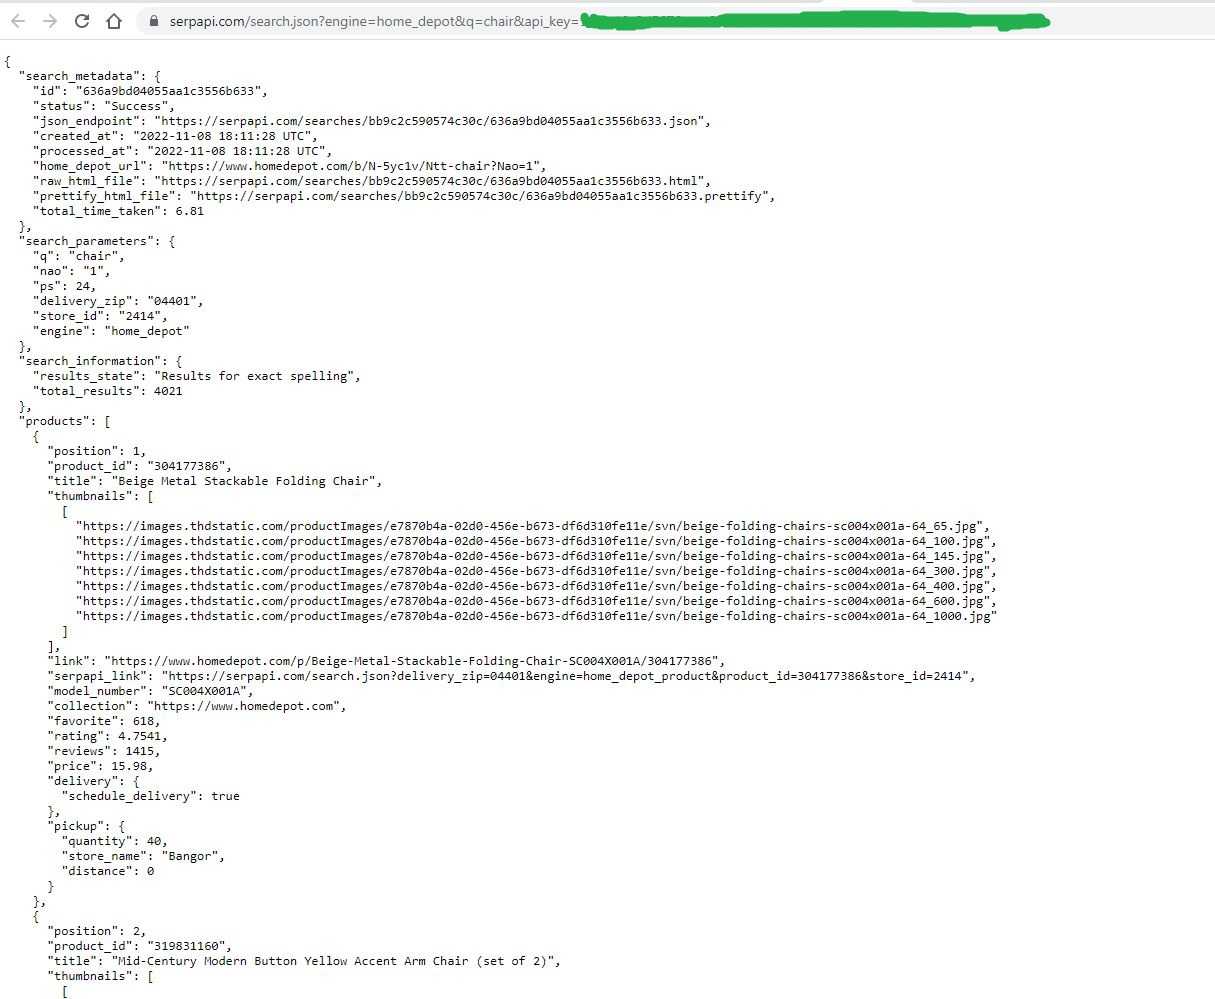
How do I get a post request URL?
2. Building a JSON POST Request With HttpURLConnection
- 2.1. Create a URL Object.
- 2.2. Open a Connection.
- 2.3. Set the Request Method.
- 2.4. Set the Request Content-Type Header Parameter.
- 2.5. Set Response Format Type.
- 2.6. Ensure the Connection Will Be Used to Send Content.
- 2.7. Create the Request Body.
- 2.8.
Mirroring a remote GitLab repository that uses a self-signed SSL certificate
When configuring a local GitLab instance to mirror a repository
from a remote GitLab instance that uses a self-signed certificate, you may see
the error message in the
user interface.
The cause of the issue can be confirmed by checking if:
-
fails:
-
Testing by using the Rails console also fails:
To fix this problem:
- Add the self-signed certificate from the remote GitLab instance to the
directory on the local GitLab instance, and then
run as per the instructions for
. - If your local GitLab instance was installed using the Helm Charts, you can
.
You may also get another error message when trying to mirror a repository from
a remote GitLab instance that uses a self-signed certificate:
In this case, the problem can be related to the certificate itself:
- Validate that your self-signed certificate isn’t missing a common name. If it
is, regenerate a valid certificate - Add the certificate to .
- Run .
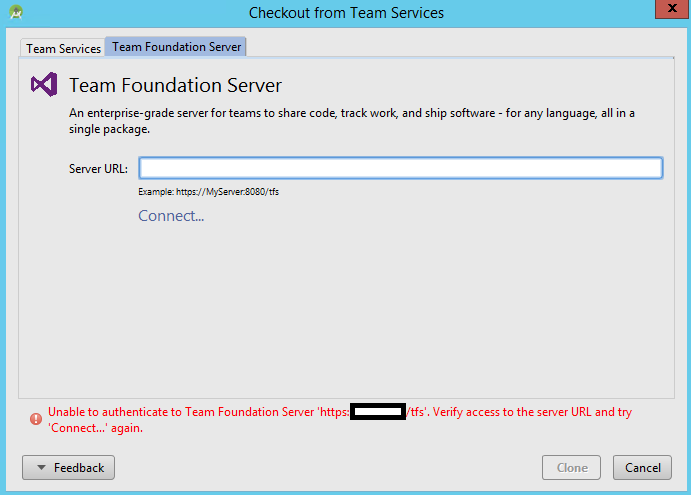
I am getting certificate hostname verification failed errror while login to spark openfire
Question:
Hello i have istalled to openfire into my computer.I am trying to login to spark using username
password and IP address
as domain but i am getting I am getting certificate hostname verification failed errror.I found that that they are asking to change server i tried that option as well no result.

![Error: test failed: [ssl: certificate_verify_failed] certificate verify failed: unable to get local issuer certificate (_ssl.c:1091)](https://kubwheel.ru/wp-content/uploads/9/7/2/972a293cbec883914f948e017aba6a58.png)

Solution:
When we install Openfire server, it generates self-signed certificates for SSL connections. Now if you are in development phase, you don’t need to worry about this error. However, once you go into production, you might consider placing proper HTTPS certificates against your domain.
Certificate directory: OPENFIRE_HOME/resources/security/
SSL Error: Unable to verify the first certificate, I have the ssl certificate zip file and the privatekey.key file. In total I have the certificate file .crt and another .crt with the name bundle.crt and a .pem file along with the private key with an extension .key. Now I am trying to use it to create a secret in istio using these files.
Tags:
error unable to verify the first certificate
certificate verify failed unable to get local issuer certificate
hostname verification failed errror while login to spark openfire
Unable to verify certificate
Spark
allows you to accept self-signed or invalid
certificates
, by marking that checkbox in the ‘advanced’ settings of the login screen.